I am beyond excited to introduce you to this season’s summer box by Decocrated. If you want the whole scoop of what’s inside, every detail. check out the video below. Basically, I came across this subscription box last fall and fell in love.
What’s Decocrated?
Basically-
They send you a box every season, full of one of a kind and timeless decor items.
They take the guess work out of what goes together, crate them up, and send them to your door. You can’t get these pieces in store.
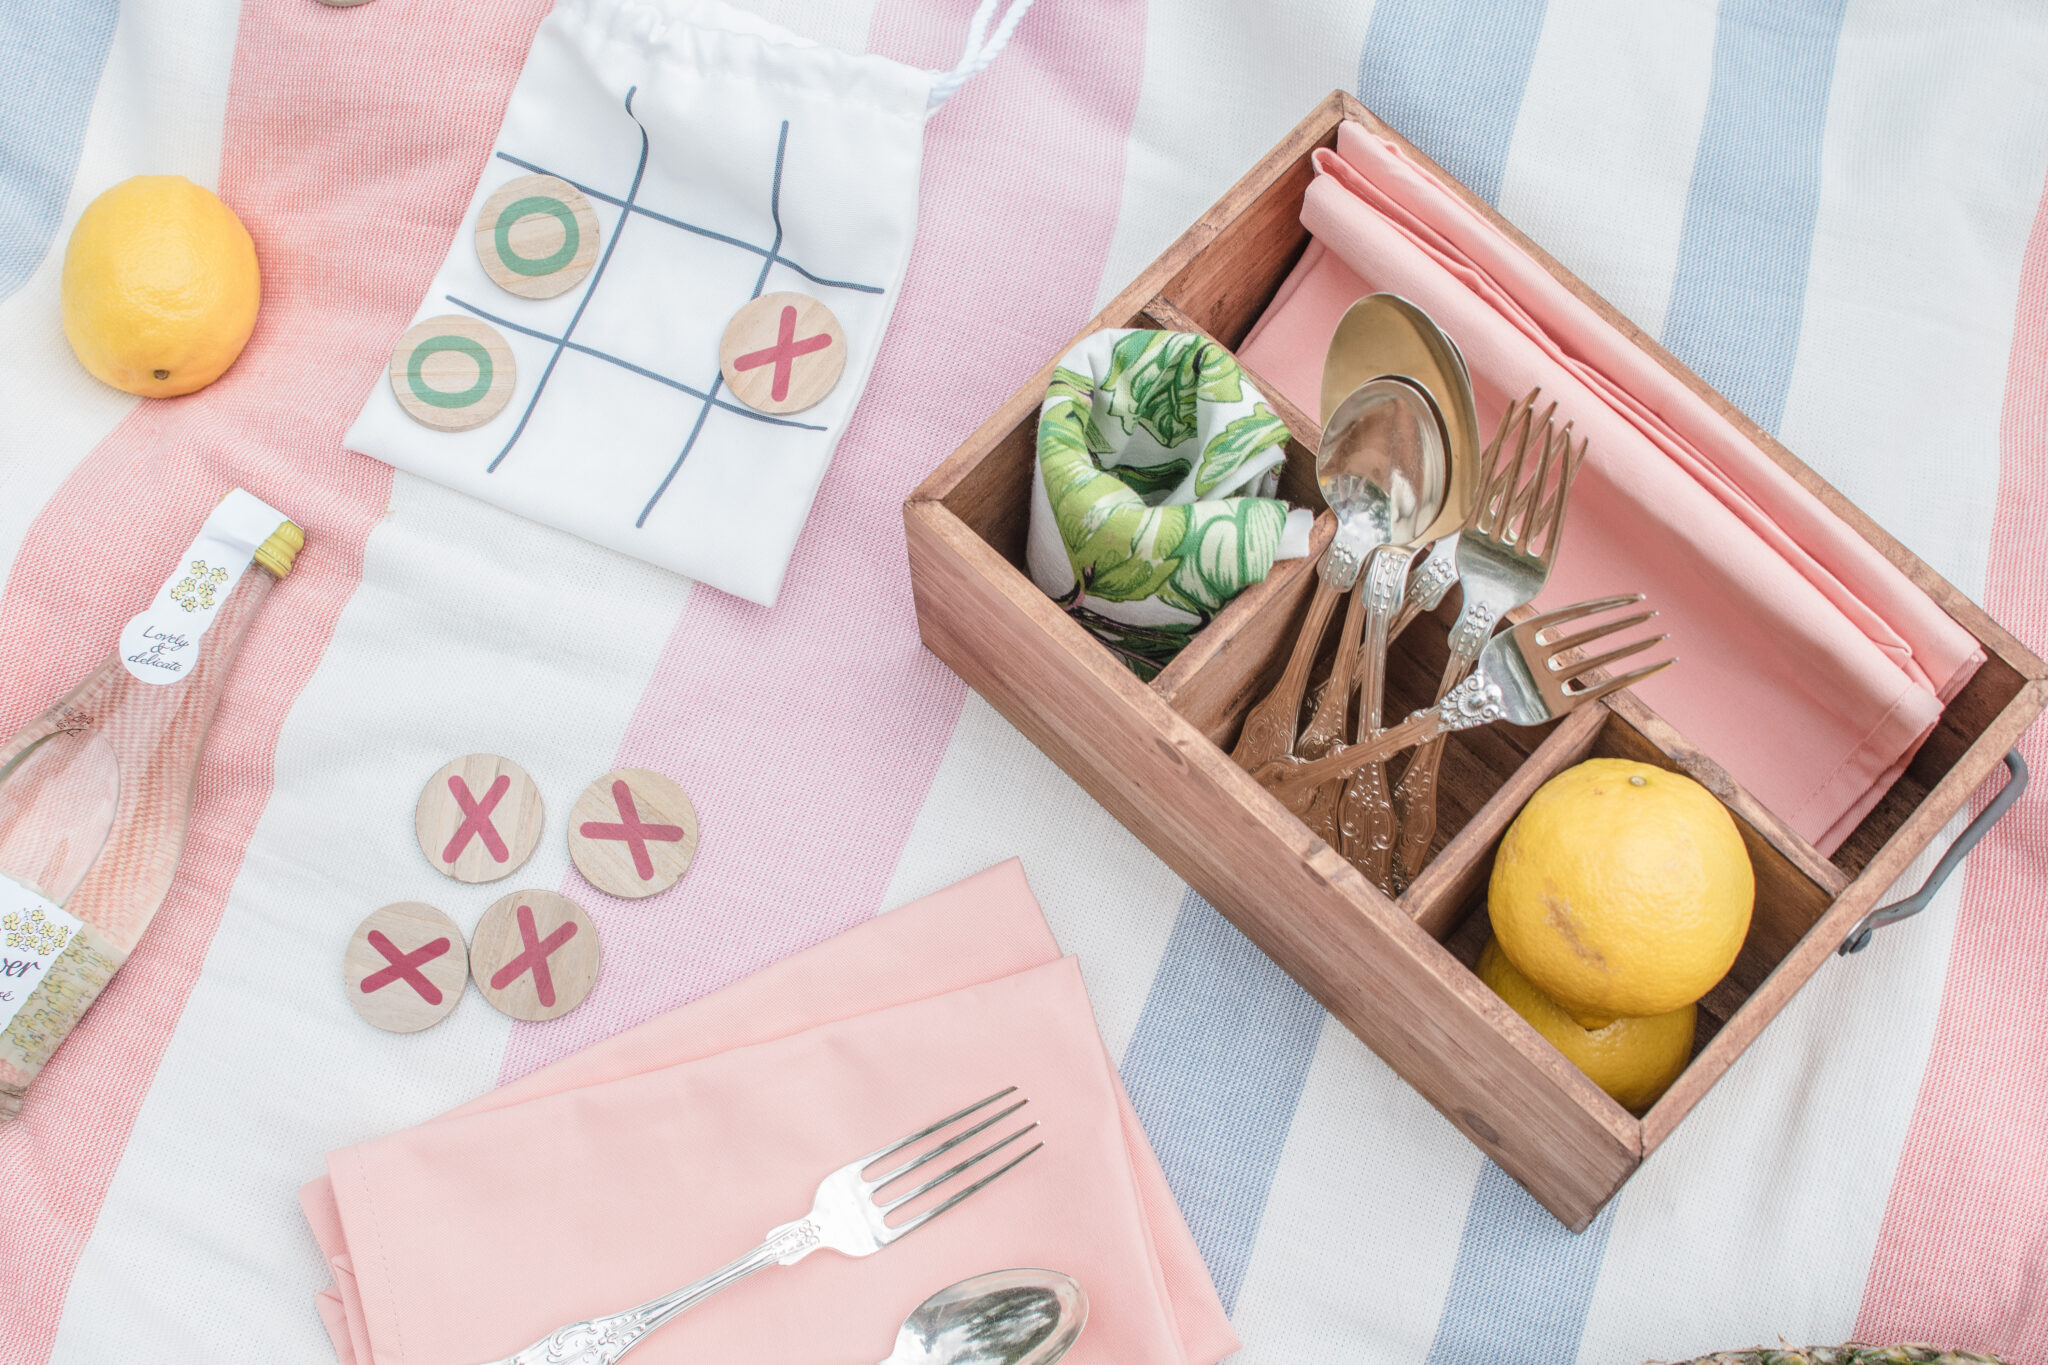
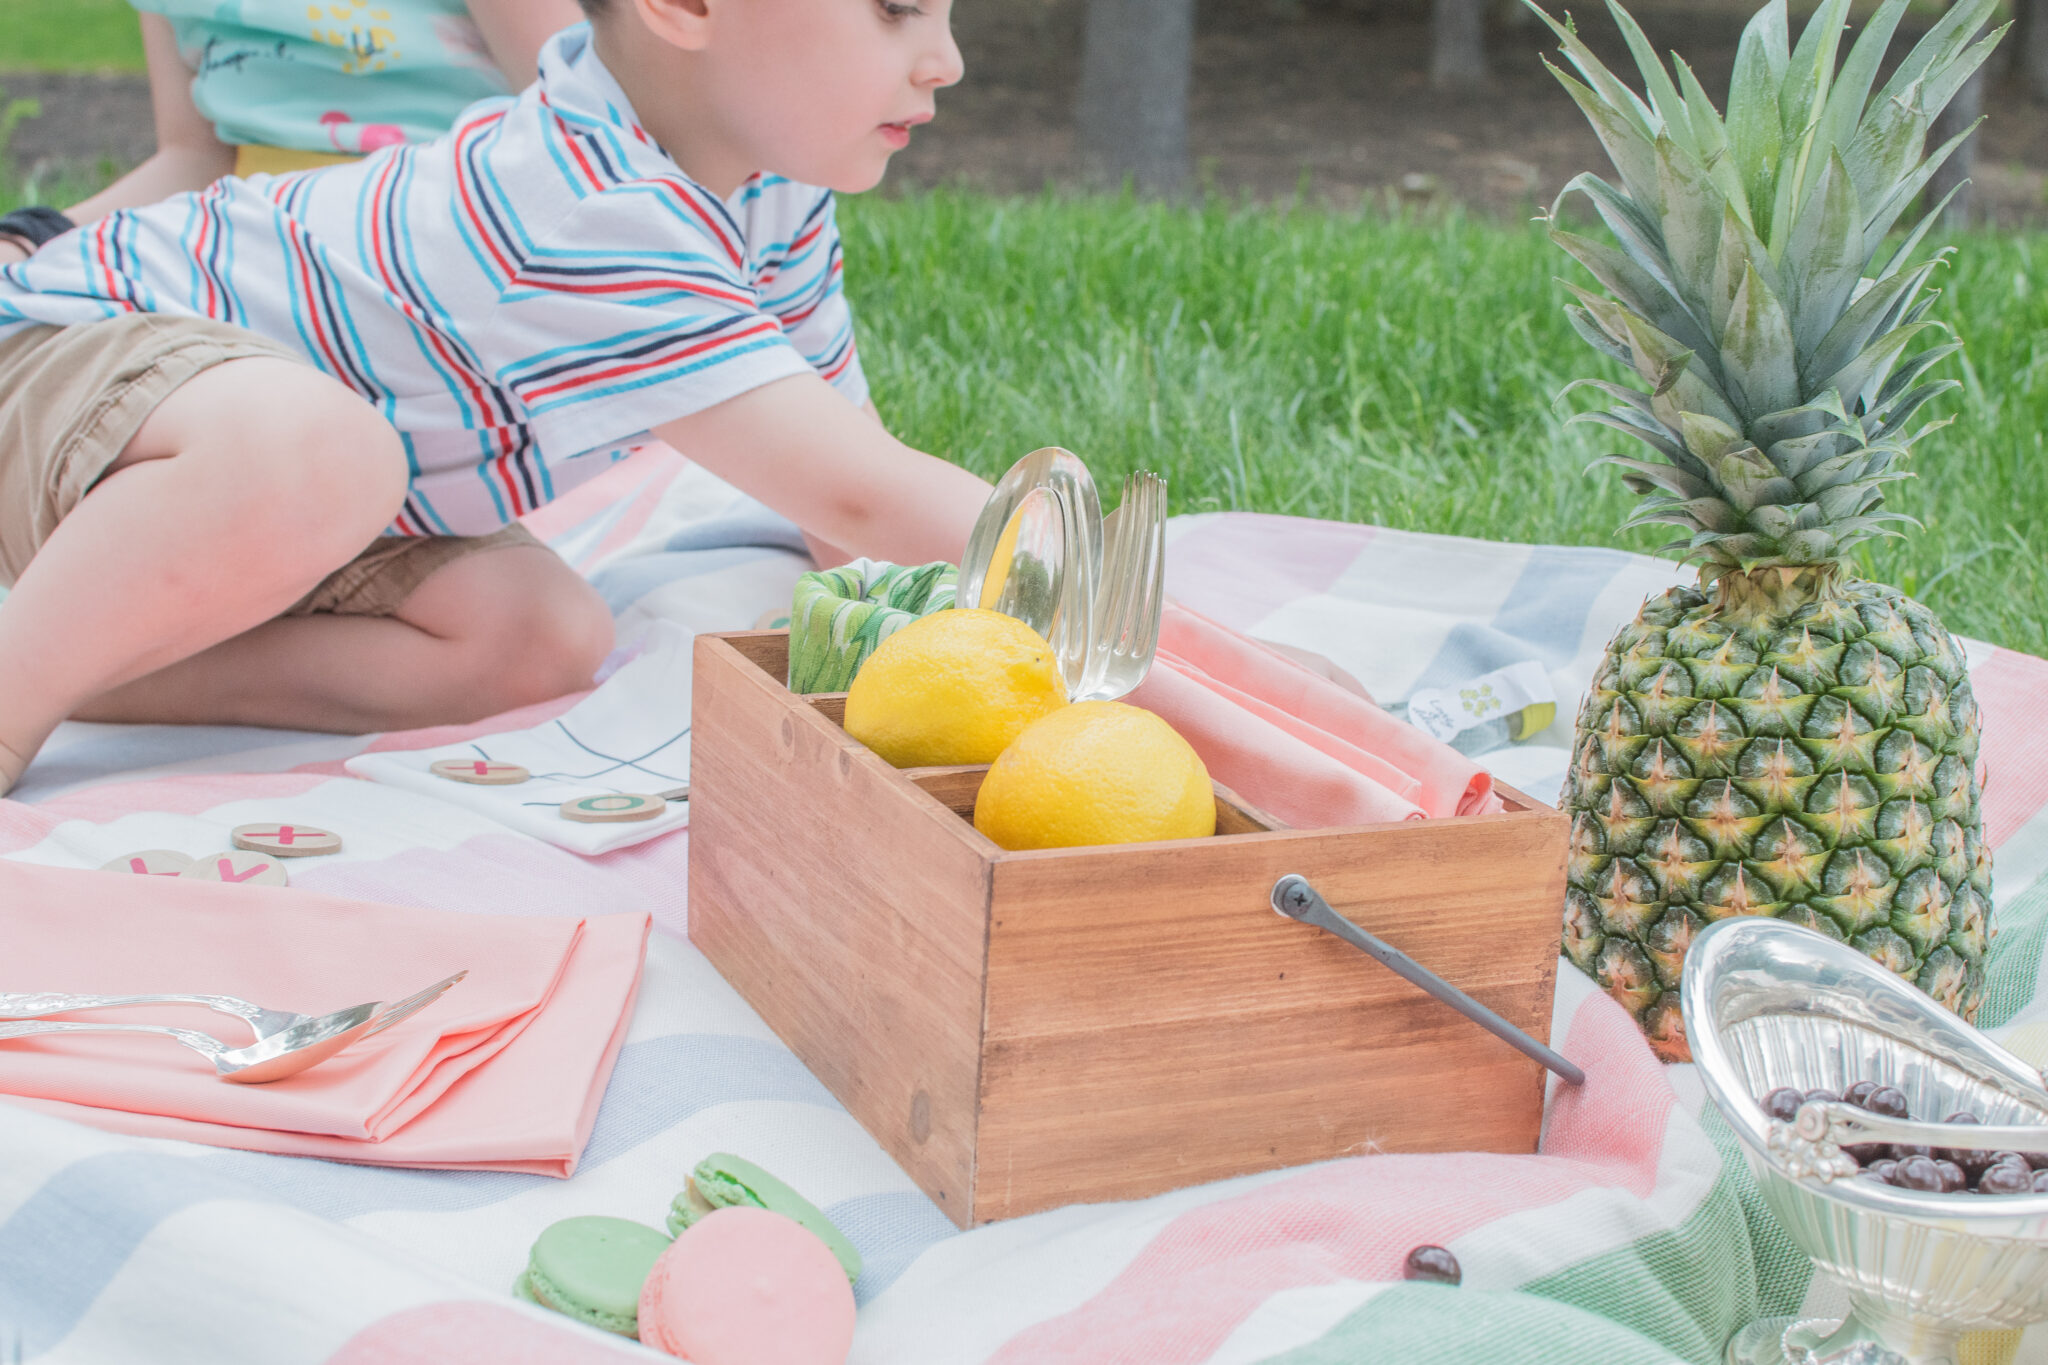
This box is all about summer dinner parties, entertaining, enjoying the sun, and so much more. However, it’s quite diverse. So far I’ve had the items in my living room for remotes, a catch all for come home with keys and what-not. For picnics, in my guest bedrooms… You name it. Tested and approved.
Nine! And each box always has at least 2-3 interchangeable pieces that reverse for a whole new look!
How Often?-
Four, one box forevery season. Right to your door with curated and timeless pieces. You can order one at a time or save and order the yearly package.
How Much?-
Each season’s box is just $79.99. It’s a killer value because you couldn’t buy all that in store for that price. Plus you can’t even find these pieces in store. Use Code CHELSEY10 for $10 off (that’s my name) and get your first box for $69.99 plus a free gift too.
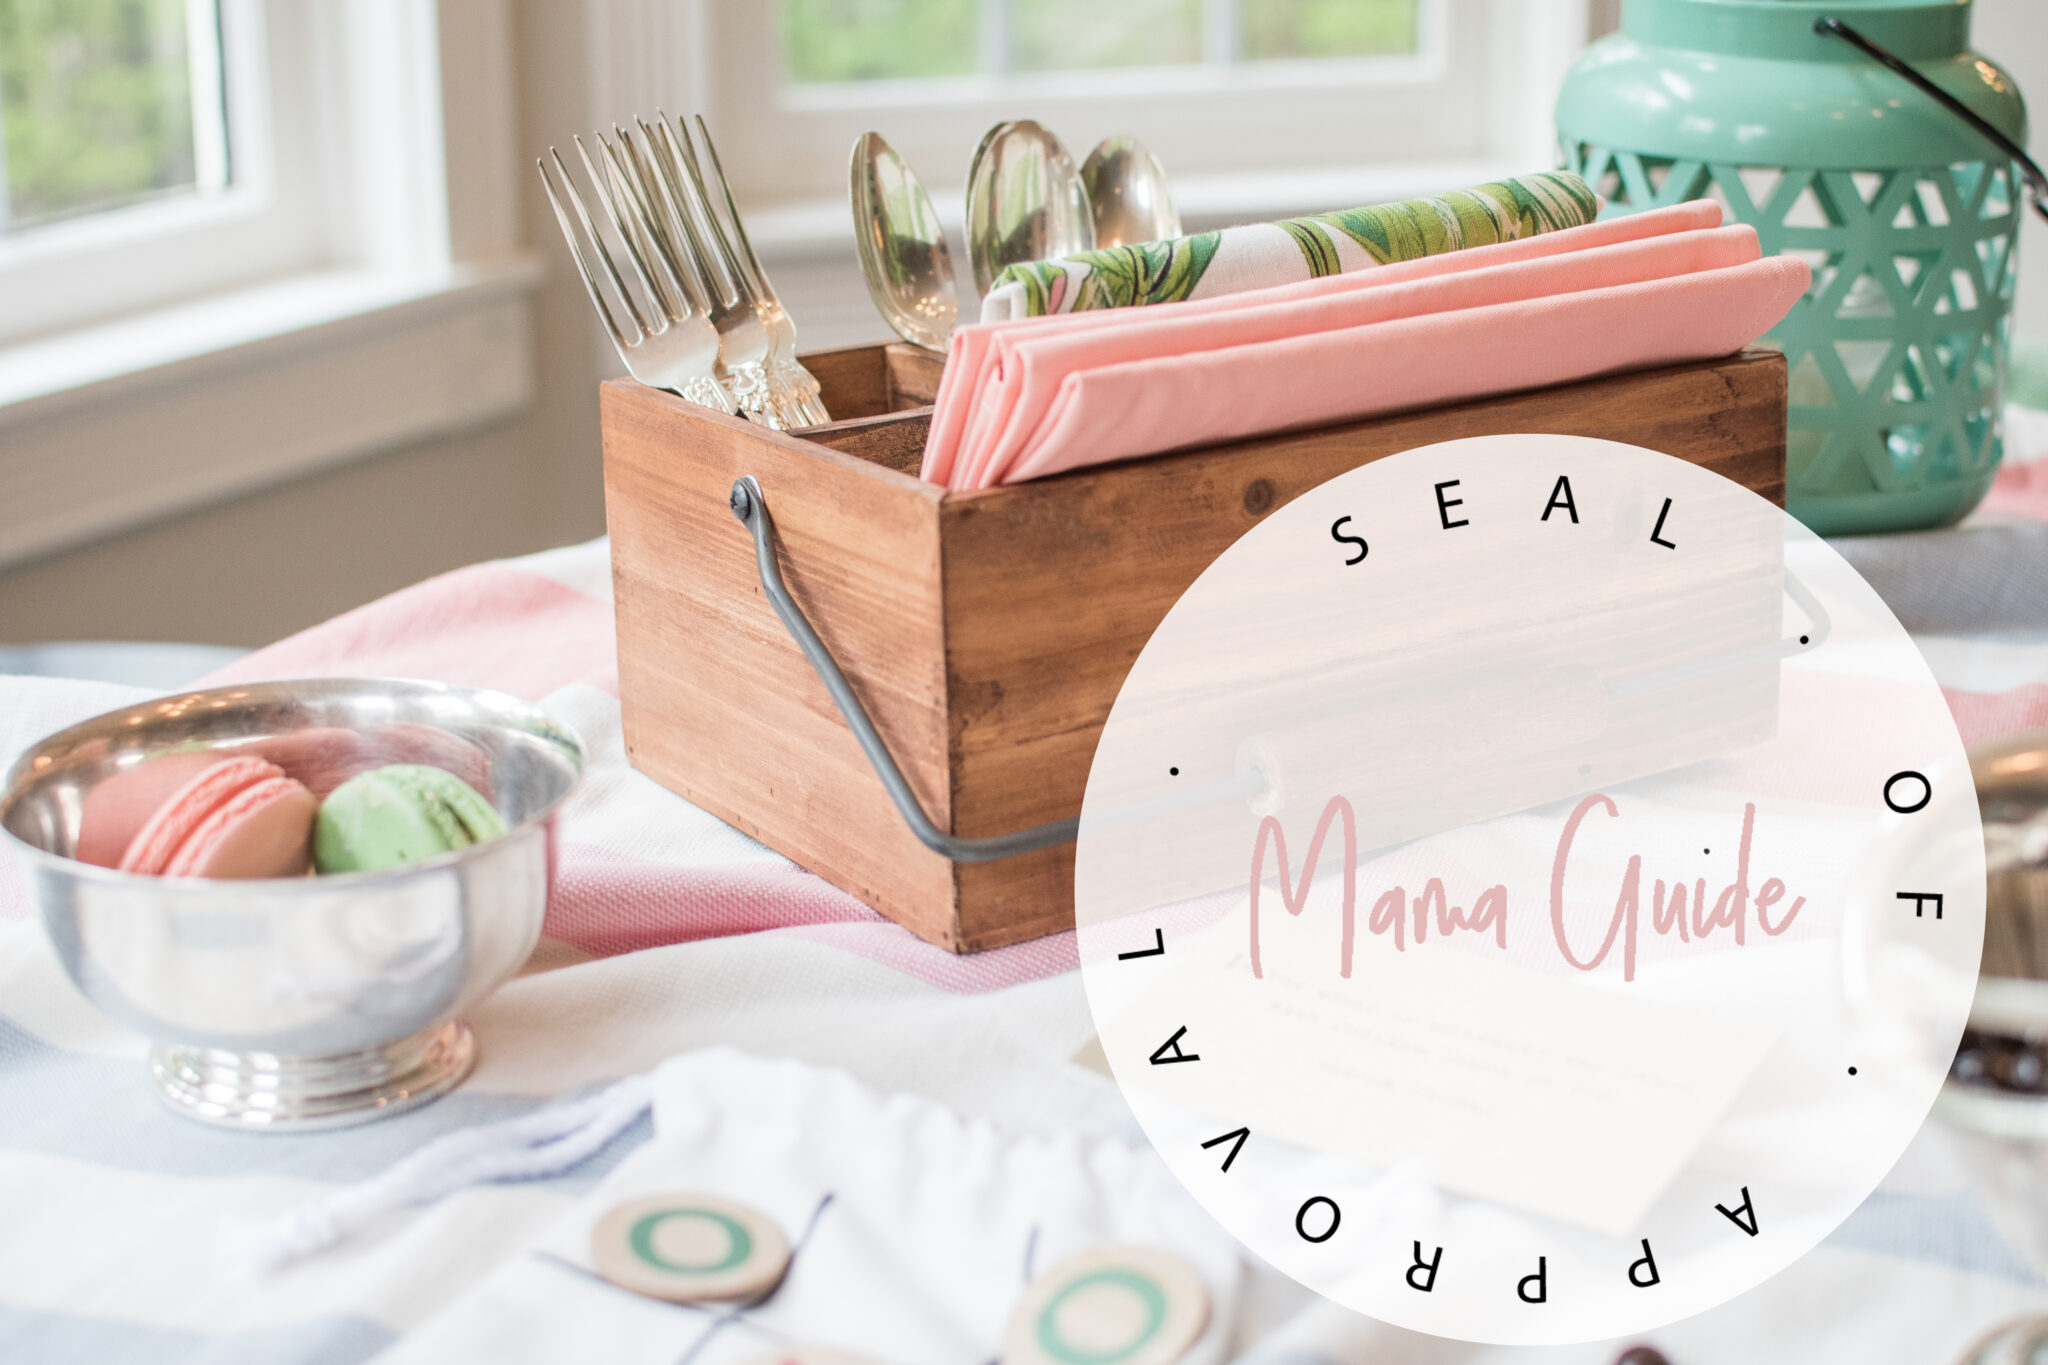
Final Verdict & Review
LOVE!
Love how the pieces come right to my door every season and takes the guess work out of decor.
We love how much we save decorating our home, each piece is basically under $9 each if you do the math. Can’t find that value in store.
The pieces are unique, you literally cannot find them in stores. Nowadays, store bought items are so mass-produced that this is a great way to get unique items.
The pieces are so nicely made, hand crafted, and designed by designers like this season’s Jazz Doodle.
The versatility of each item is awesome, from double sided decor to pieces that can go into almost any room.
They do a beautiful job with the design booklet showing you how to decorate, how to use your pieces, they make it easy.
The Decocrated Summer Box Get’s A Definite Seal Of Approval From The Mama Guide.
Xo, Chelsey
– The Mama Guide
The summer box was gifted to me from Decocrated for testing and review purposes. All of the opinons and statements are my own and my true beliefs about the product. I do not receive any compensation for my review. I simply share a product that I love so much and hope you will too.
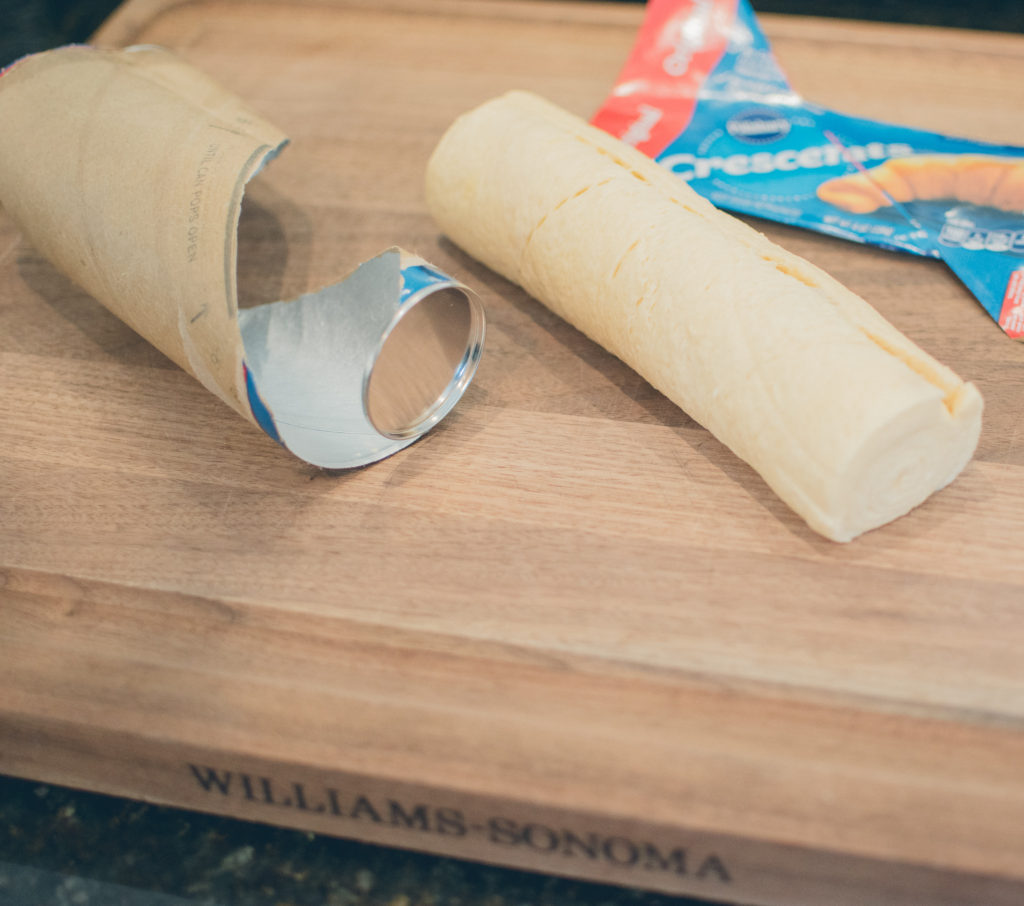
I get into these kicks, when I really love something and just keep making it. Lately, that’s donuts. Sure I can make my favorite recipe that takes over a day to prepare… but I prefer the quick and easy route. Enter, 15 minute donuts using Pillsbury Crescent dough! You know those little blue tubes with the dough boy on front? Fry those up and they make delicious donuts. Especially when you cover them in cinnamon sugar. Here’s how to do it.
Make Your Donuts
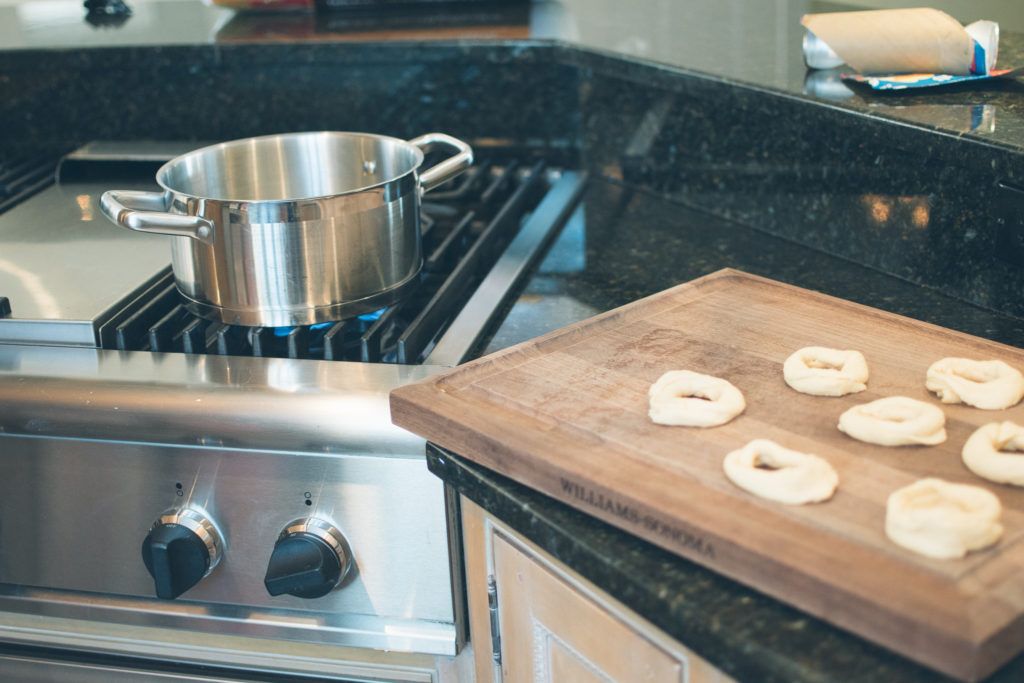
Some people roll the dough out and use a cookie cutter to make the donuts… but that’s a waste of time. Instead, just tear off the pre-cut sections, pull and shape them into 9 donuts (depending on the size of your crescent can). Told you this was easy. Then, heat your oil in a tall pan to medium-high heat. Your oil should be at least two inches deep, so add more oil to your pan if necessary. The tall pan will give you a little protection from oil splash, and help keep your kitchen clean too. (I hate oil splatter cleanup) You’ll know the oil is ready if you drop some water inside and it splatters back.
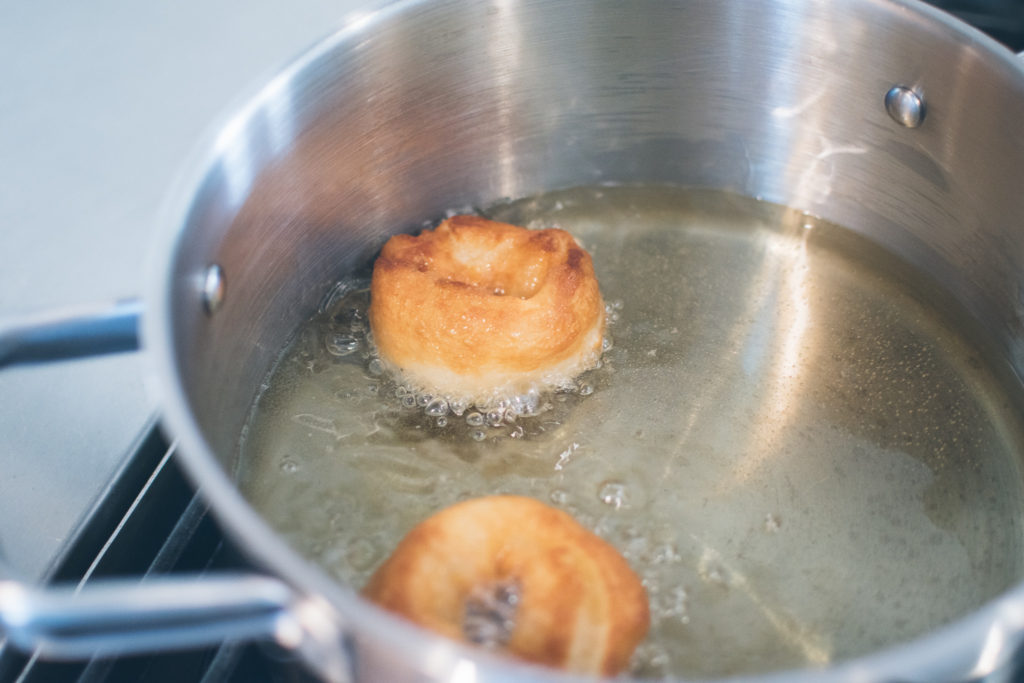
In a small bowl, mix together your cinnamon and sugar and set aside. Set a plate aside with paper towels to rest freshly cooked donuts as well. Have something ready to pull the donuts out of the hot oil, like a chopstick or skewer. Drop your donuts in two or three at a time, overcrowding the pan cool the oil down too much and you’ll have soggy donuts.
Cook for 1-2 minutes until the donuts turn golden brown, then flip them to cook the other side. Just look how delicious they look! Remove them from the oil quickly and set aside on a plate with paper towels to soak up excess oil.
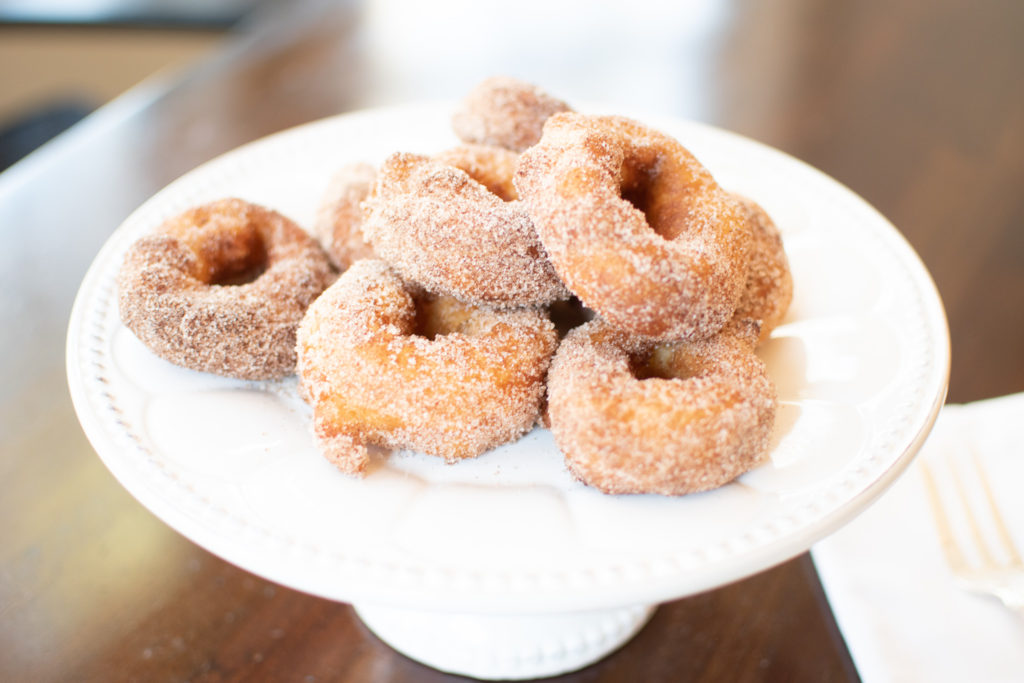
Let your donuts rest about a minute before coating them in your cinnamon-sugar mixture. All in all, the whole recipe takes no longer than 15 minutes! Serve these delicious little donuts right away, they don’t keep for more than a day. Also, check the temp before feeding to littles in case hot oil is trapped inside!
Hey Mamas! Need some last minute- easy proof snacks? I love to entertain, we have parties all the time. What I have learned with hosting success is to stick to easy to make snacks and foods. I would much rather whip up something quick instead of slaving away the whole party! Here are my easy to make, but sure to fly off the plate party snacks. Tested and approved! Heads up though, you’ll want to make more than you think because they get munched up in a hurry! Here we go.
Mini Cheesy Quesadilla Bites
Quesadilla bites are quick to make and delicious with a fresh side of salsa. To really impress, use corn flour tortillas for an authentic and fresh taste. Another secret tip? Buy store-bought salsa and mix in some fresh chopped cilantro. Your guests will think it’s fresh and you save a ton of time. To get the pretty bite sizes perfect for plating, use small taco sized tortillas. Easy, peasy, but still party perfect and pretty!
Spinach & Brie Cups- Secret Ingredient Alert!
These are the all-time favorite in my house, I whip them up on the weekends, but always for every party! They’re easy to make, and are cheaper than store bought! The secret ingredient? A dollop of marmalade. You won’t taste it, just the perfect medley with a hint of sweet. This recipe makes up 30 bites, so serve them all, or freeze half to reheat in a hurry another day!
Pigs Do Fly- Off The Plate…
Surprisingly, these are the number one snack to disappear anytime I make them. Kids love them, adults love them, they just vanish. The best part, they are brainless to make- so turn on your favorite show you’re streaming and whip up a batch, or 5. All you need is a pack of smoked mini sausages and two cans of Pillsbury croissant dough. Cook them as directed on the Pillsbury package and time how long they last on the plate.
Final Thoughts
Enjoy these snacks, and your party too! Your snacks never have to be super intense, just quick, pretty, and party pleasing good! I always try to spend more time enjoying myself, and shortcuts make that possible! Do you have any favorite snacks? I’d love to hear them! Use the contact form in the menu to send me your favorite recipes so that more Mom’s can enjoy them too! You might get featured on the blog. Happy snacking!
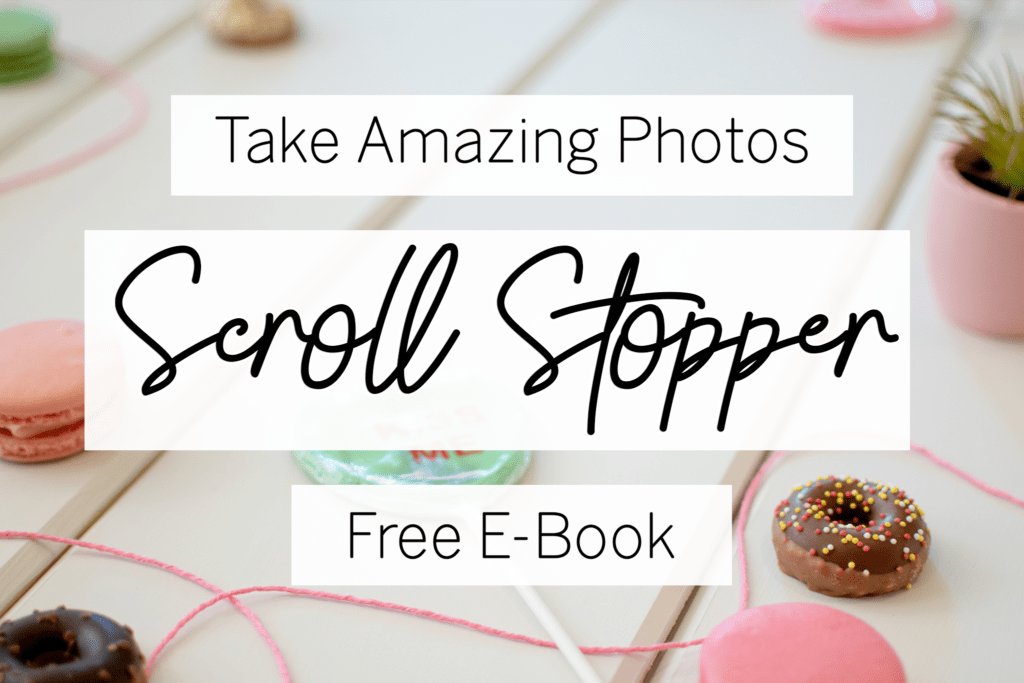
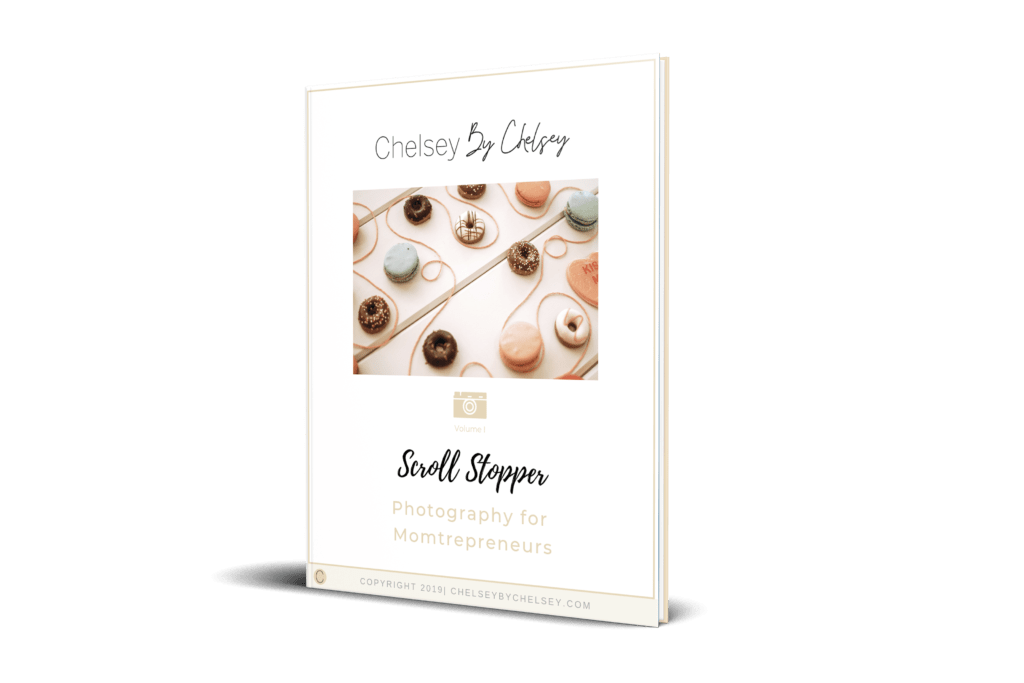
Hey Mamas, soo… I created a free E-Book for you on how to take better pictures. A little note on WHY I created it for you, it’s because as Mom’s we have 100 job titles that go into what we do (we’re the family nurse, cook, maid, you get it). For me, I like to continue to learn and better myself. I continue to try new recipes, learn new skills, and I love sharing those with you. We all continue to learn and grow every day but I really like finding the easy ways to do them, to simplify it all. I realized that we take pictures now, almost every day! Don’t believe me, open up your camera roll in your phone. Why not do it better? Then, I realized how many of us Moms are selling things online too- to provide an income for our families. What about that picture of our little one at the playground, why not take that shot better and display it on our walls! That’s why I put this together for you. Why not add photography to our list of super-mom-skills too.
Ok Lemme Tell You About it
Photos tell a story & stop people from scrolling. Amid the algorithms and overflow of posts in our feeds, there is one sure way to get people to
Stop & Pay Attention
Scroll stopping pictures stand out and set you apart. They tell a story and draw us in. It’s because they
Capture Our Senses
Use this mini book to kick start your photog skills. To capture
What Matters Most
This is for you if
+ Want to take amazing pictures for social media that stand out
+ Want to capture the most treasured moments that you are proud to display in your home
+ Need photos to stand out on social to build your business for your family
+ You just want to take pictures like a professional and learn how to do it
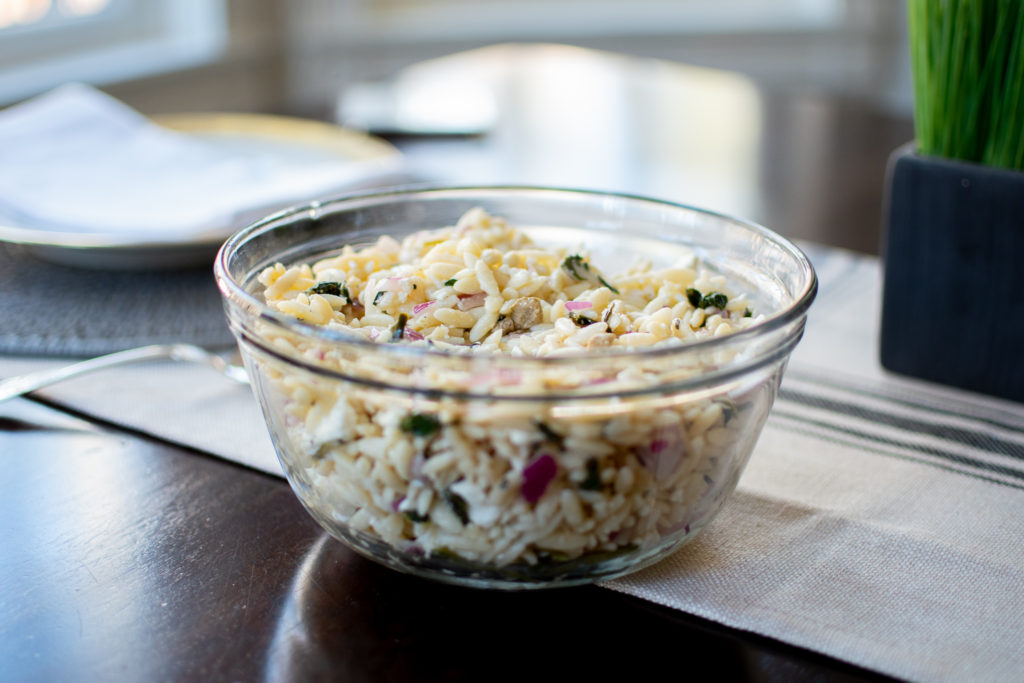
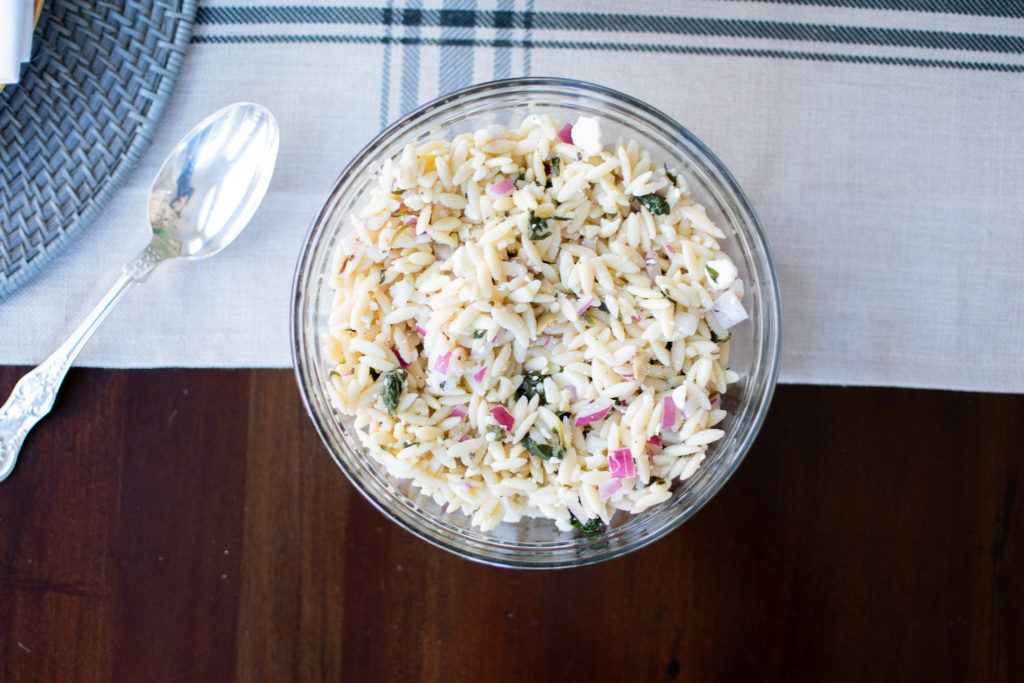
If you’ve had Whole Food’s Greek Orzo Salad, the most delicious and light salad with spinach and feta, you know how addicting it is. I love it. However, for a whole family, and how much we love to eat, it gets pricey. Plus, I can’t buy everything I need at that store and sometimes can’t make it in. So obviously, I was on the hunt for the recipe. There are tons out there, but trust me when I say that none of them made the cut. They were all slightly off- UNTIL NOW! I cracked it! I figured it out, and it’s actually easy too! Plus, it’s cheaper to make at home.
Some Quick Notes
I have a few quick notes to make this a smooth cook because I’m all for easy. You’ll need your strainer, some spoons to stir, a pot and a saucepan. No biggie. Make sure to rinse the orzo immediately in cold water, and stir the olive oil right in. Otherwise, the orzo will clump. I left our the sundried tomatoes and bell peppers, they didn’t add much to the flavor and helped cut cost so why not. You can add them in if you’d like, but again, not much flavor gained there.
Let Me Know!
I would love to hear how the recipe worked for you, comment below, email me with the contact form up top in the main menu, or message me on IG! If you have any recipes you’d love to share, send them to me and maybe they’ll be featured!
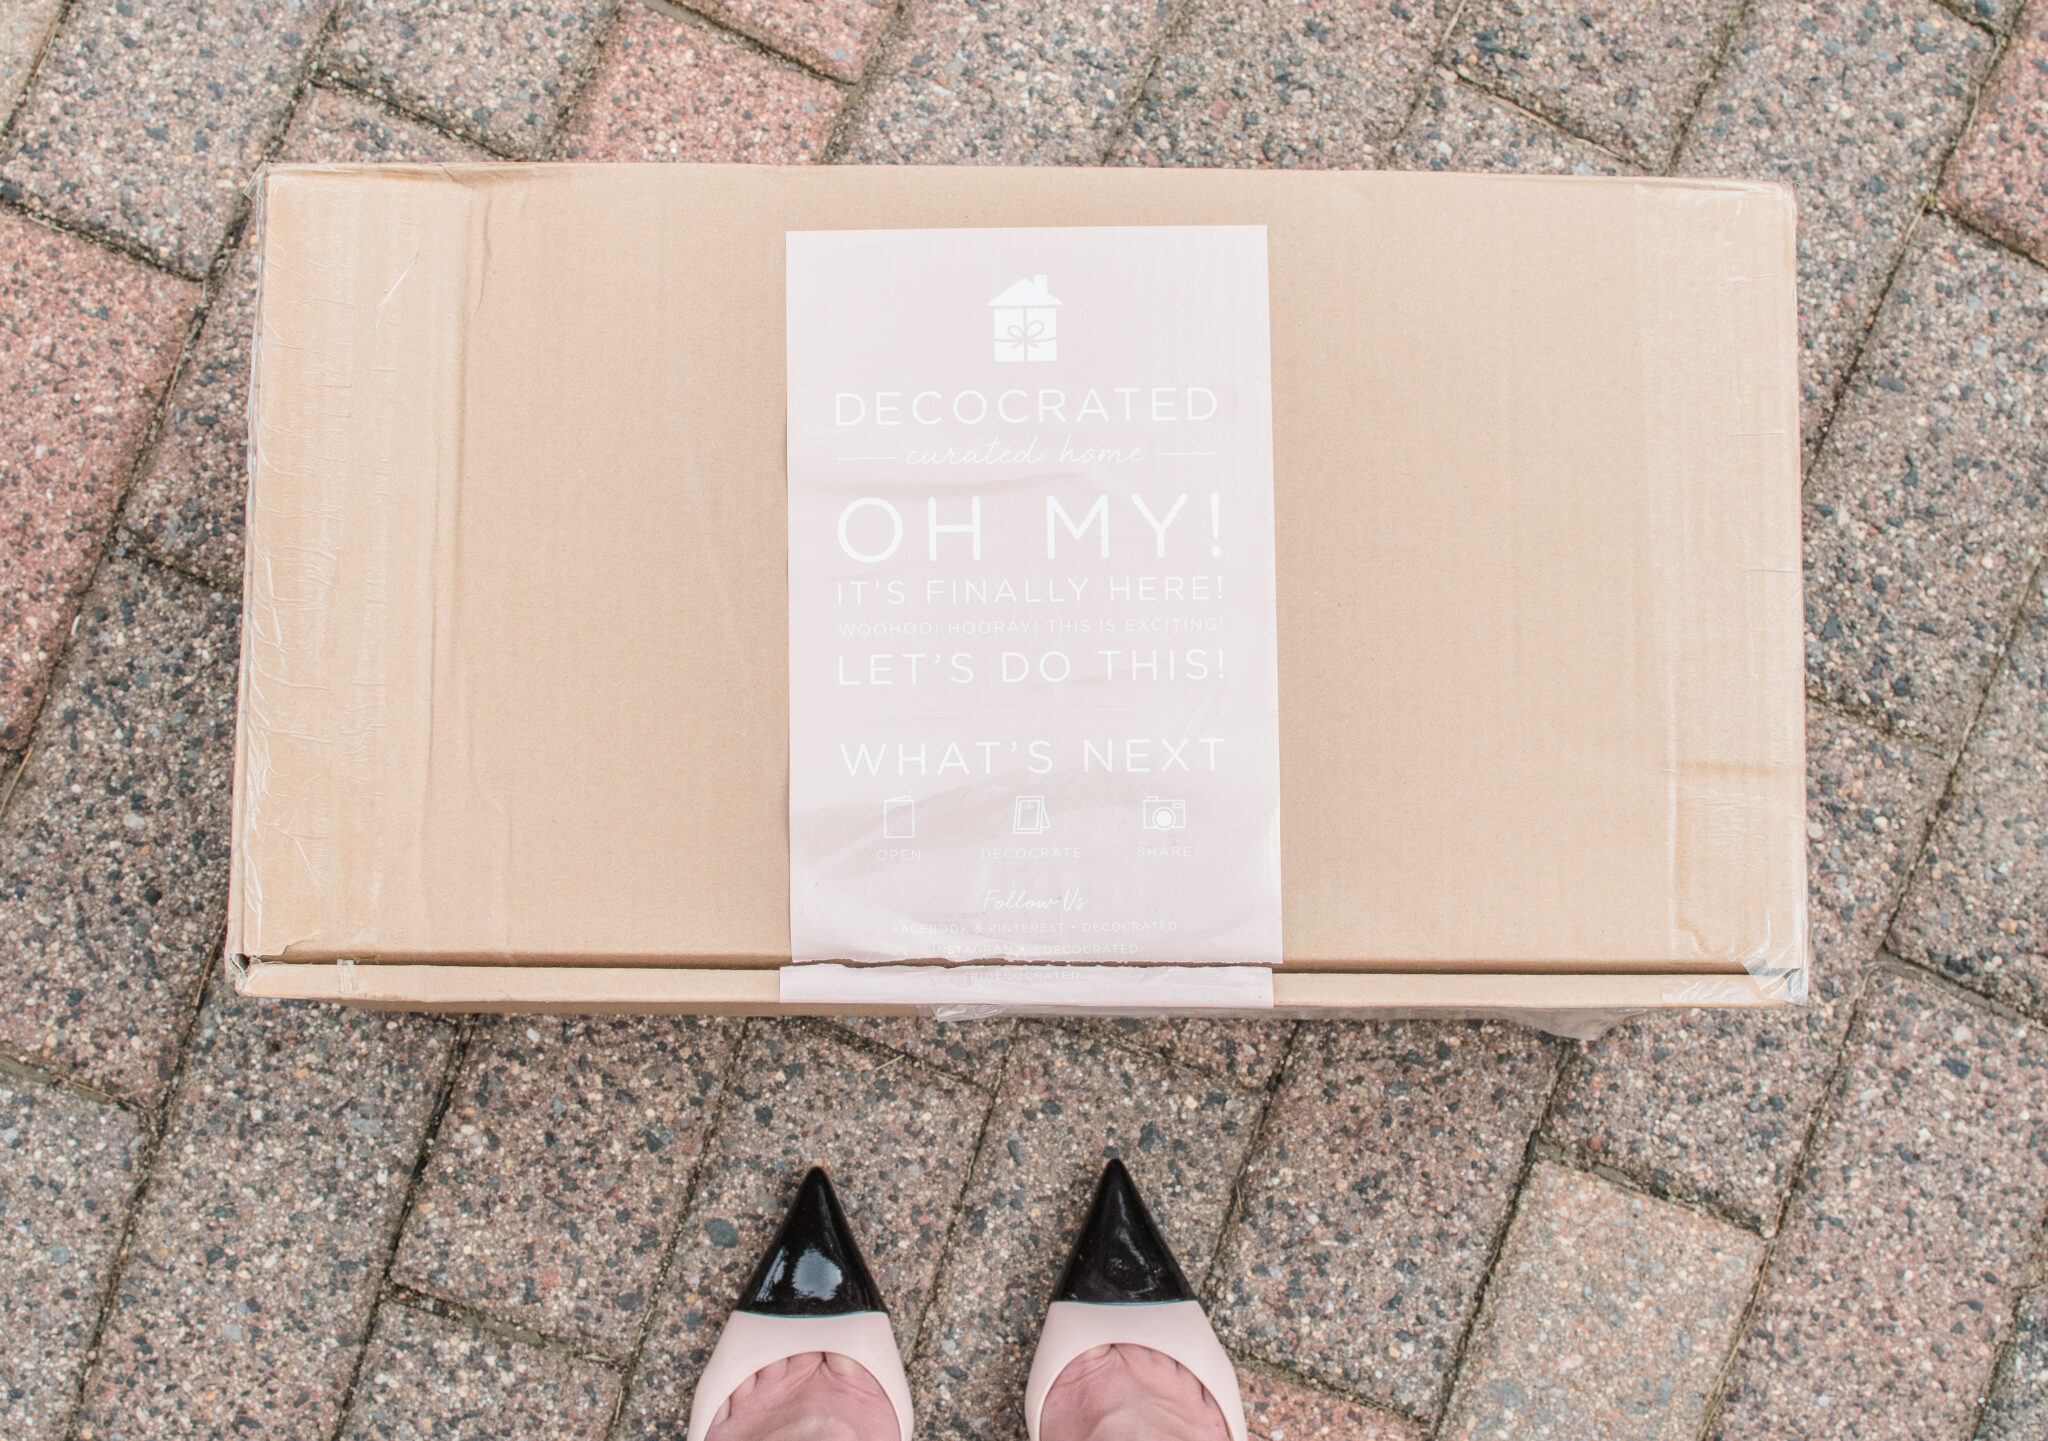
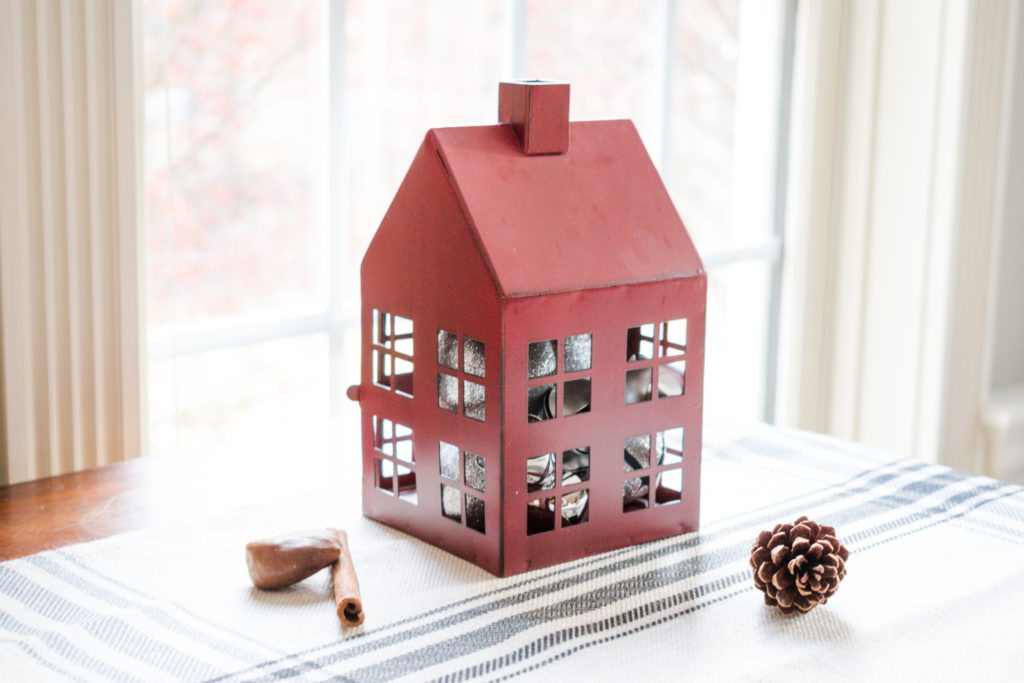
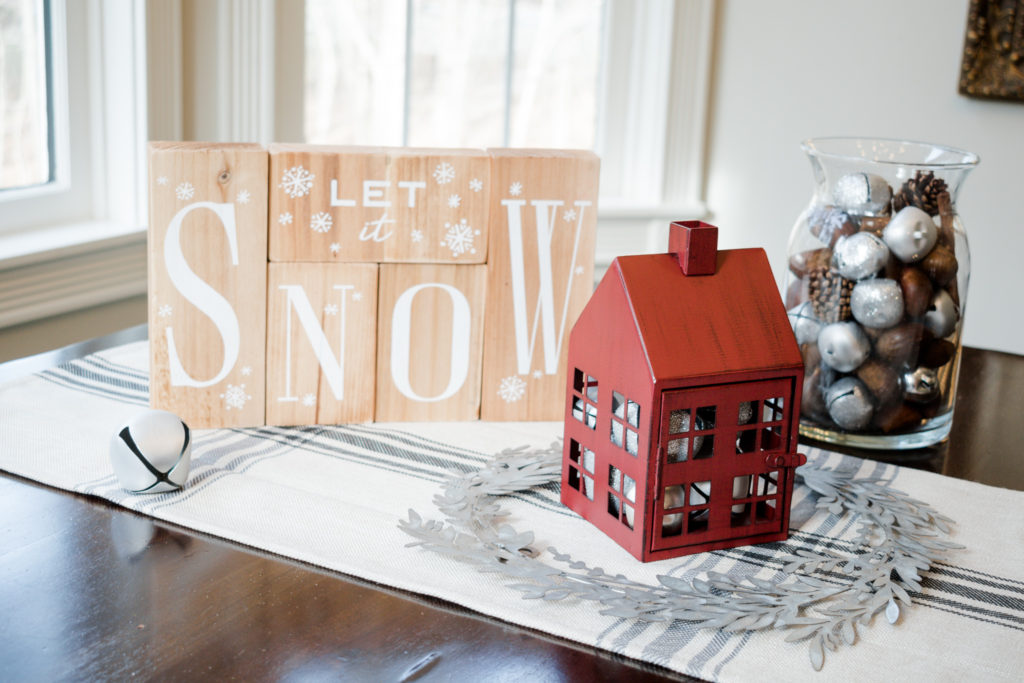
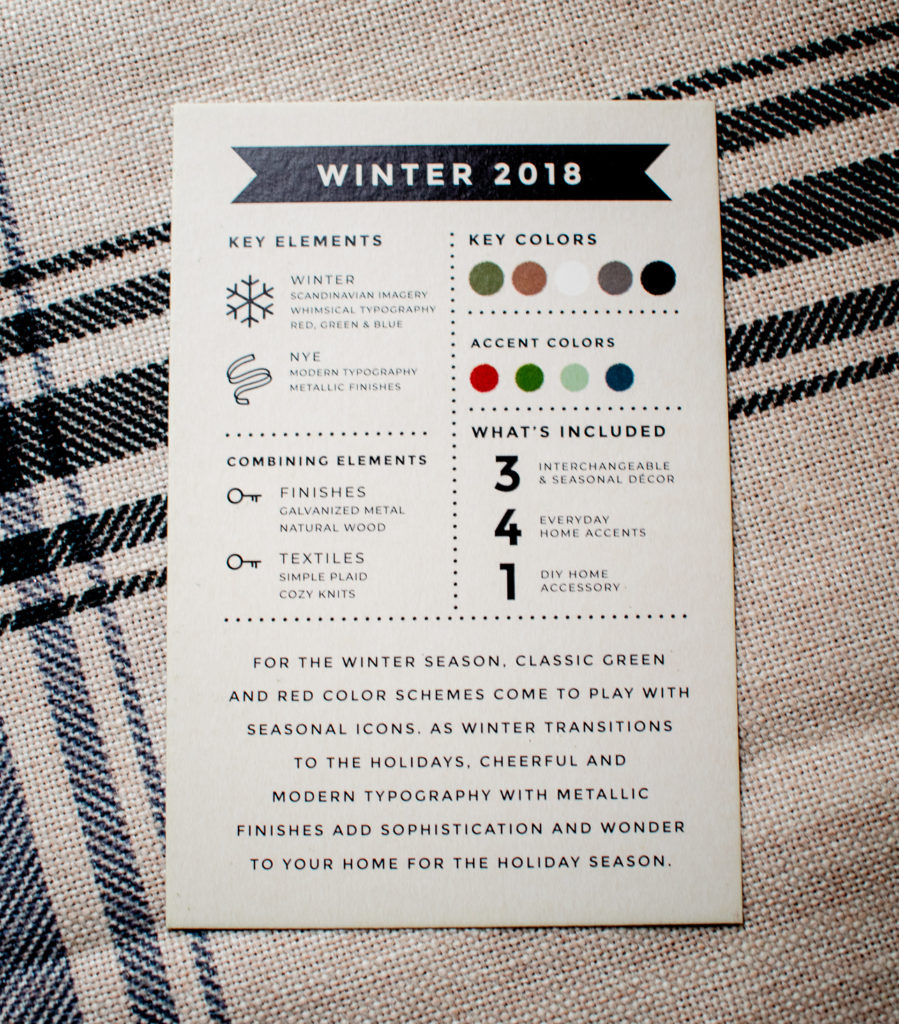
Hey Mama, picture this. You come home from a long day of errands, the holidays are approaching too quickly, and your to-do list of course, is endless. As you turn to unlock the front door and lug that purse off your arm, you see it. The warm pretty pink label shining up at you, saying the work has been done for you. Your big and pretty Decocrated box has arrived. All you have to do is peel back that tape, your decor is transformed for the season, adding that extra magic that turns a house into a home.
THAT FEELING
You know that feeling when you have an amazing surprise for someone that you know they’ll love, but it’s so hard to keep it a secret? That’s how I felt this past season keeping this a surprise! I teamed up Decocrated to bring you solutions that you asked for, and a gift for you as well! They provide you with seasonal decor boxes that work with any home style, to make your seasons more special. Their pieces are on trend, yet timeless, and take all the work out of home decor. They just make the magic for you.
WHY YOU’LL LOVE THEM
We know that we want to decorate for every season, but sometimes there’s too much to do. What do we even buy? Especially on a family budget? We see all those beautiful mantels and tablescapes & want the same in our homes. That’s where Decocrated takes the guesswork out for you. They hand select the perfect pieces to send you each season, many of the pieces multi purpose.
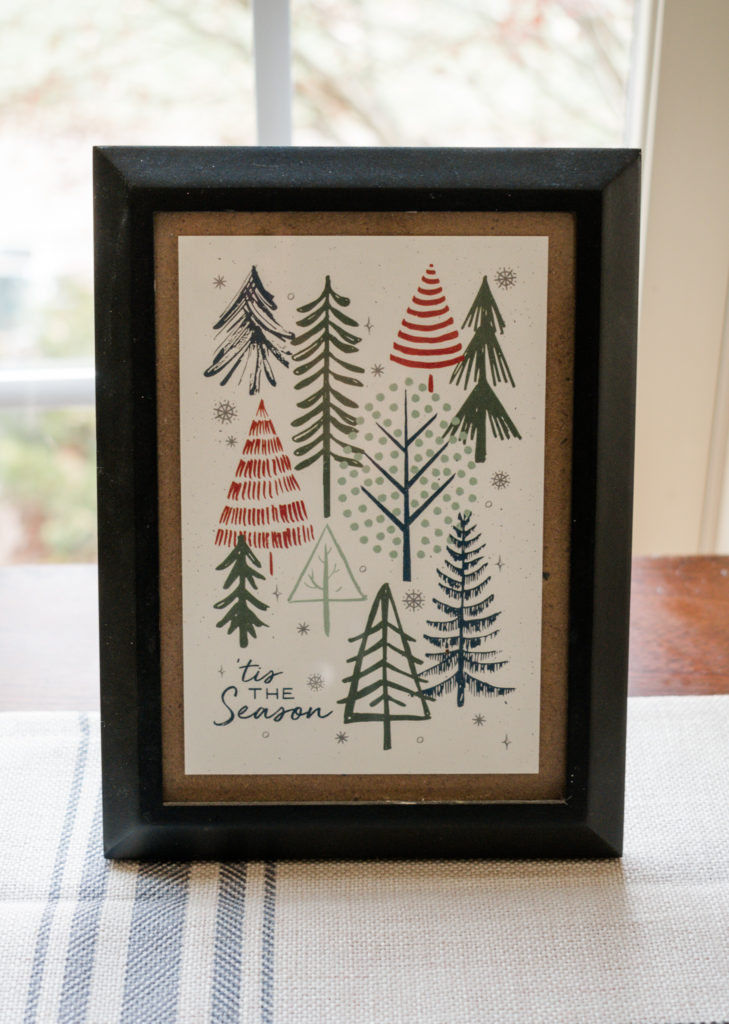
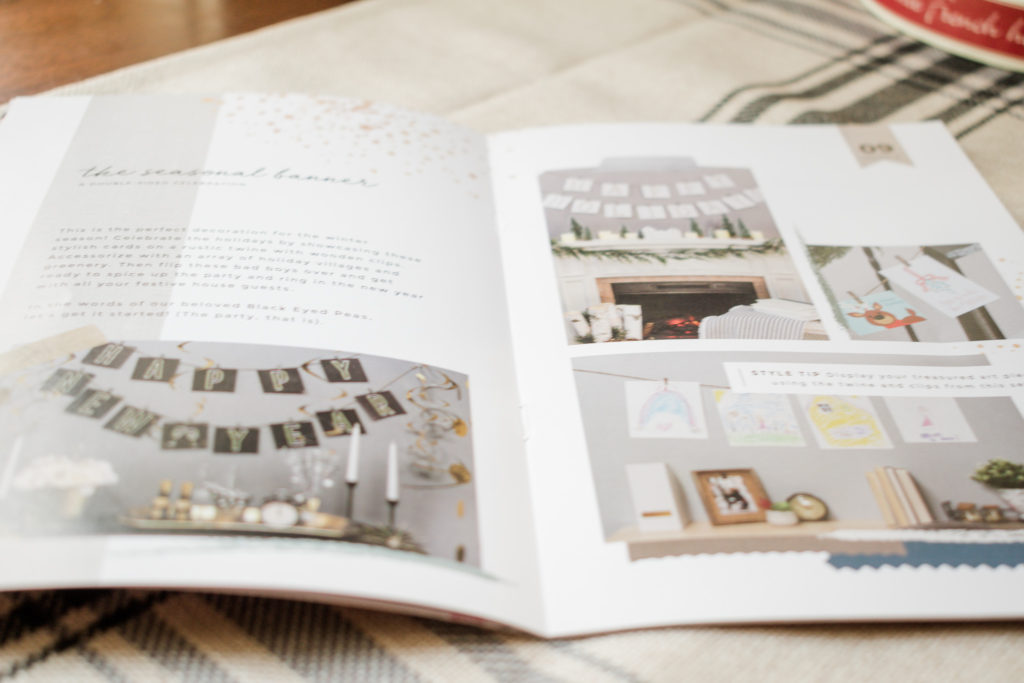
BONUS CONTENT THAT HELPS
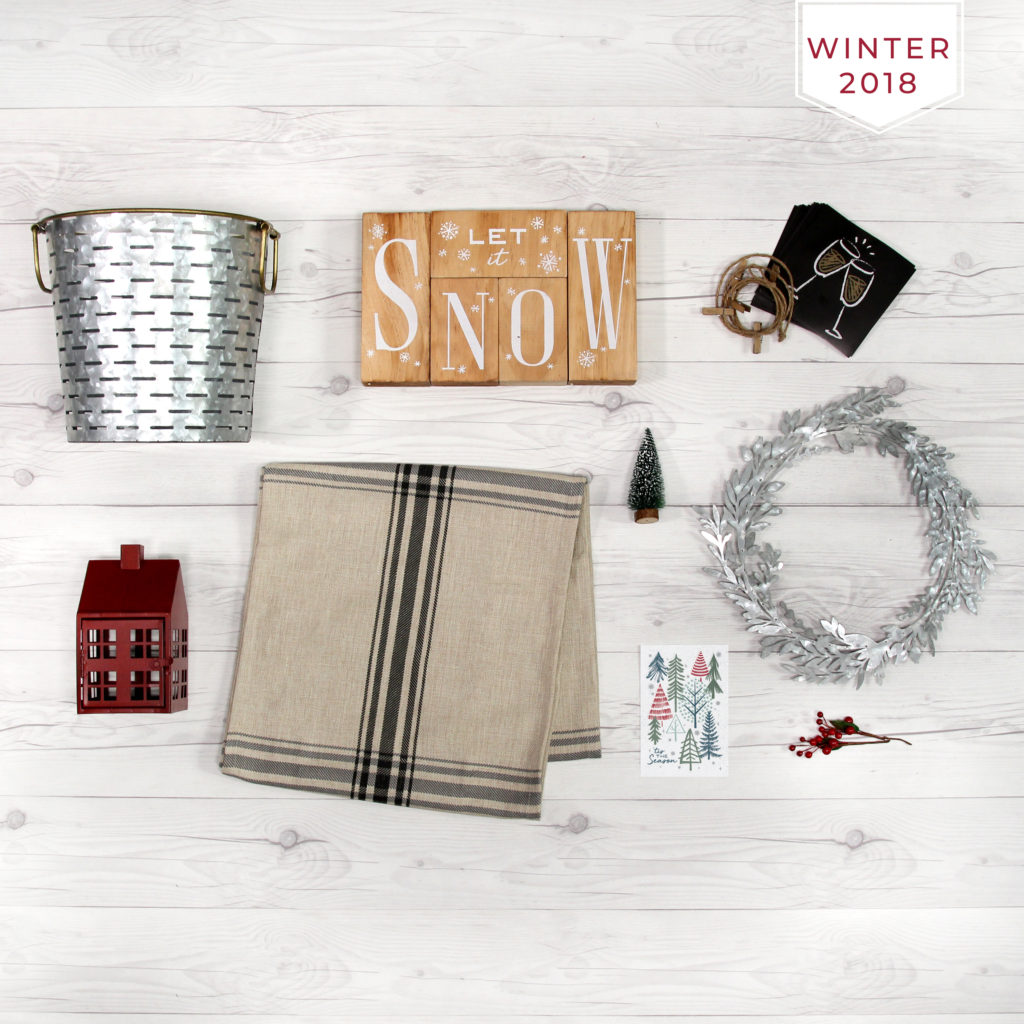
Laying on top of your goodies is this 19 page booklet, super useful ways to quickly put your pieces to work. What will it pair with, you wonder?
AND MORE…
Just refer to your element guide that goes above and beyond to simplify your decor placement. It doesn’t get any easier than this. Here is the look inside my full box of goodies. Don’t you love it? Plus, there is no way that I could have all the pieces below for the steal of a deal price they have. Target would have abused my debit card for this. Ha!
WHAT’S INSIDE
I know you were looking for it, where is your gift? I didn’t forget you! When Decocrated sent me this box, they also created a special discount code for my readers, just for you Mama!
So come spring, when the snow melts away, and your tulips start to peek, your very own pink labeled Decocrated box will be waiting on your porch to brighten your season too. That touch of magic for your home, that cozy sophistication. And believe me lady-lady, I have seen the spring box and am counting the days to receive mine.
Many families leave cookies for Santa, but lots of children like mine also leave treats for the Reindeer! If you haven’t started this tradition yet you’re going to love it! If you already do feed the Reindeer on Christmas night, these are the perfect way to make it more magical!
The Reindeer Food Printables
Reindeer food is fun to leave out on Christmas Eve, but these printables make it even more fun! In this downloadable are adorable little sheets to cut out and attach to your Reindeer Food baggies. You may attach the printables with tape, tie them on with a bow, or even staple them. Remember to keep safety in mind when attaching your labels; never leave plastic, staples or strings with children unattended!
Use This To Engage Their Imagination & Let Them Learn
This printable includes a wonderful instruction sheet with questions for you to ask your littles. Make this activity even more magical by engaging them, helping them explore their great imaginations, and learn about distances and what food does! Use these questions to really get their little minds thinking!
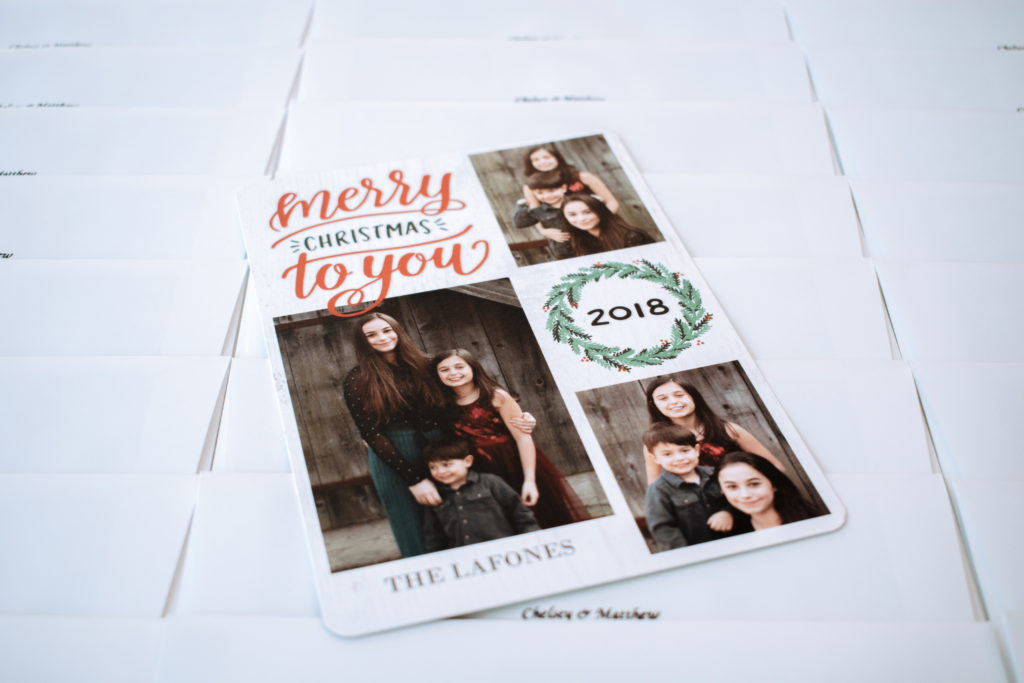
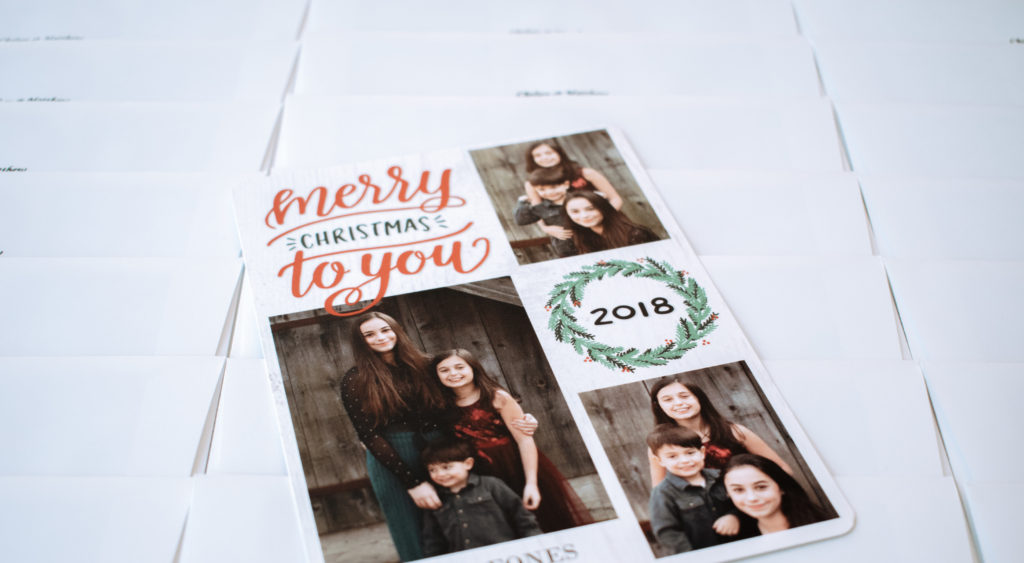
Merry Christmas Mama! It’s that time of year again, to send out a million Christmas Cards! I have got to tell you that this used to take me hours and days to complete. This year, my cards were finished and out for delivery before Thanksgiving and it took me only two hours, for ALL of them! Here are my tips to have a pain free experience, what you need to know for Christmas card success!
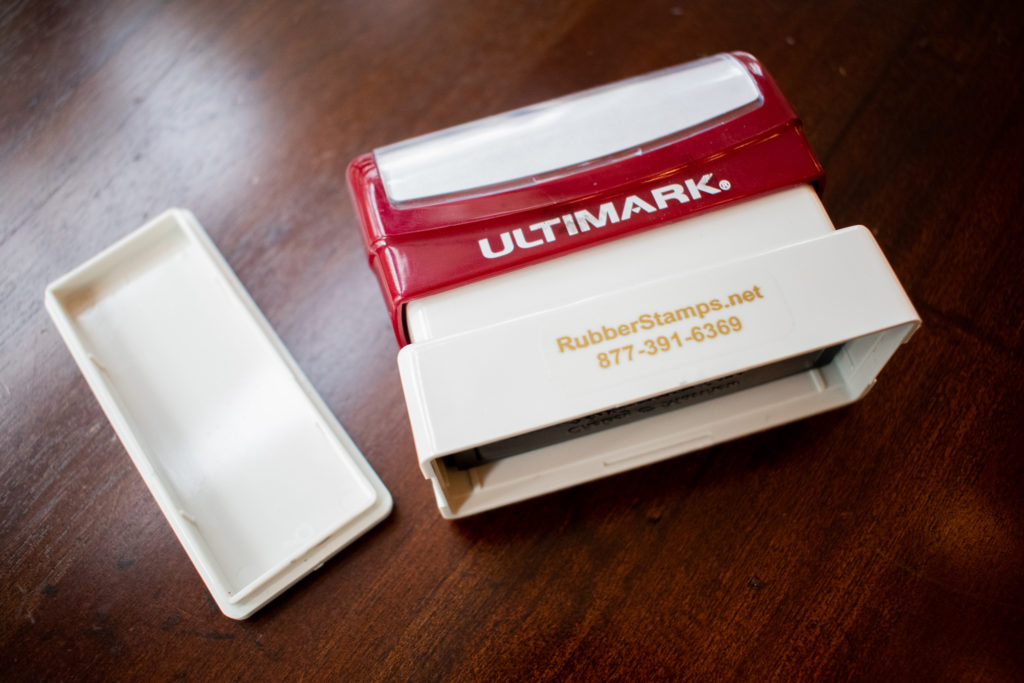
Invest In A Stamper
When my husband and I married, I ordered this nifty self-inking stamper from rubberstamps.net. They’re inexpensive and I just stamp away all the return addresses! I use this for all the mail and bills I send too. You’ll save hours of time and avoid those writing hand cramps. Literally, hours saved!
Shop Early
If you haven’t ordered your cards yet, it isn’t too late! The earlier you order, the more you’ll save. Check with each of my favorite card printers like Minted, Shutterfly, Walgreens, and VistaPrint. They all run great specials with great quality prints. I always choose whoever is running the best pricing on heavy card stock. I saved over $100 this year with ordering early and using the promo codes I found online, so be sure to google their best promo codes for those savings!
Batch Your Work
If you find yourself spending hours on your Christmas cards, batch your work instead. Work in sections, all the written notes, then the stuffing, the addressing, one thing at a time. This is guaranteed to cut out at least an hour of your time if not more. We work more quickly when we stick to a single task! Try it, you’ll love it.
Store Your Addresses Online
Nowadays, people move a ton! I spent so much time last year just calling and texting for addresses. My solution- store everyone’s addresses online! Minted has a great address book feature, plus they’ll even print your envelopes right from your contacts! Google Contacts is the safest program for long-term storage, both programs are free. So while you’re at it this year make sure to upload your addresses. Plus, everyone announces their moves on Facebook so you can update your lists right from your phones. Win-Win.
Before You Go
If you have any time-saving tricks for Christmas cards be sure to let me know and you might be featured here on the blog! Contact me right up there on the menu up top or find me on Instagram @chelseybychelsey.
Merry Christmas Mamas I have a special Christmas gift for you. First, I’ll let you in on a little secret. A couple of years ago I thought my home would never look magazine worthy, I thought that I needed hundreds of dollars to create those same looks in my own home! I was so wrong! This Christmas I am sharing with you how I decorated my home on a budget, no joke, this Mama loves to save money! Plus, I teamed up with my absolute favorite interior designer Marissa Herr of Herr Home Decor who has spilled all of her decorating tips and secrets just for you. We’re sharing how to spruce up for the Holidays, where to find our favorite pieces for less, and how to incorporate what you already have. Plus, are you ready? We collaborated to create the FREE Practical Home Decor Guide E-Book! So excited to share my first E-Book with you all, chock full of Marissa’s interior design secrets and how she helps me bring my home decor to life! Here we go.
Where To Begin
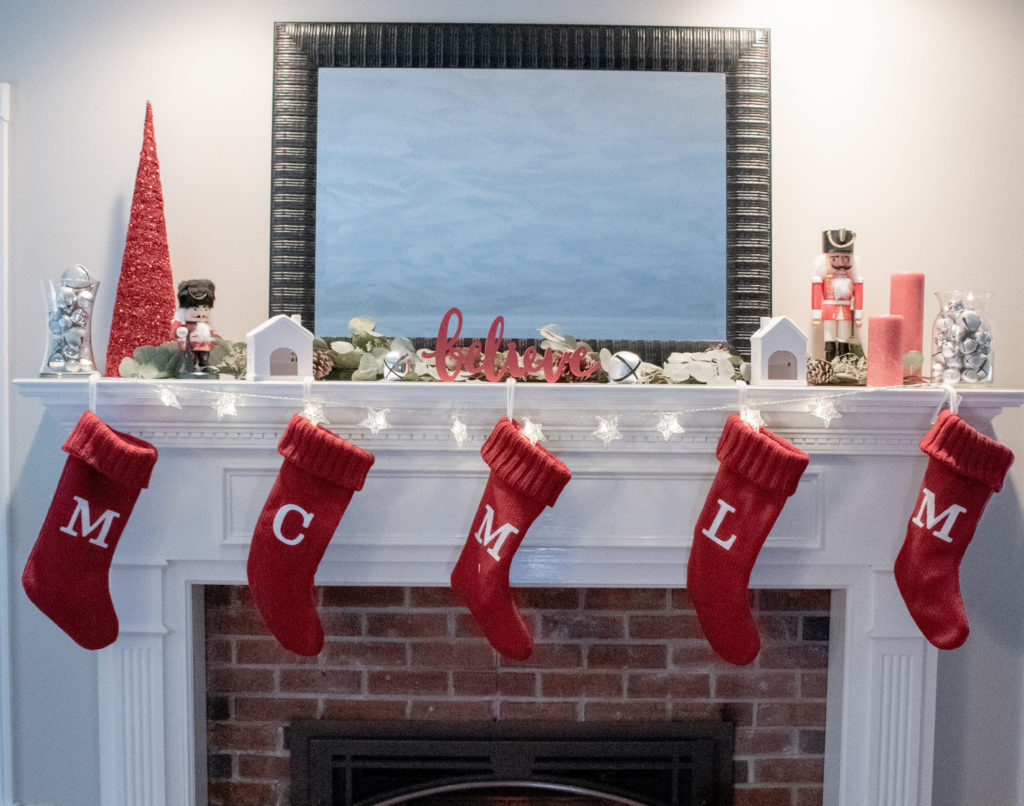
Sometimes Christmas decor can seem overwhelming, or out of order. To create a cohesive theme Interior Designer Marissa Herr recommends choosing one item that you can’t live without and letting that dictate the theme for your space. Perhaps you’re like me and have old nutcrackers you love or stockings that make your Christmas so special. This year I let my nutcrackers breathe color into the rest of the room, turning a classic into a modern. Their reds blacks and whites were just perfect for my theme and so simple to incorporate.
Arranging Your Pieces
I used to throw up my pieces wherever they would fit, or struggle with placement. I didn’t know how to use multiple items together to create that flowy look. Marissa explains her rule of threes and balancing out the weight for our eyes. If you look closely, I chose the believe sign as my focal point, bright and red as my main color. The complimenting and coordinating items fall to the side to weight the look on each end. My sections of three. In each section, I have three pieces. Ther white houses act as a neutral and the muted garland in the back acts as another neutral to tie it all together.
Where To Find Affordable Decor
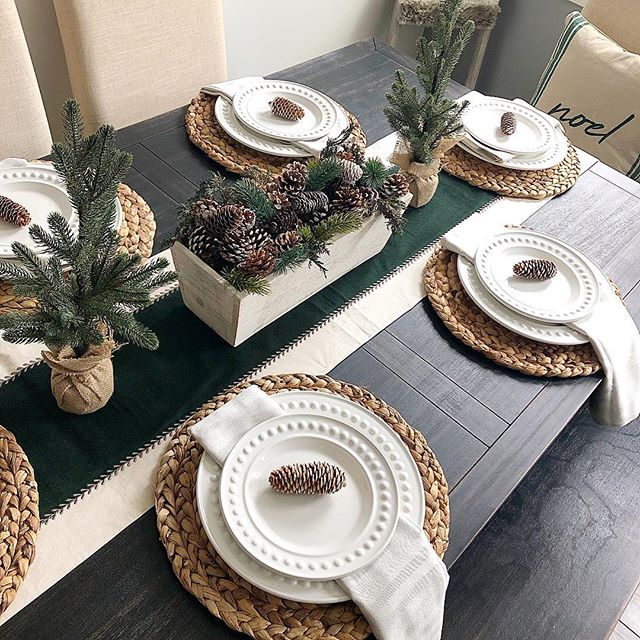
I truly want to emphasize that decor doesn’t have to break the bank. This year I have found so many great pieces for less! The little white homes were just $3 a piece, along with the string lights at Target. Yay value aisle! I also found this precious garland at Target in the Magnolia Home section. Can we all pause and admire Joanna Gaines’ new home decor line? I could live in that section of Target. I’ll link each piece down below! Marissa Herr shares her Christmas Tablescape above- her centerpiece basket was a great find at TJ Maxx Home Goods! So before you think you’ll need to spend a ton, set your theme and head out for the hunt! Once you know what you’re looking for, you’ll be surprised to find so many steals.
More Interior Decor Secrets For The Holidays
We have so many more secrets to spill with you that can be used through any season! Don’t forget to download your free Home Decor Christmas Edition E-Book! From Marissa’s home decor rules to follow, how to cozy-up a room, to incorporating what you already have. Create your dream room on a budget in every room. You won’t want to miss out on all of our secrets!
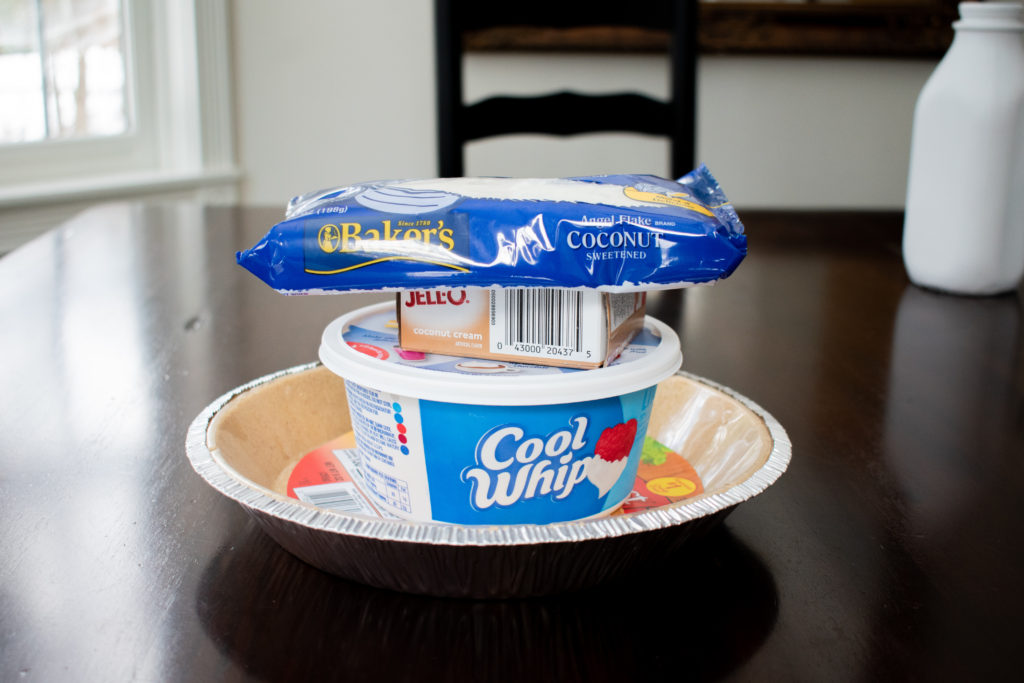
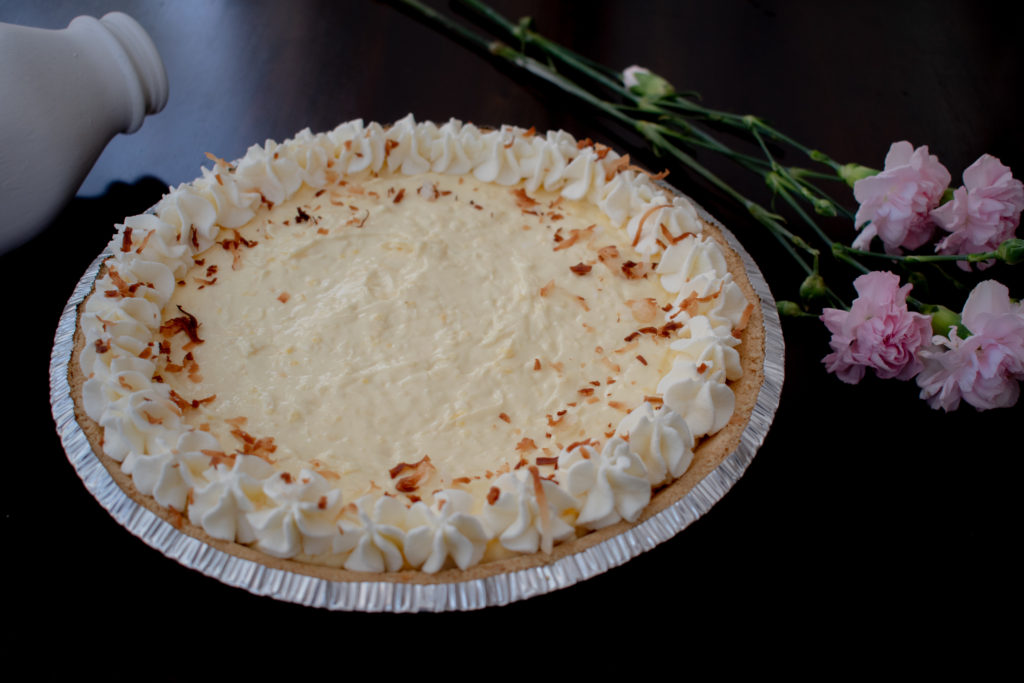
Ok so I really have a confession. Mom to mom. I love baking, but I love quick desserts the most. Quick gratification for all the pretty, sweet, and tasty. Especially right now when Thanksgiving is just around the corner and I have so much else to do! Then Christmas. Oh my! Enter, this sweet jewel. My Quick & Delicious 30 Minute Coconut Cream Pie! It’s a no-bake pie that finishes so silky and fluffy. Here is what you’ll need.
Ready To Use Graham Cracker Crust (or make your own it’s just butter and graham cracker pressed)
Mix & Whip
Set aside 1/4 cup coconut for toasting. Then, why I love this recipe, mix almost everything together in no particular order. How fun and carefree did this just get? I use my large KitchenAid bowl and add the following.
2 Cups Cold Milk
1 & 1/2 Cups Cool Whip
2 Packages Coconut Pudding Mix
3/4 Cups Shredded Coconut
I mix for about 5 or more minutes on high speed. The trick for a FLUFFY no-bake pie is to really whip the air into it.
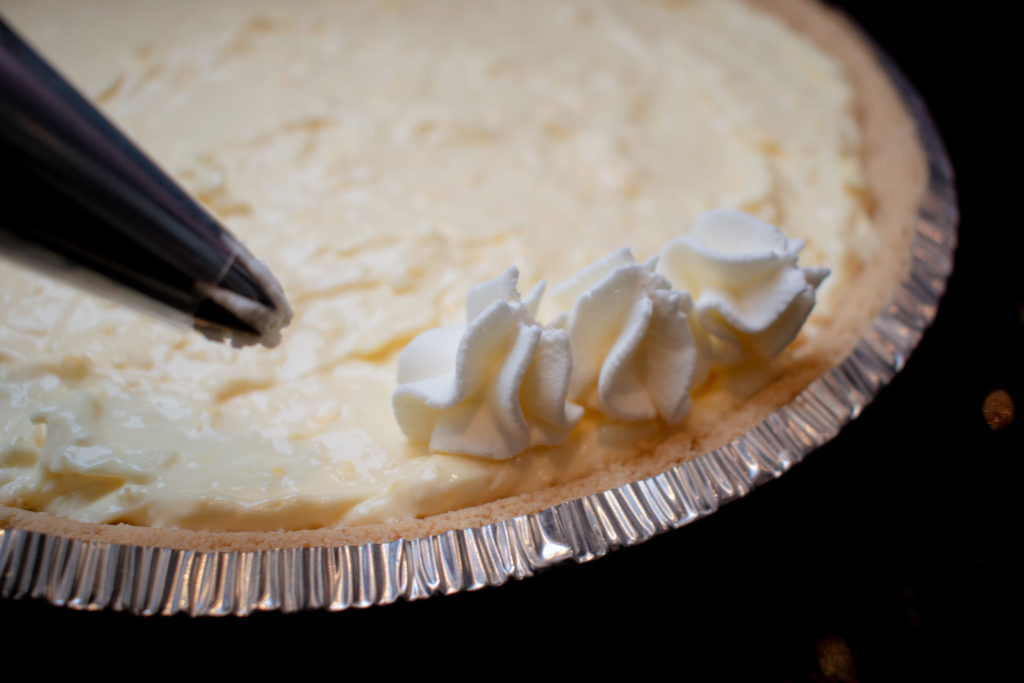
Time To Toast
This pie really needs a little prettiness, which is easy to do because the main prep time is about 10 minutes. You could do a lot to pretty it up no matter your skill level. You could spread some pretty meringues around the crust edge, or even use a stencil to add a design in the middle with graham cracker bits! I love to go with a pretty piped whipped cream and toasted coconut! Make sure to tell me below what your favorite is. Today we are going classic. Crank the oven to 320 and spread the remaining coconut on a layer of foil. Why foil? Because it’s easier to clean up, cheers to one less dish to wash! Every oven is different so keep an eye on your coconut, it burns quickly.
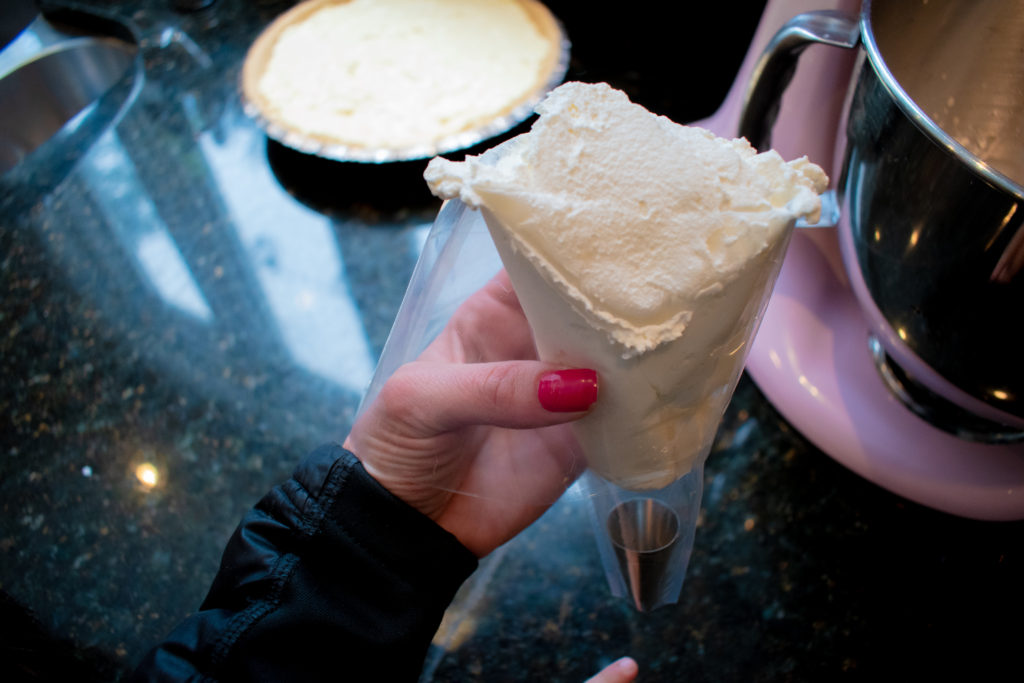
Home Made Whipped Cream
If you haven’t made whipped cream yet, you’re really missing out. All you’ll need is
One Cup Heavy Whipping Cream
4 Tbs Powdered Sugar (regular sugar works in a pinch but confection sugar is the best)
1 Tsp Vanilla
Ready, set, easy! Throw the sugar, vanilla, and cream in a bowl and mix on high speed until your cream forms high peaks. About 3 minutes.
Then just pipe your edges with a 1M piping tip and piping bag around the whole pie. Hold the piping bag vertically, squeeze with even pressure, lift and release to copy these starry peaks. Don’t forget to sprinkle the piping with your toasted coconut!
Let Set
The pie will be fully set in about four hours, the hardest wait in the world! Here are a few more pro tips!
For clean pretty slices, rinse the knife under hot water and wipe dry between slices.
Tuck the pie in the back of the fridge to set faster.
Add 2 TBS Cream Cheese & 1/2 TSP lemon juice to the whipped cream to keep the piped shapes overnight if you make the pie ahead of time. The lemon juice balances the cream cheese flavor.
You’re going to love this pie, and you can adapt it to all different jello pudding flavors! What about a key lime pie version next? Who knows what I’ll send you so be sure to subscribe!