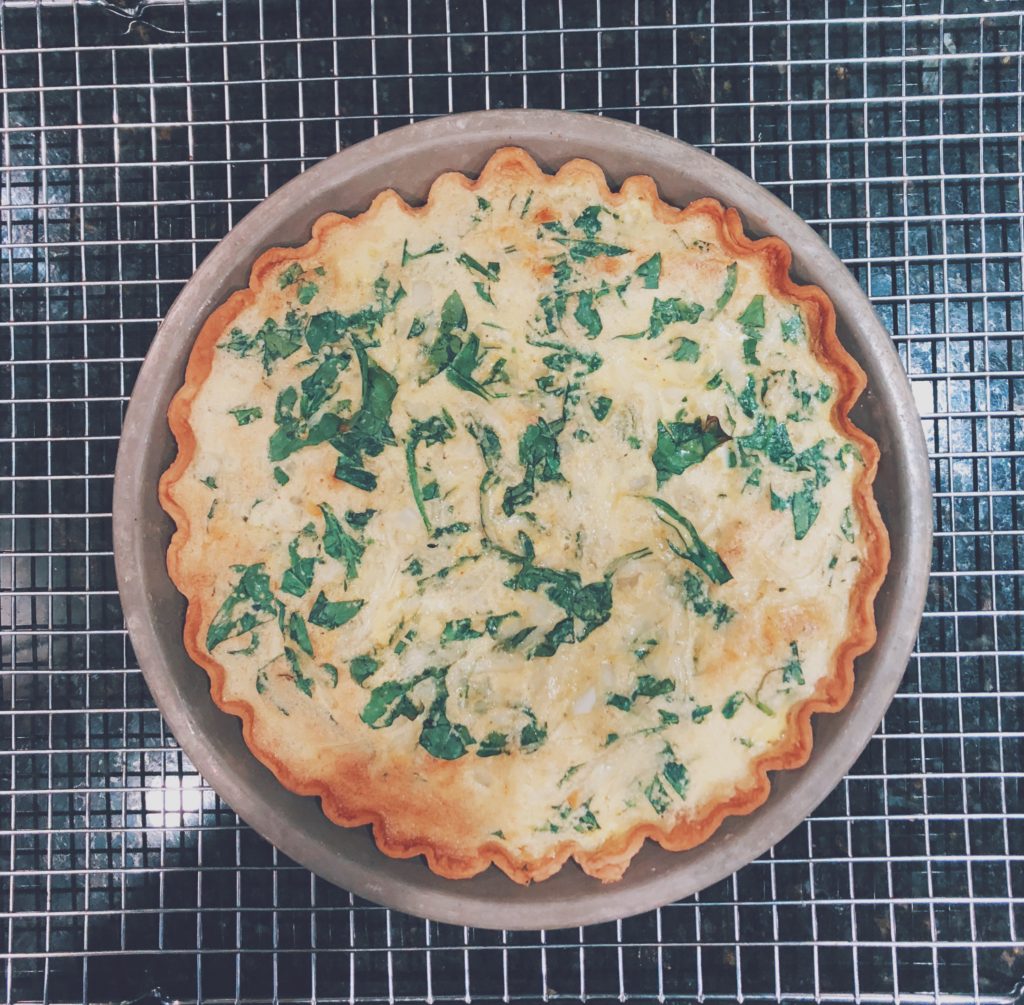
You’ll crave this easy to bake Quiche Florentine after your first bite. I am always looking for recipes to impress my family with, but as a Mom, sometimes we struggle with fitting homemade foods into our schedules. That is why this will be your new favorite recipe, it is quick to prepare and you can refrigerate until you are ready to serve it the next morning. Your family will love it, you’ll save time in the morning, and feel good knowing they are eating something homemade and good for them. Don’t forget to save this post for later when they want it again!
Ingredients For Your Grocery List
1 Tbs Vegetable Oil
2 Tbs Flour
1 Package Pillsbury Premade Pie Dough
1 1/2 C Chopped Spinach
1/3 C Chopped Onions
4 Eggs
1 C Shredded Swiss Cheese
2 C Half & Half
1/4 Tsp Salt
1/4 Tsp White Pepper
1/2 Tsp (Heaping) Paprika
Kitchen Supplies You’ll Need
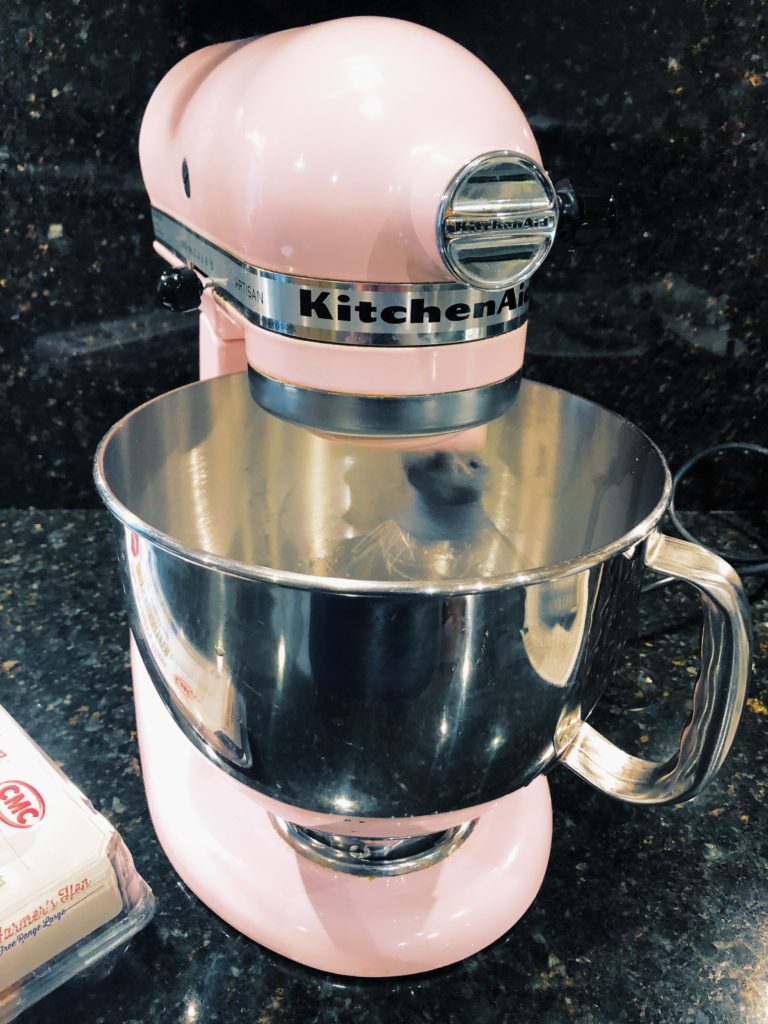
Mixer
Spatula
Pie Dish
Fork
Napkins or Dish Towel (To Dry Produce)
Prepare Pie Tin
I have always found the old school way of preparing pie tins with oil then flour to be the most reliable. Pour a tablespoon of vegetable oil into the pan and coat the entire interior with your napkin. You shouldn’t see any excess oil drops or puddles, just a thin coat. After, drop a tablespoon or more of flour into the pie tin and turn it to coat it thoroughly. Give it a gentle tap over the sink to release excess flour before moving to the pie dough.
Prebake Pie Crust
If you have a family recipe for pie crust, feel free to use that. For this quiche, I have found the Pillsbury Prebaked Crust to be delicious and a huge time saver. Lay your pie crust into your tin gently. With your fork, poke about 15 holes into the bottom of the crust to prevent the bottom layer from bubbling up. Some people use pie weights to hold the base down, I like this method because it is simply easier. Prebake the pie crust at 450 Degrees for 10-12 minutes. While your crust prebakes, prepare the filling. Reduce oven temperature to 425 Degrees.
Chop Produce
Chop onions and spinach. Vegetables tend to release a lot of water when they bake so pat them dry with a paper towel or dishcloth. The less water they retain, the fluffier your quiche will be. One of my favorite tips is to sprinkle a light amount of flour onto the veggies before patting them dry, this pulls more moisture from spinach leaves etc.
Separate & Whip Eggs
Separate your egg whites and yolks. Whip the egg whites until they hold firm peaks that don’t settle. This will give volume to your quiche and again, make it soft and light. If you have trouble with the peaks, make sure there aren’t any traces of yolk or water in the bowl, that will usually prevent the peaks.
Mix Filling
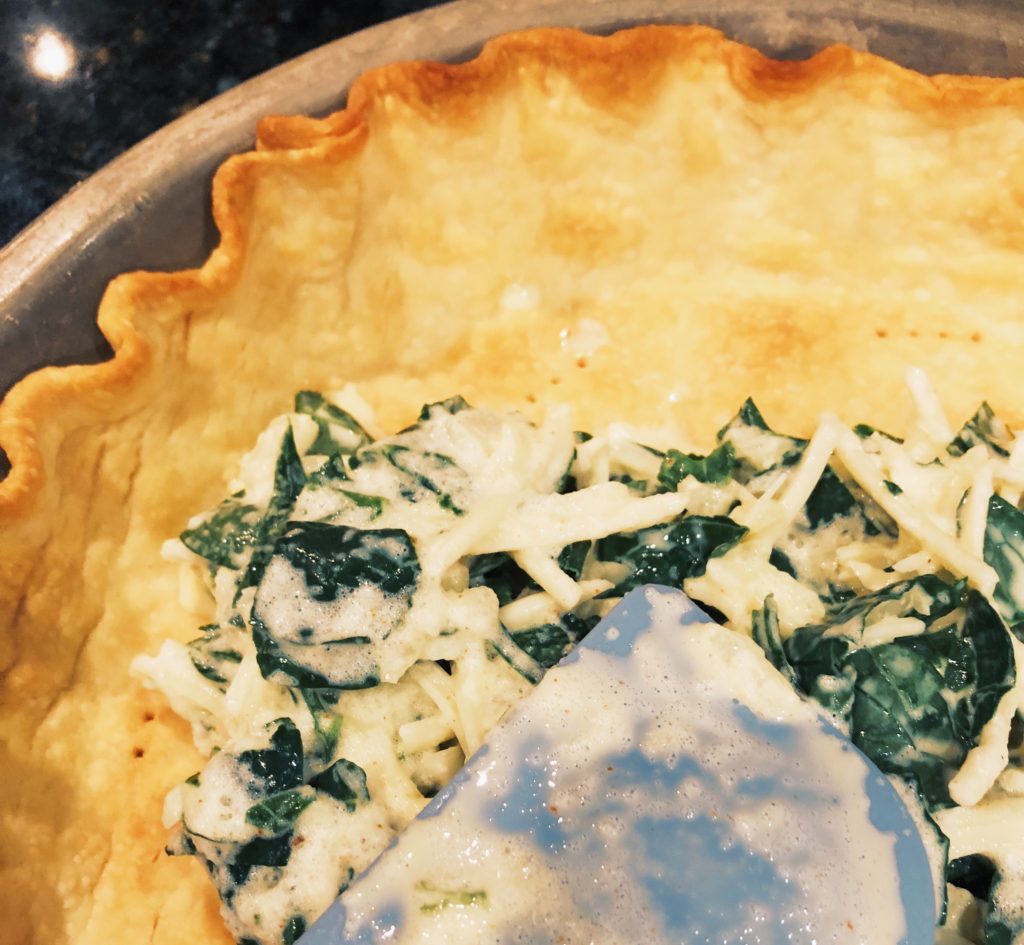
Whisk your half and half and eggs together in a large bowl until fully combined and bubbles form. Add in paprika, salt, white pepper, shredded swiss, onions, and spinach. Once you have them fully combined, fold in your egg whites. Careful, if you mix them in instead of folding, your quiche will be dense. Fold them until they combine entirely. Slow and steady.
Bake Girl Bake
Cover the pie crust edges with foil to prevent them from overcooking, then fill your pie. My foil is never pretty but it gets the job done. Bake your quiche at 425 Degrees for 15 minutes. Then reduce temperature to 300 Degrees for 30 more minutes. Your pie is done once a knife can be inserted in the middle and come out clean, without runny eggs especially.
Storing Your Quiche
If you and the family even have leftovers, it should keep nicely in the refrigerator for up to three days when covered. I like to make these when I have time in the day, but store them until breakfast the next morning. They are perfect for when you have guests or family from out of town too. You can warm the pie covered in foil at 200 Degrees for 30 minutes, or just nuke a slice in the microwave for about 30 seconds at full power.
Overall
I love anything that saves me time and is better for the family. I am not a morning person, so with recipes like these, I get to sleep in a little but still be rockstar Mom. I would love to hear what other ingredients you would add, or your quiche baking tips that I may have forgotten. Comment below or send me a message in the contact form up top. I can’t wait to hear your thoughts!
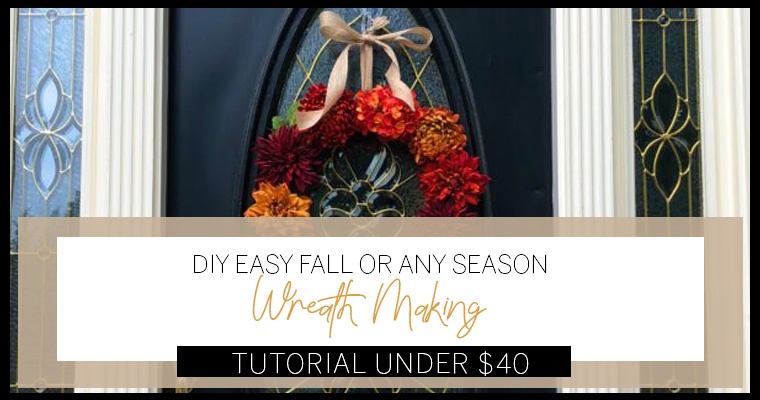
How To Make This Beautiful DIY Fall Wreath Your Neighbors Will Love
Don’t you just love Fall? All of nature’s bright, warm and welcoming tones. The set of mums I picked up for the porch last week inspired this fall wreath. To help you make your own, I created this step by step easy tutorial just for you. You can truly create whatever your heart desires, on an actual affordable budget. When comparing similar wreaths online, they ranged from $120-$240! This tutorial cost under $40. You’ll probably be driving to your hobby lobby in a few hours to make your own. Here is how to make your very own Pinterest worthy wreath, in just 30-40 minutes (even with a toddler).
What You Need
Let’s talk about what you will need, it isn’t much. I recommend shopping at A.C. Moore and Hobby Lobby for the best prices. Both of these stores have great coupons online, don’t go into the store without one. They pretty much price things to be used with their coupons. Just show them the coupon on your phone. At Hobby Lobby, their florals go on sale every other week, bonus savings!
Hot Glue Gun
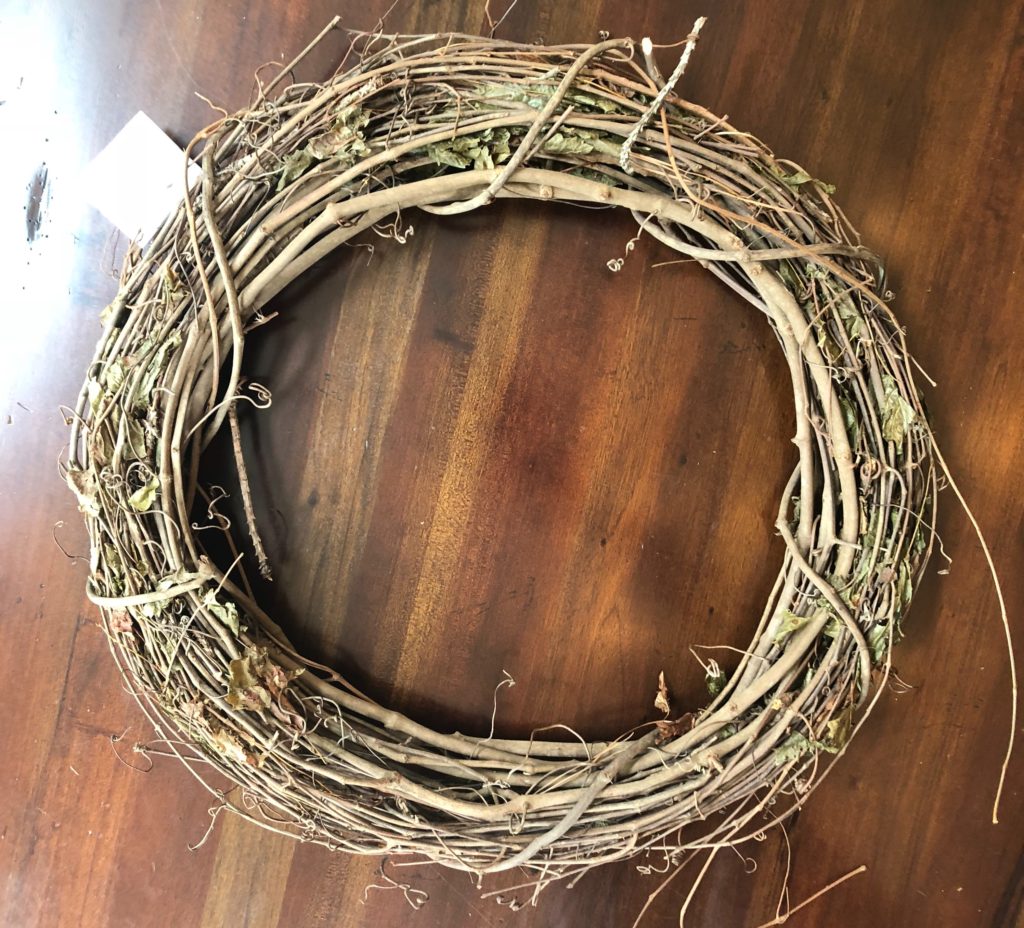
18″ Grapevine Wreath
24″ Ribbon – Jute Ribbon
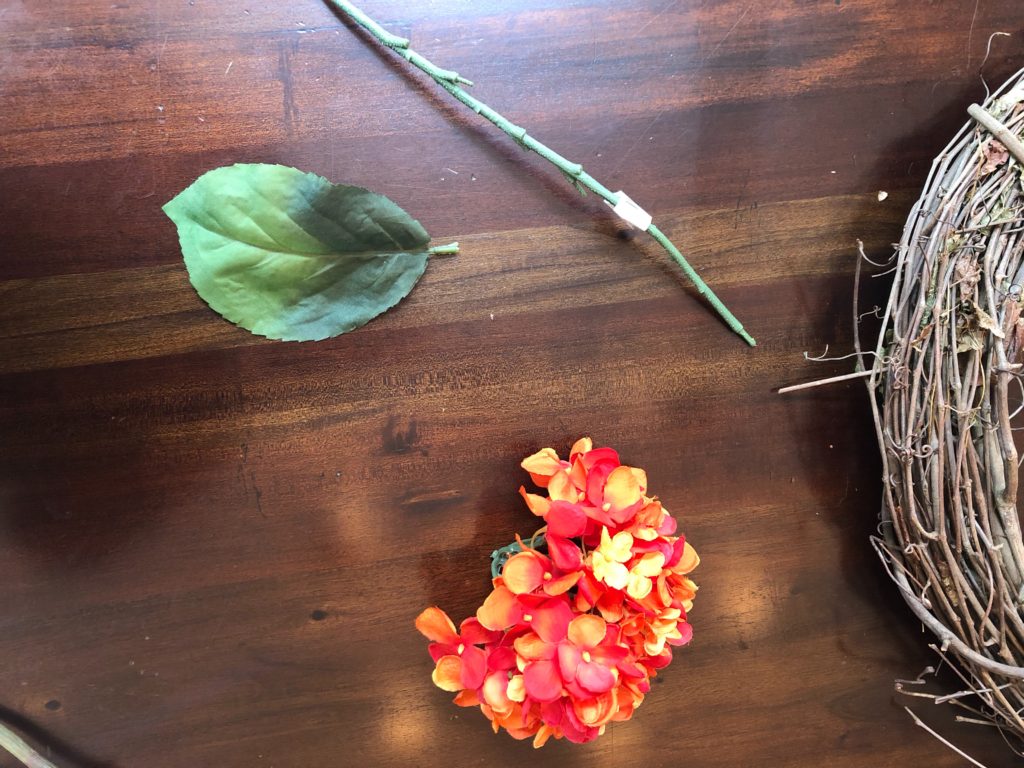
10 Flowers – I used artificial Hydrangeas, Zinnias, and Dahlias
Hot Glue Sticks – This project used ten 8 inch sticks
Sharp Scissors or Wire Cutters
Prep
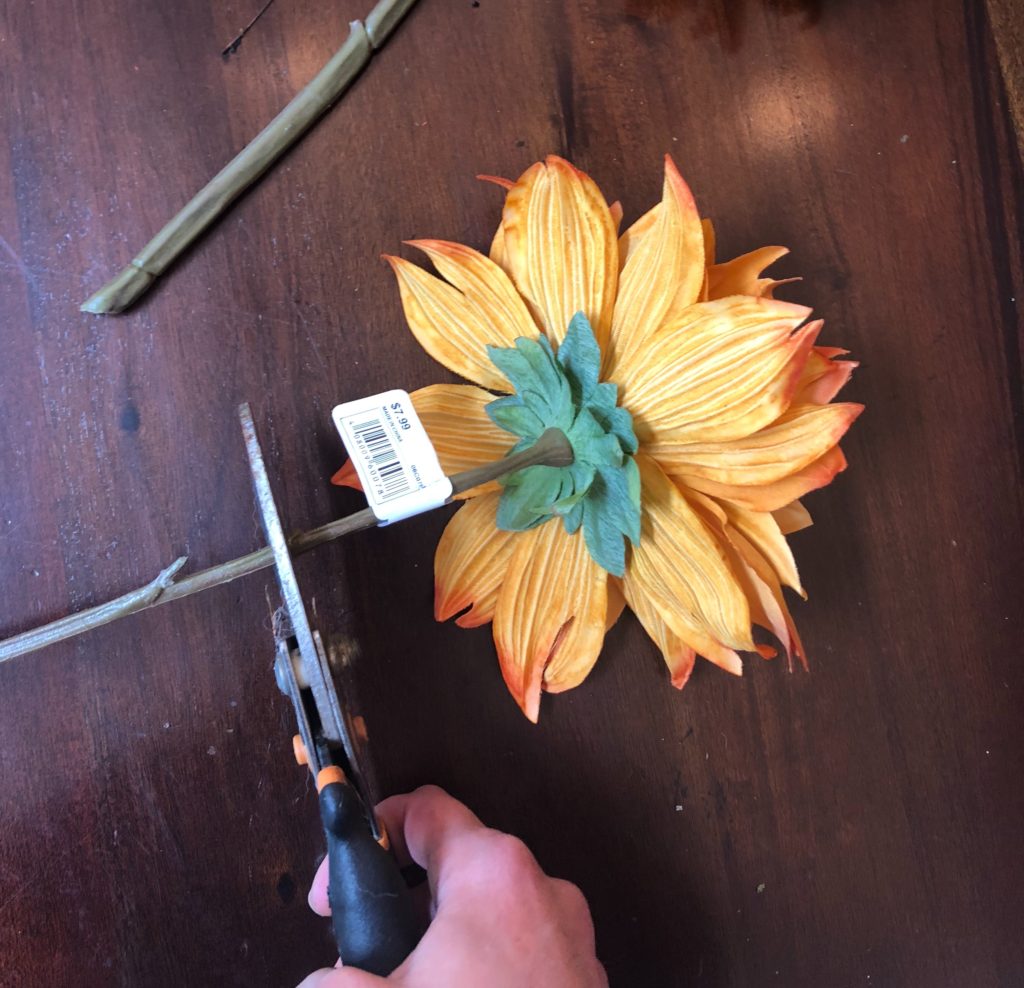
Pull the stems off your flowers, you won’t need them. Hydrangea flowers usually pop off too. Some are hard glued to the stems, cut them or they fall apart. Leave about three inches of stem to stick into the wreath, see below.
Plug in your hot glue gun, while it warms, work on placement. Before you glue anything, lay your flowers on the wreath and rearrange them until you fall in love with your design. Make note of the distance between flowers to ensure even placement as you glue your flowers to the wreath.
Plan & Design
When planning your design, keep in mind that odd numbers and groups of threes are more aesthetically pleasing to the eye. Choose colors in the same tones like warms or cools, or even color families like these sunset colors.
Pro Tip – Take a photo of your arrangement to reference before you start to glue. I came back to this photo about ten times as I secured the flowers to the wreath. It is easy to forget your planned placement, do yourself a favor and snap a pic.
Glue
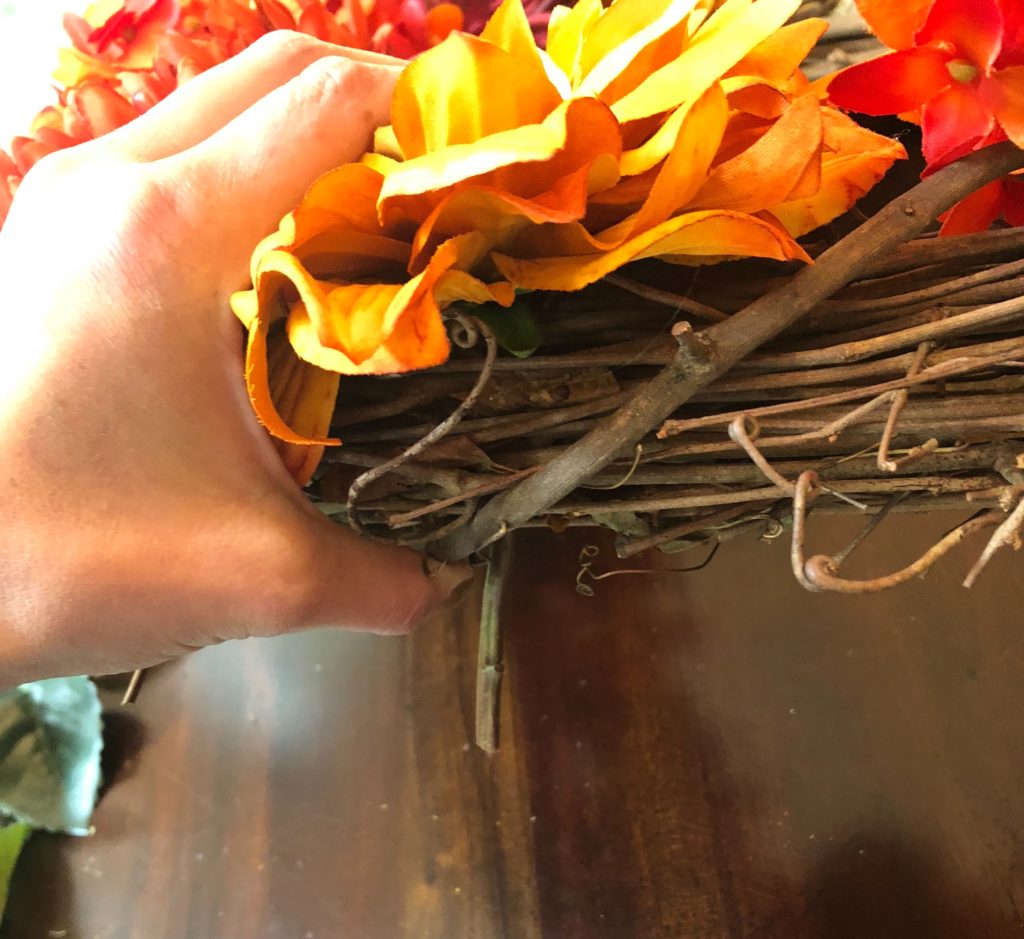
Add hot glue to the stem and base of the flower, like above, then quickly pop it into the wreath.
Insert the stem of the flower into the wreath, sometimes it needs a little wiggle to go through. I left a larger stem on this flower to show placement, but mine are usually shorter. If your stem is coming out through the back of the wreath, cut it to be flush so it doesn’t push the wreath off your wall or door. If needed, go through your flowers again and cut the stems so they do not come out the back, it is easier to cut them before they go into the wreath than after.
Finishing Touches
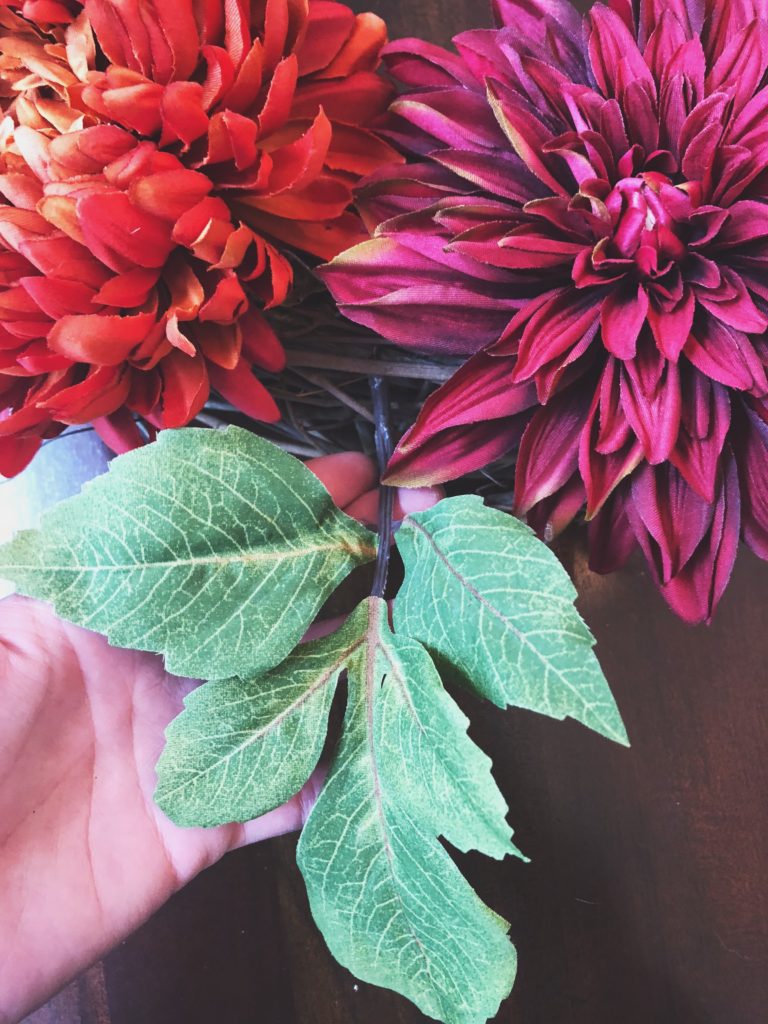
Use the leaves that we pulled from the floral stems to cover gaps between flowers. This wreath was given three leaf stems, just enough to add color without overpowering the reds and oranges. Add glue to the tips of the leaf stem and tuck it into the grapevine. Place them at an angle to flow with the curve of the wreath, instead of sticking straight out. I like to hide the stem of the leaves underneath the flower petals next to the space we are filling.
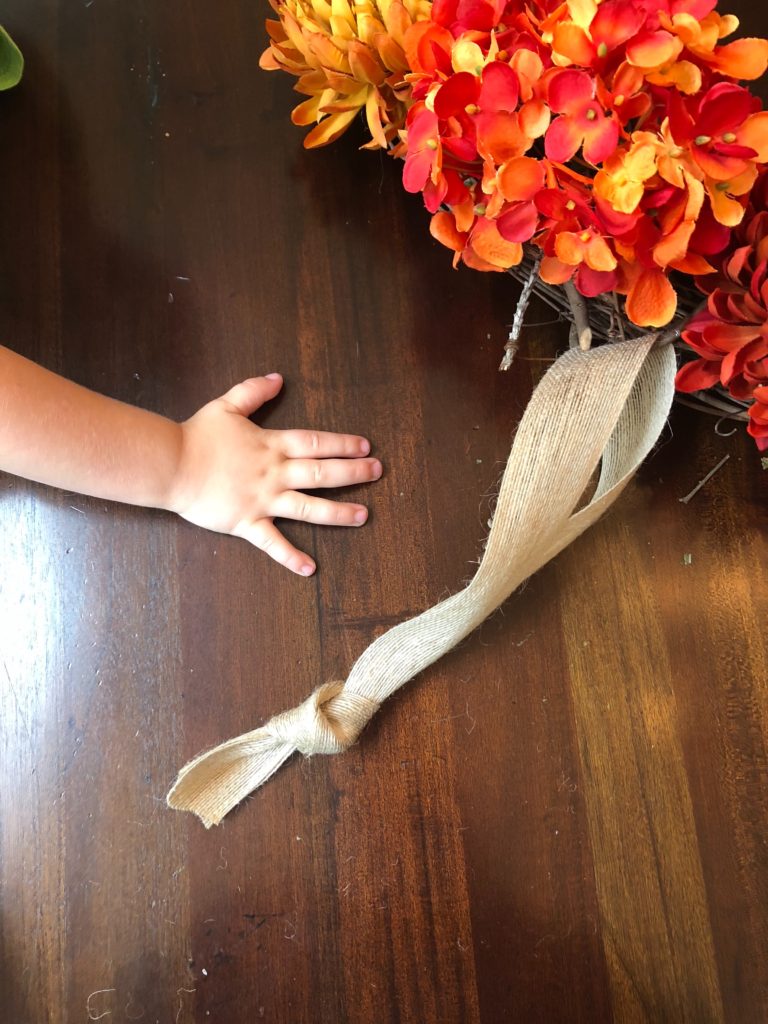
Tie A Bow
You’re almost ready to hang up your beautiful masterpiece for the whole neighborhood to see! Take the jute ribbon and attach it to a sturdy branch in the grapevine. There are usually larger branches that spiral through the wreath, find one of these. Measure the length for your door and tie off the ends. You can also add bows, I tied a separate quick bow and hot glued it to the top knot, nothing fancy.
Hang It For Your Neighbors To Enjoy
Isn’t it gorgeous? You will never look at a wreath the same way again now that you know how easy it is to make your own. Especially when you see those price tags for $100+ and you can make the same one for under $40. If you’re wondering when you can set your fall wreath out, right away! The glue sets fast. I don’t recommend command hooks to hang them outside, mine always fall off. For metal doors, you can find magnetic hooks. For glass, these suction cup hooks are fantastic and about $3 from Joanns fabrics.
What colors would you use? Would you choose different flowers? Make sure to tag me on Facebook & Instagram with your creations at @chelseybychelsey or send me a pic of your creations to be featured! Stay posted for the full Fall Porch DIY On a Budget, I’ll teach you to make beautiful front door signs under $20 and more!Subscribe to the monthly newsletter and don’t forget about the giveaway to be announced soon! It’s not too late to sign up.
Hey Girl! Get excited because I am finally spilling some awesome hair secrets. Even better, my amazing hair stylist joined in to help me teach you what she taught me. It took a long time for me to learn which products to use, how in the world to keep waves and curls in. I know you probably have a lot of hair questions as well, be sure to ask! Plus, I’ll reveal my all time favorite, magic handed hair stylist with you in the end! Here are your new favorite products that work, save you time, and did I say they actually keep your hair in place? Ok, here we go.
First- let’s talk product. How, in the world, do we get beachy waves to stay put? Even those curls or ends, and bangs! I have super fine hair, and nothing at the grocery store kept my curls and waves in without being heavy and crunchy. You know when hair goes flat after you spent all that time on it? I decided to finally splurge on salon product because I realized that the stuff at target was not giving me hair like my stylist does. To my surprise, these were actually easy to use. Really easy.
So here we are, and I have never regretted the splurge. Kevin Murphy hair products, don’t forget the name because you’ll start seeing them everywhere in salons. Let’s talk about what they do.
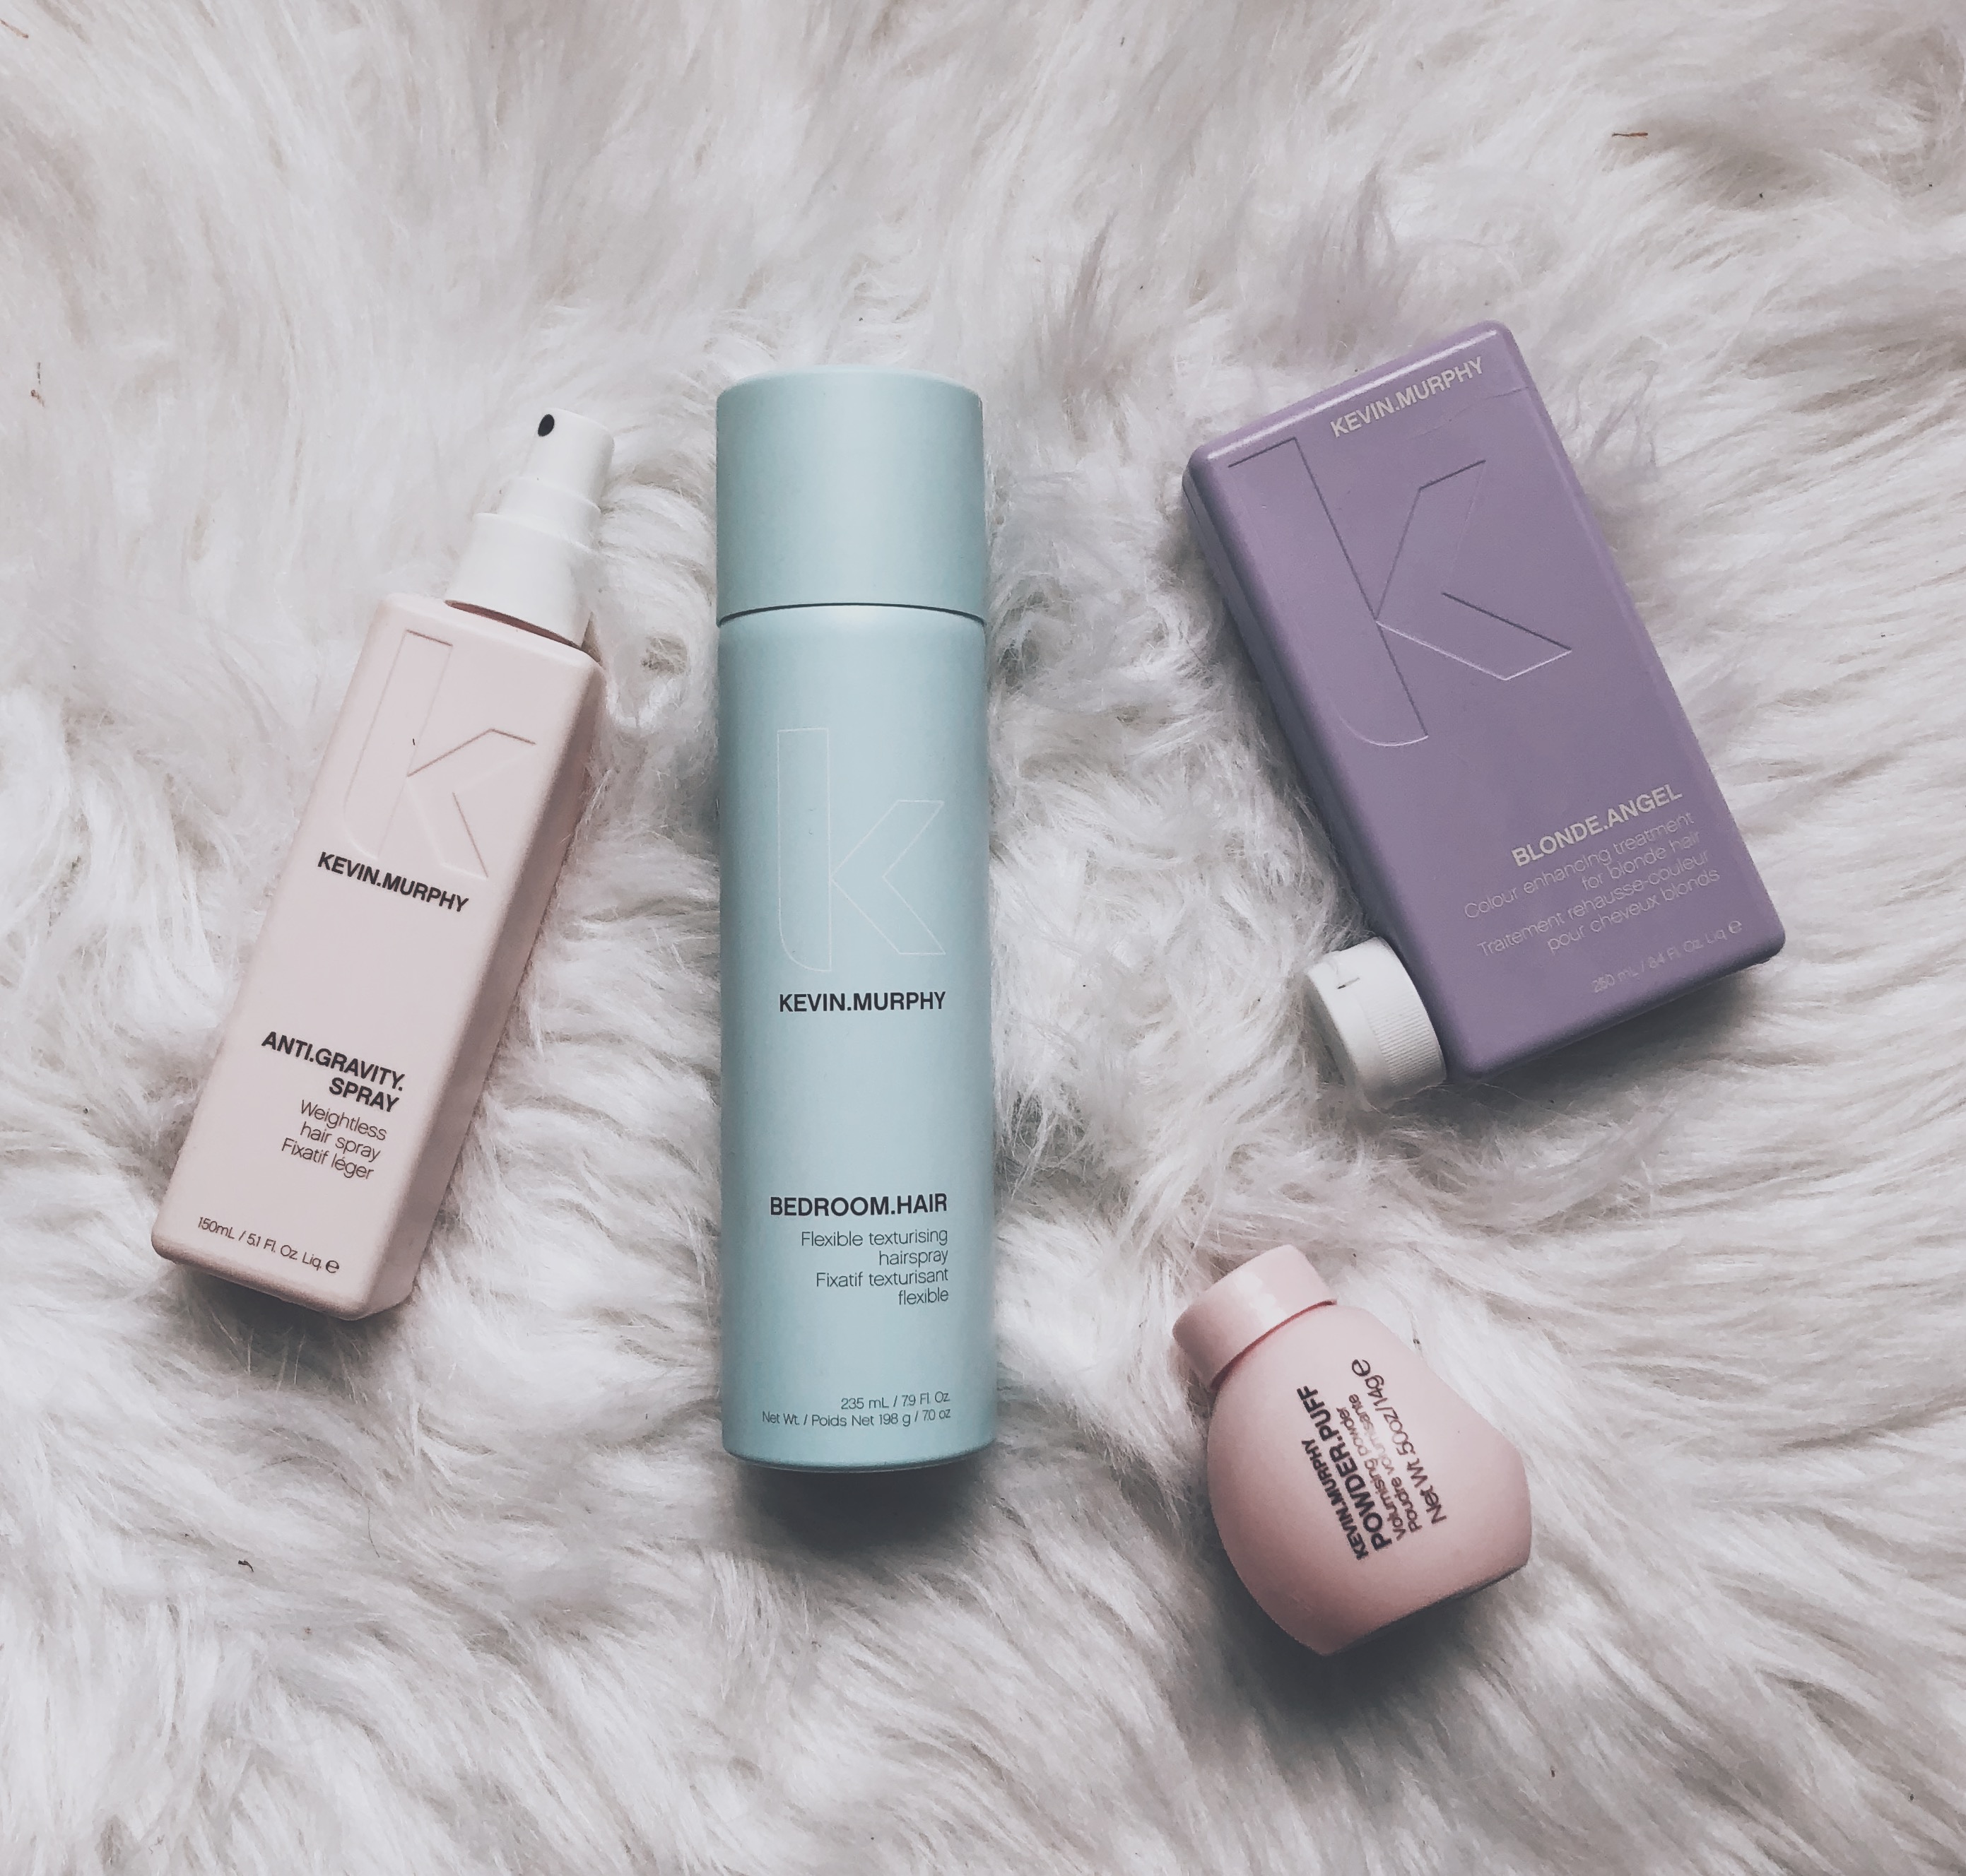
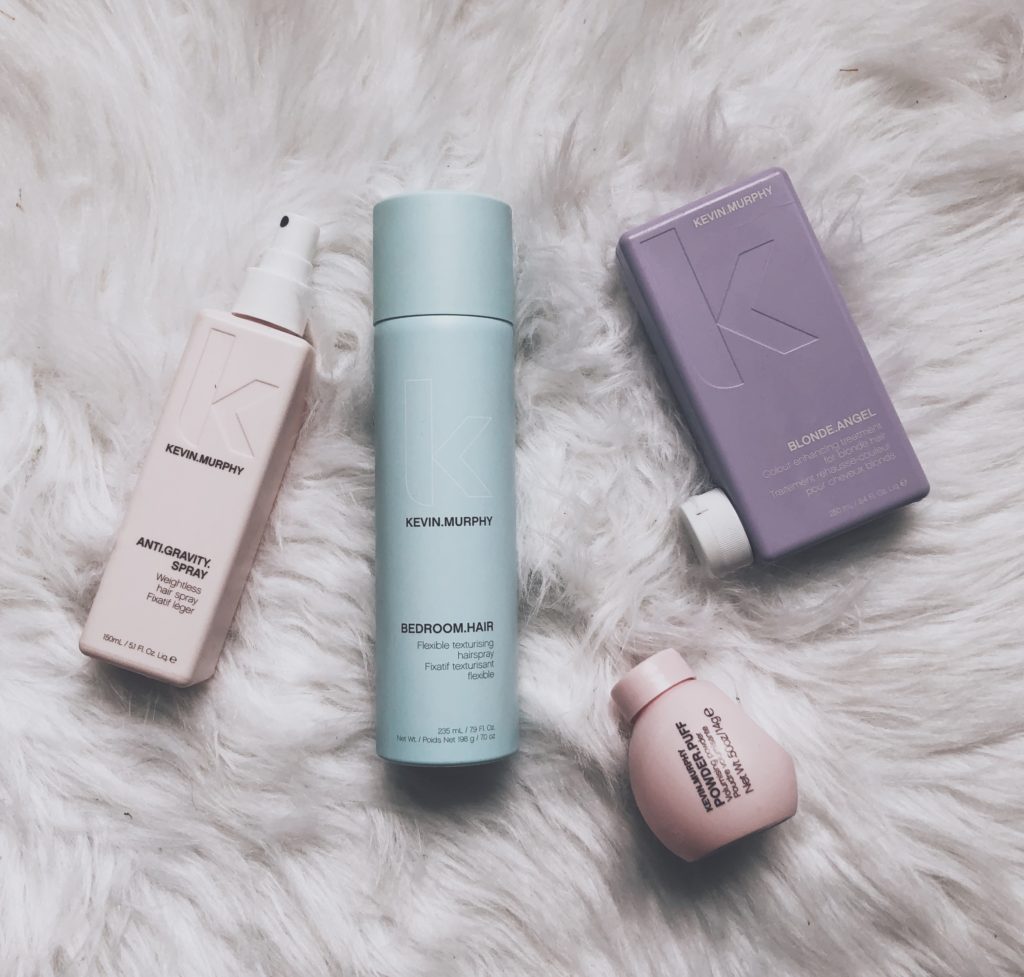
Kevin Murphy Bedroom Hair Spray
This isn’t just a hairspray, it’s kind of a combination of spray and dry shampoo and texture magic. They referred to it at the salon warmly as hair crack. It doesn’t weigh my hair down but keeps my waves in for a couple days. I can re-spray when I need to the next day, and honestly, I have never tried or seen anything like it before. If you can only get one product, make this your priority. Especially if you have struggled to keep your curls and waves in, this is for you girlie.
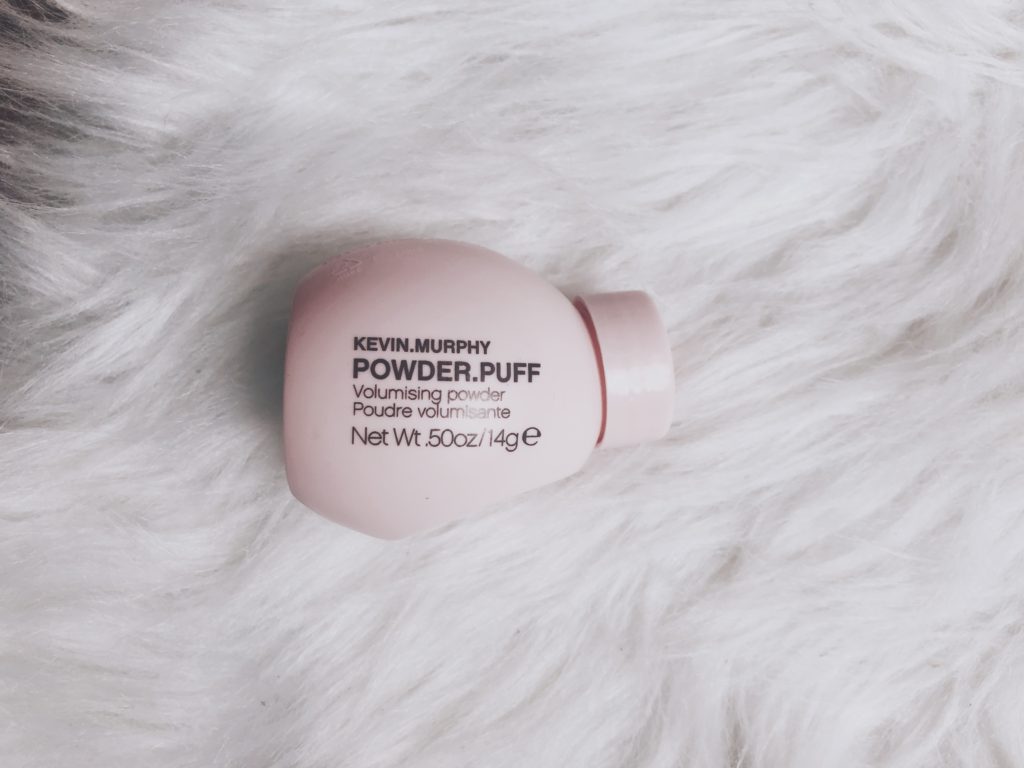
Kevin Murphy Powder Puff
I almost wish you were here to show you in person, so let me explain. This cute little weightless ball is filled with powder. It dissolves and disappears into your hair when you shake it in. From my stylist exactly, ” It creates volume, dry matte texture, it’s a metamorphosis product. It is a setting lotion encapsulated in a sphere of powder.”
Basically, in your hand, it is a powder. When you rub it, it turns silky and vanishes. It holds your hair and roots however you would like them, invisibly. Magic, I think. This is how I finally can have full looking hair because I don’t have a lot This is how I keep my daughter’s wavy and thick hair stay where she would like it to stay. This works for everyone.
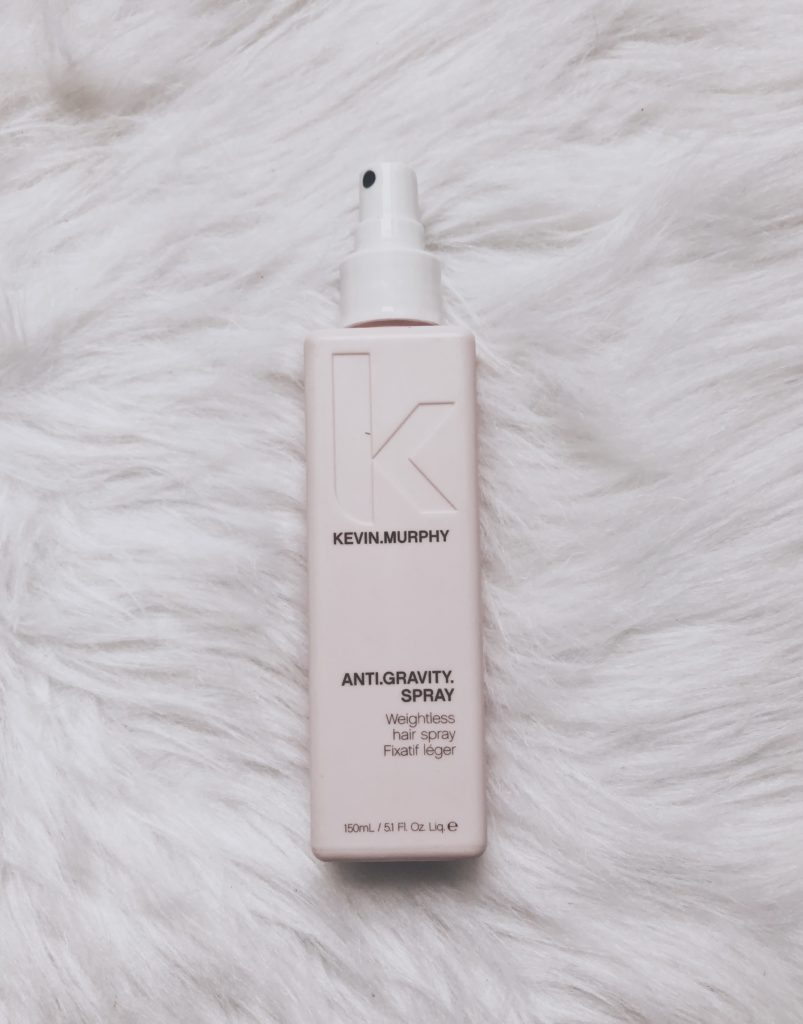
Kevin Murphy Anti . Gravity . Spray
This is another one of those “hair sprays” but not your traditional hair spray. I use this when my hair is wet, so yes it is technically a spray for hair, but it does so much more. For one, it contains lavender, so it smells TO DIE FOR. But as my stylist explained, it’s a natural astringent. It cuts dry time significantly and prevents that lovely frizz we can get from heat styling. Bye fly aways.
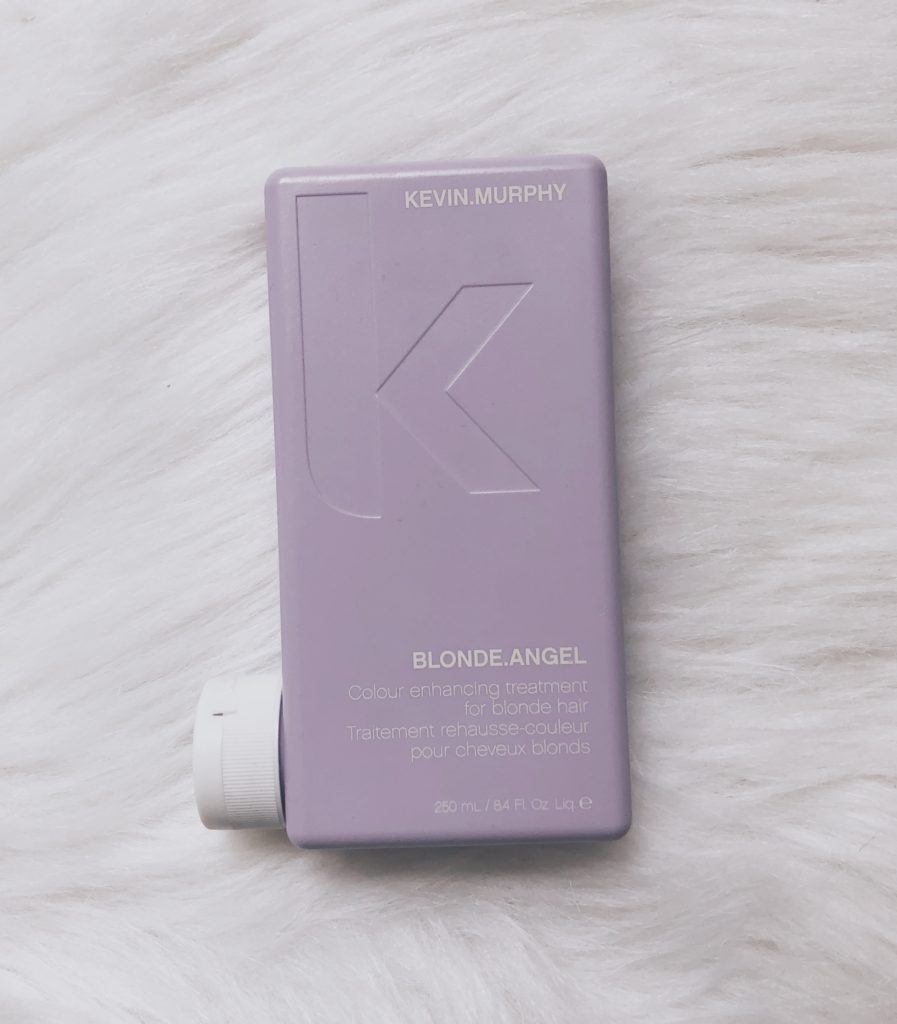
Kevin Murphy Blonde Angel
The last product I’ll share with you today is this conditioner. I skipped my shampoo because I’m not positive that I love it quite yet and I only share my favorites with you. This gem keeps your hair blonde and stops any brass from showing over time. It hydrates your hair, has loads of vitamin A & E for repair and protection, keeps it shiny, it is an angel. It does a lot more but is the first conditioner that treats my hair from all the bleaching without weighing it down. Love it.
When we think of Fall, two things usually come to mind; pumpkin spice and the best outfits of the entire year. Fall or Autumn fashion and trends are cozy, chic & so much fun. If you’re like me, the time to shop for our fall outfits is now, because we didn’t have time while we were getting the kids ready for school. I’ve got you, Momma! Here are the top Fall Fashion Trends for 2018 and how you can actually incorporate them into an easy, but chic wardrobe that is actually wearable.
Western Elements
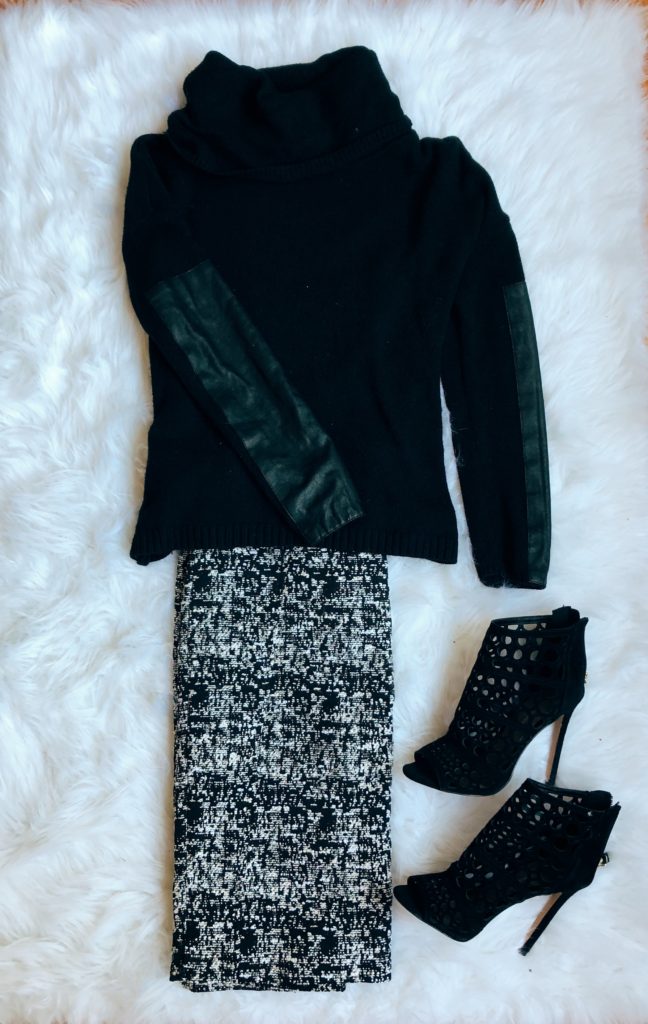
This year on the runway we saw a lot of nods to western wear, which is totally fun to add to your wardrobe. Whether you pull out those leather pieces that you’ve tucked away or shop for a new leather skirt, it’s the perfect touch to fall 2018. I paired this skirt from White House Black Market with a sheer black top, dark BCBG heels, and a felt hat from Nordstroms. Dress the look down with a pair of simple flats for a daytime look that you can chase the kids in, this outfit is actually super comfortable!
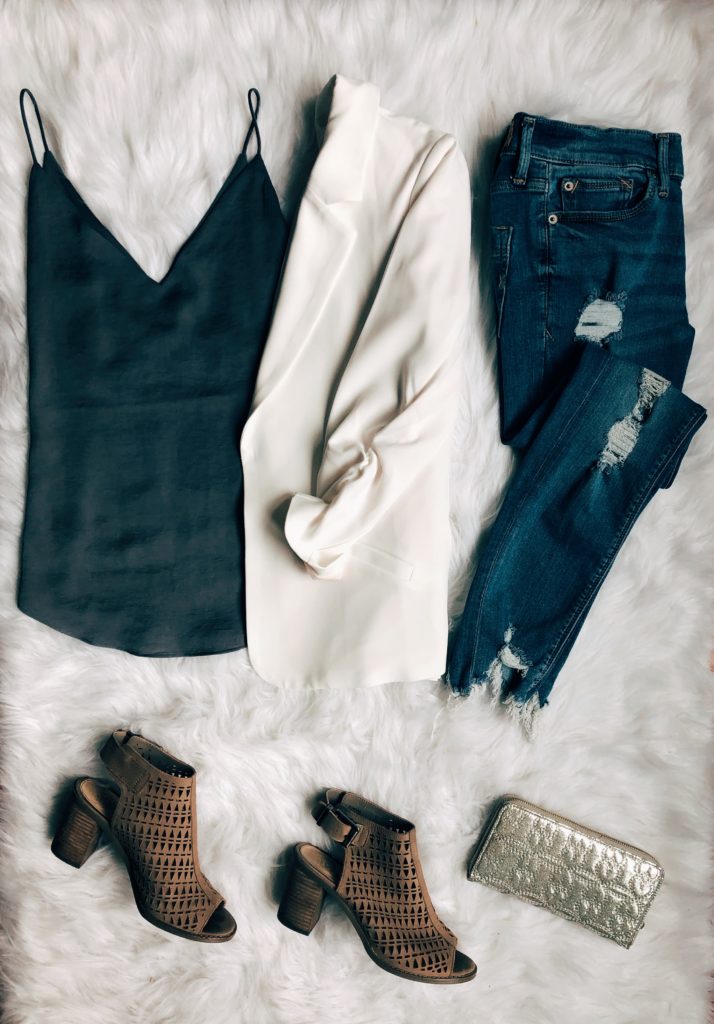
Blazers & Sparkles
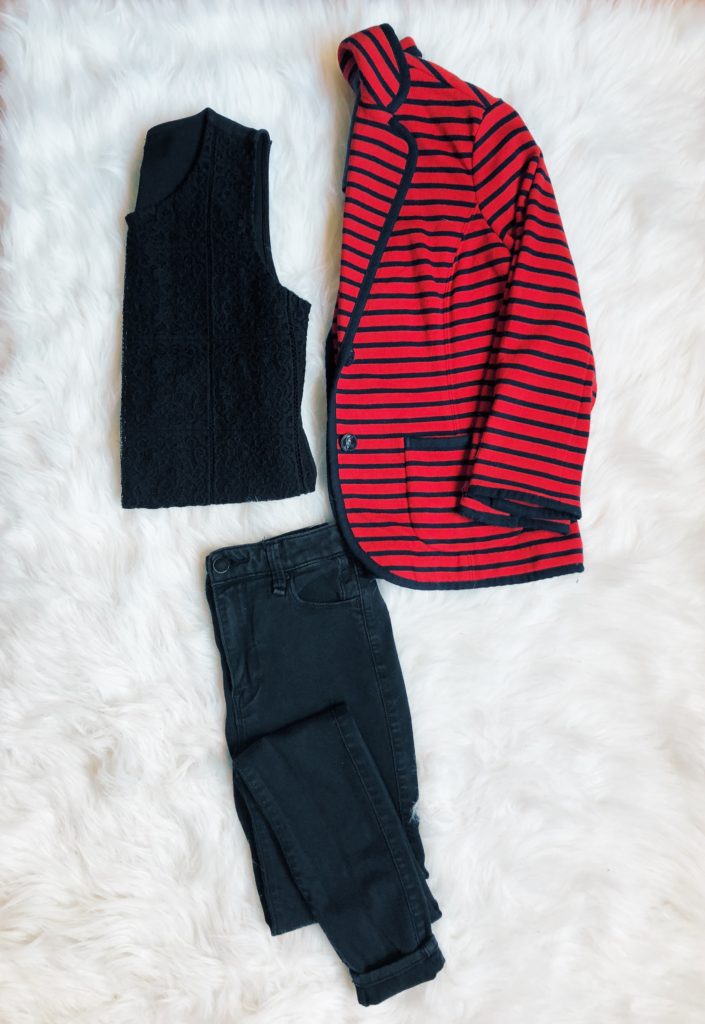
Next, on the runway this year were suits and sparkles! Think Blazers and shiny accessories as a simple way to update what you already have. Remember, you can and SHOULD wear white after Labor Day. I love this blazer from the Eleven Oaks Boutique, they always have a fantastic assortment available and stay up to date on wearable trends. Check them out here, or find them on Facebook where they host plenty of fun giveaways. I paired this look with comfy ripped jeans and my favorite Vince Camuto booties. Vince Camuto heels are the most comfortable in the world and you can actually chase a toddler in them, trust me.
Animal Prints
Fall is always about deep gem tones and leather boots, but spice it up this year with trending animal prints. I tend to lean away from actual prints and keep it more subtle and neutral. Add a faux fur vest to any solid top or dress for depth and style to your outfits this year. I paired this look with my favorite Frye leather boots and my Louis Vuitton clutch. The two are timeless pieces that will reappear on me for years to come.
Mid-Length Skirts
Mid-length skirts are here to stay, along with oversized bags. Thank goodness we are seeing larger bags again because my purse is a hub for my family’s survival. Tulle skirts have also been floating around on Pinterest for a while and are a super affordable chic way to dress up an ordinary blouse. I paired this skirt with my Tory Burch sandals because, well, winter is almost here and I want to make the most of the mild weather before it’s too late. This season we are channeling a lot of Carrie Bradshaw too, so if tulle is a little out of your comfort zone, try it for a fun date night outfit.
Subtle Plaids
Plaid makes a comeback this year, but in softer tones. From full on plaid suits, to subtle accessories, find room for it in your fall wardrobe. I paired my fall basics with this Burberry belt I’ve had for ages. This look not only screams autumn classic, but is great to wear anywhere including the pumpkin patch. For affordable sweaters, check out Nordstrom’s BP line. This sweater is my toddler’s favorite to cuddle on my lap because it is just so soft.
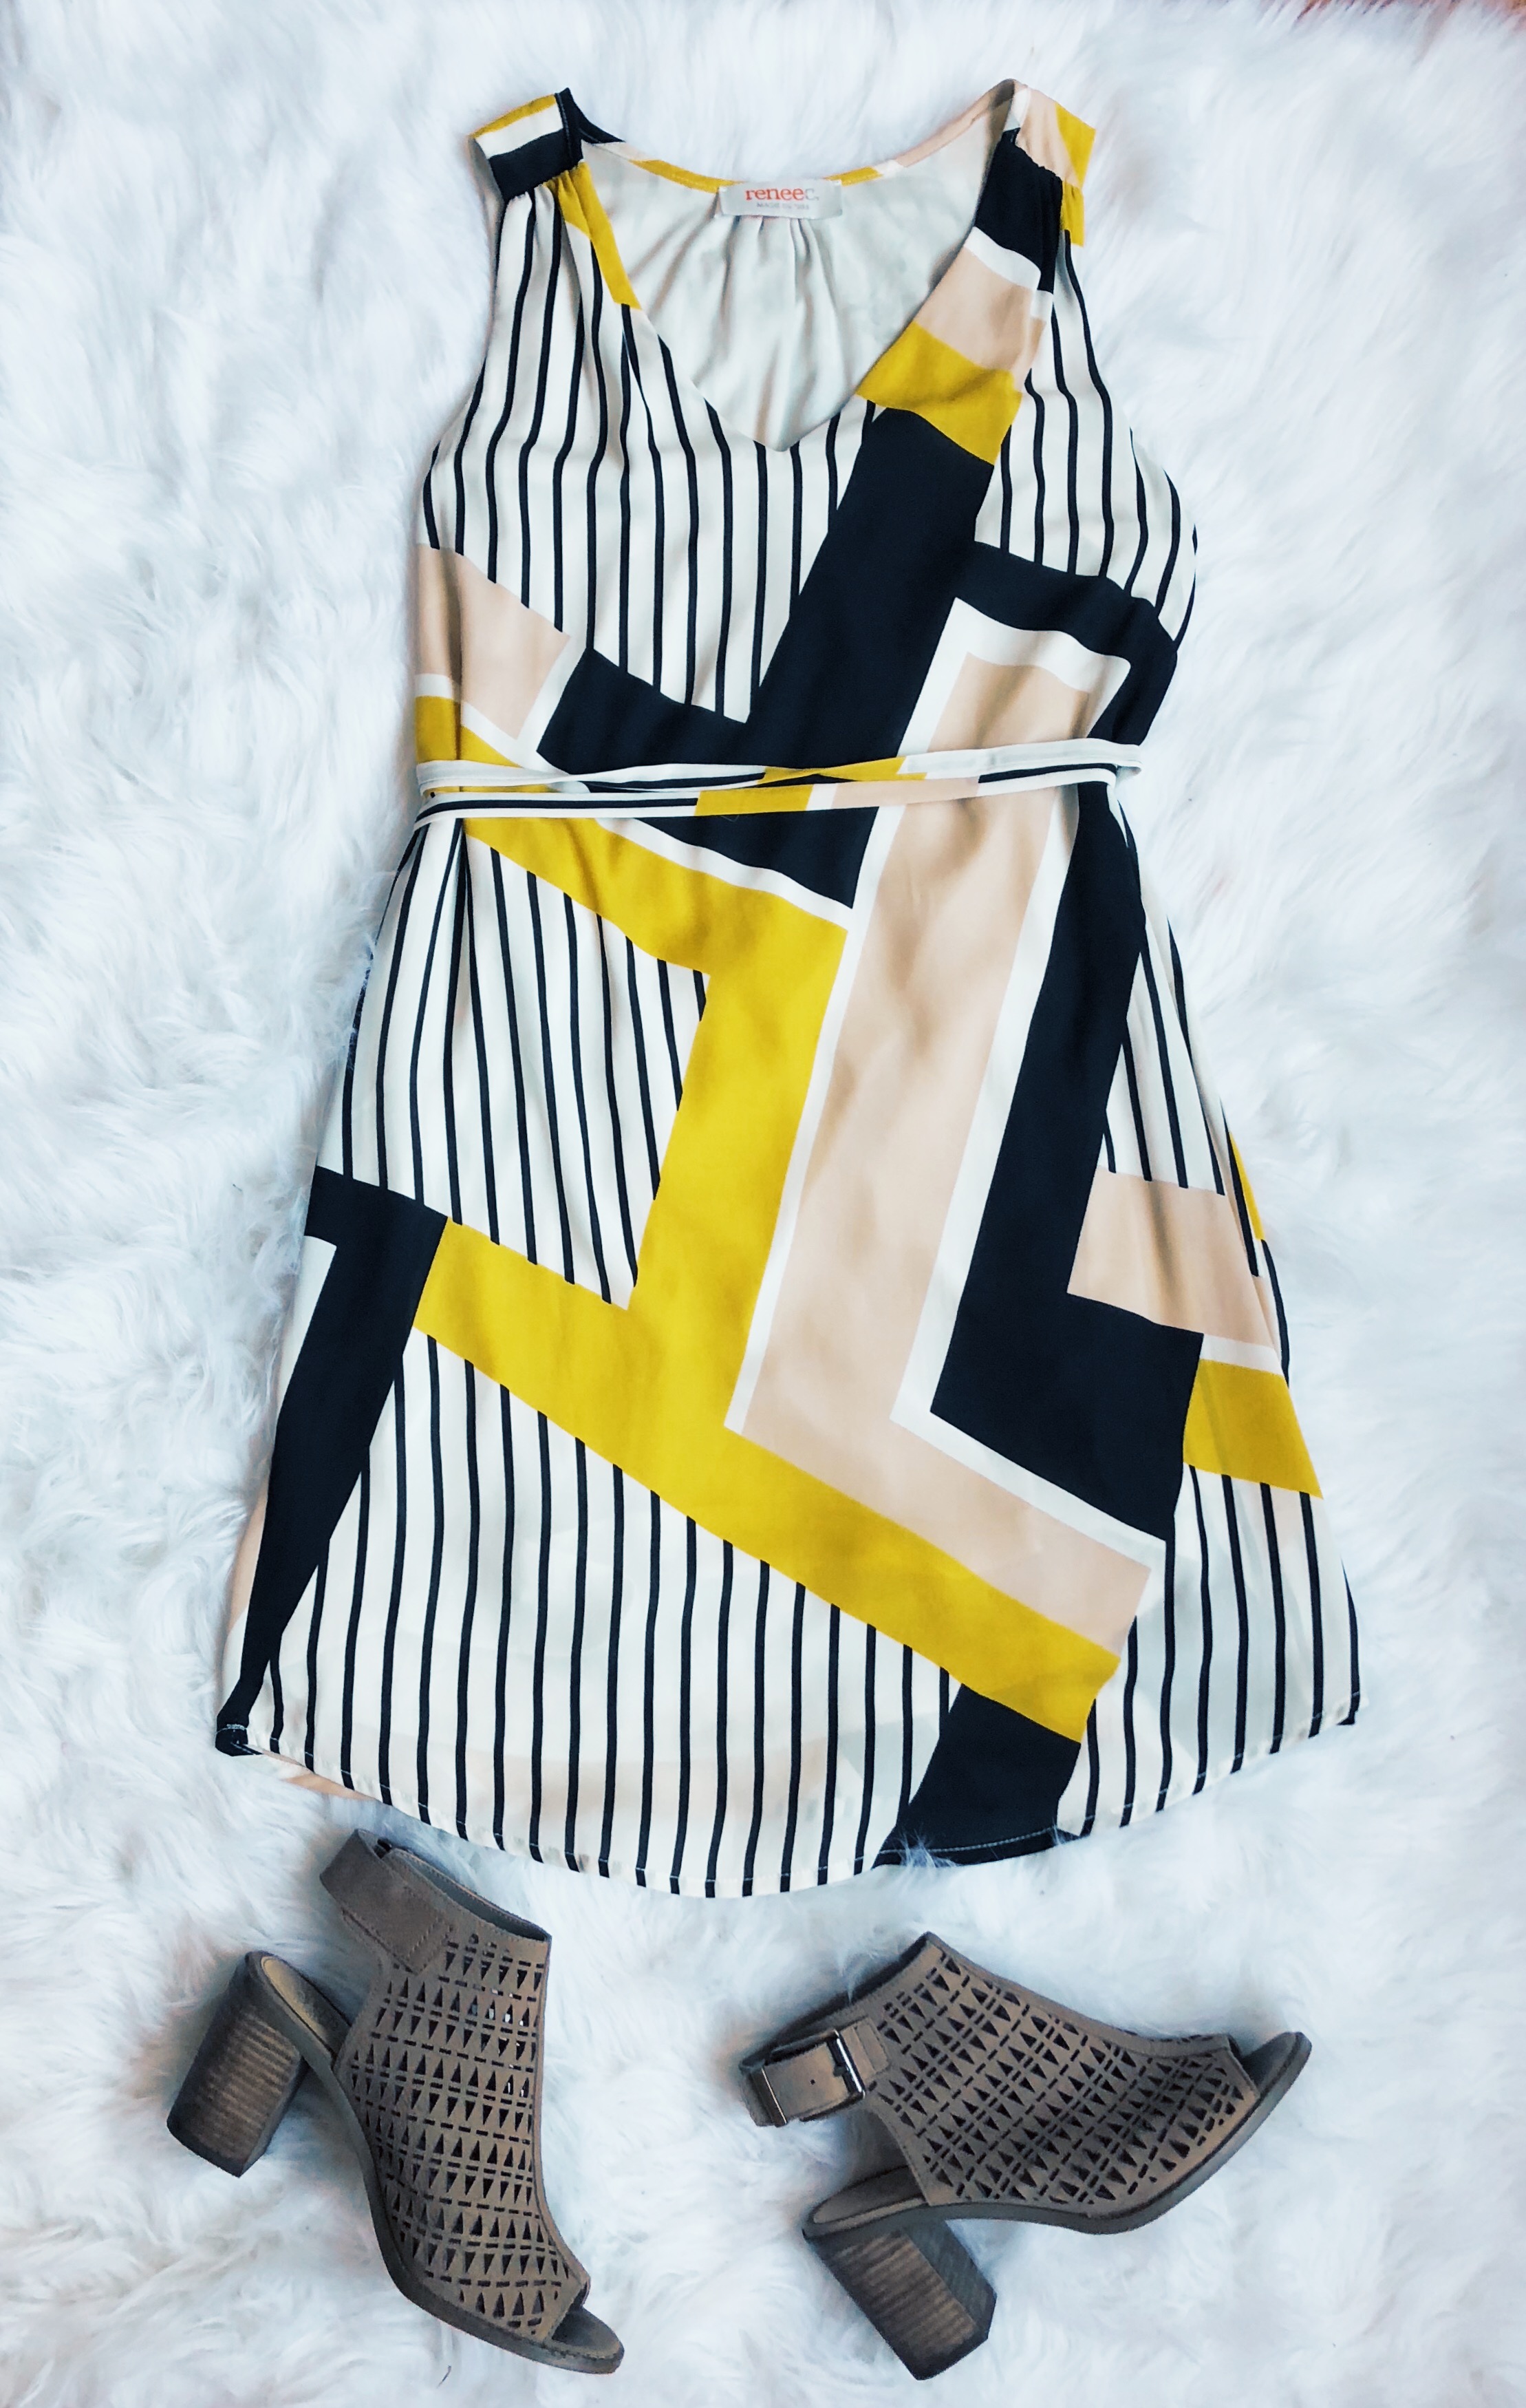
80’s Bright Colors
80’s are making a huge comeback with bright colors and geometric color blocking everywhere. This flowy dress from Renee Collection added a perfect nod to the trend without looking like a teen in neon colors. I love flowy A line tie dresses because they flatter my mom-tummy and are super comfortable. I get the casual dressy look, without having to pair a top and a bottom.
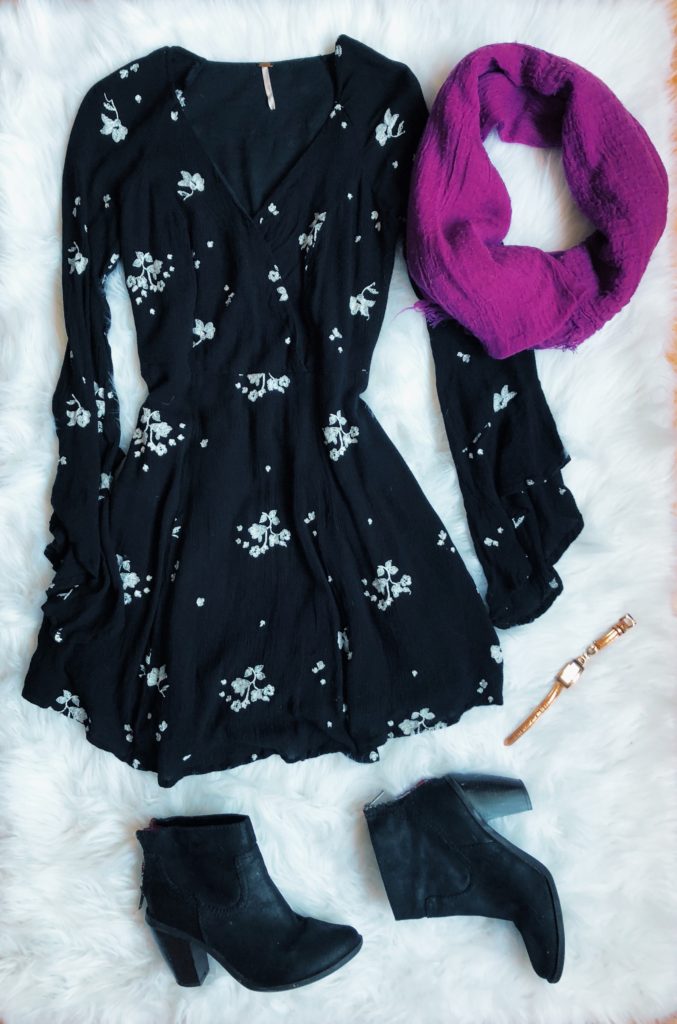
Florals & Gem Tones
Booties are always Fall, especially with an easy throw on floral dress. Free People make lovely florals like this one, which I love to pair with this purple scarf! When it gets a little chilly, toss on some opaque leggings. These booties from Target are a super affordable addition to any closet as well. Plus, they can be worn all year long!
Red, Red, Red!
Red, red, everywhere! You will need this bright tone to wear this season. Red was seen across the runways, but I love to wear it in a wrap dress. It can be quite a bright color to wear, if you need confidence with it, try pairing it with neutrals like beiges and blacks here. Wrap dresses are always a perfect pair with your fall boots and flatter literally every body type in the world.
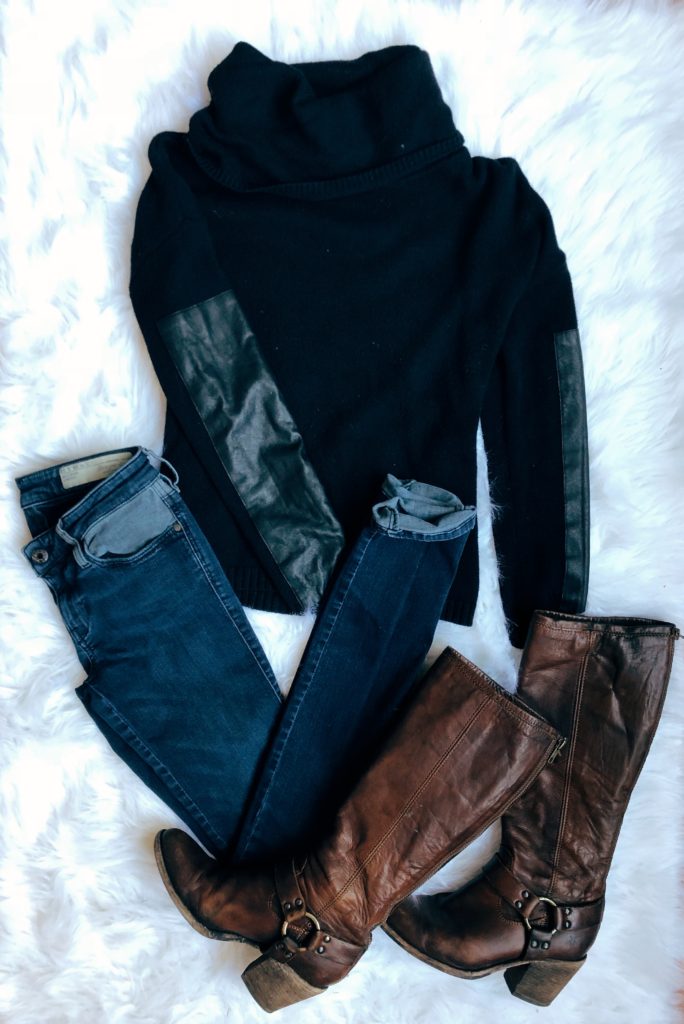
Oversized Roll Neck Sweaters
Chunky sweaters are still a fall basic and must have, but look for ones with textures and oversized roll necks. We saw a ton of roll necks in this season’s fashion line up, and they are super cozy. Pair it with your favorite blue jeans, or opt to mix up textures like below!
Mix Textures
Push your boundaries with mixed textures and separates you might not have tried in the past. Also, it’s time for wool again! One of my fashion rules is to wear only one form-fitting piece, letting the rest be flowy or oversized. This is how I keep my outfits pretty and trendy, but not sexy because I’m a mom. Try this outfit with booties for a cozier daytime look.
Simple Yet Chic
See a pattern? One of my biggest fashion secrets is to buy pieces that can be worn as multiple outfits. When investing in your wardrobe this year, stick to pieces that can be worn through many seasons and many outfits. I tend to stock up on silky express tops and camis that I can layer or tuck, they are so flattering on any woman! I love a good highwaisted jean that elongates our torso, if you haven’t gotten a pair yet, the style is not going anywhere. Nude or beige booties go with virtually anything, so splurge on a pair that really feels comfortable so you can look chic while with the kids. Also, they make us look taller and leaner because they’re so neutral yet to die for cute.
Try Multiple Trend Elements
Here we have that important blazer this year, the casual blazer is something you really need to try. Notice that red again? I paired mine with an Anne Taylor tank and simple black jeans. When stepping out of your comfort zone with new pieces and colors like this season’s red, tone down the rest and let the piece speak. Black jeggings are my favorite slimming weapon in my closet for when I overindulge in that pumpkin spice.
Go Full Trend
That western and 70’s vibe really is everything, and you’ll get compliments left and right. Knots, tucks, and tied up tops are the perfect detail to basics as well, so whether you’re rocking a button up or a classic T, give it a little something extra to hit trending notes. No leather? Grab a clutch or boot with fringe to add this style.
Overview
We have Reds, Westerns, Chunky sweaters with oversized rollnecks and details. We have our basics, our 80’s neons, animal prints, plaid, and sparkle. This Fall 2018 lineup really does push the style boundaries in such a fun and wearable way. With so many ways to reuse the pieces we have, and fun new looks to try, which is your favorite outfit? What items do you need in your wardrobe this Autumn? Let me know! Comment below & follow me on Instagram!
Happy Shopping,
Chelsey
P.S.
My toddler helped style this special look and told me, “You’re welcome Mommy.” That’s true Mom life for you right there.
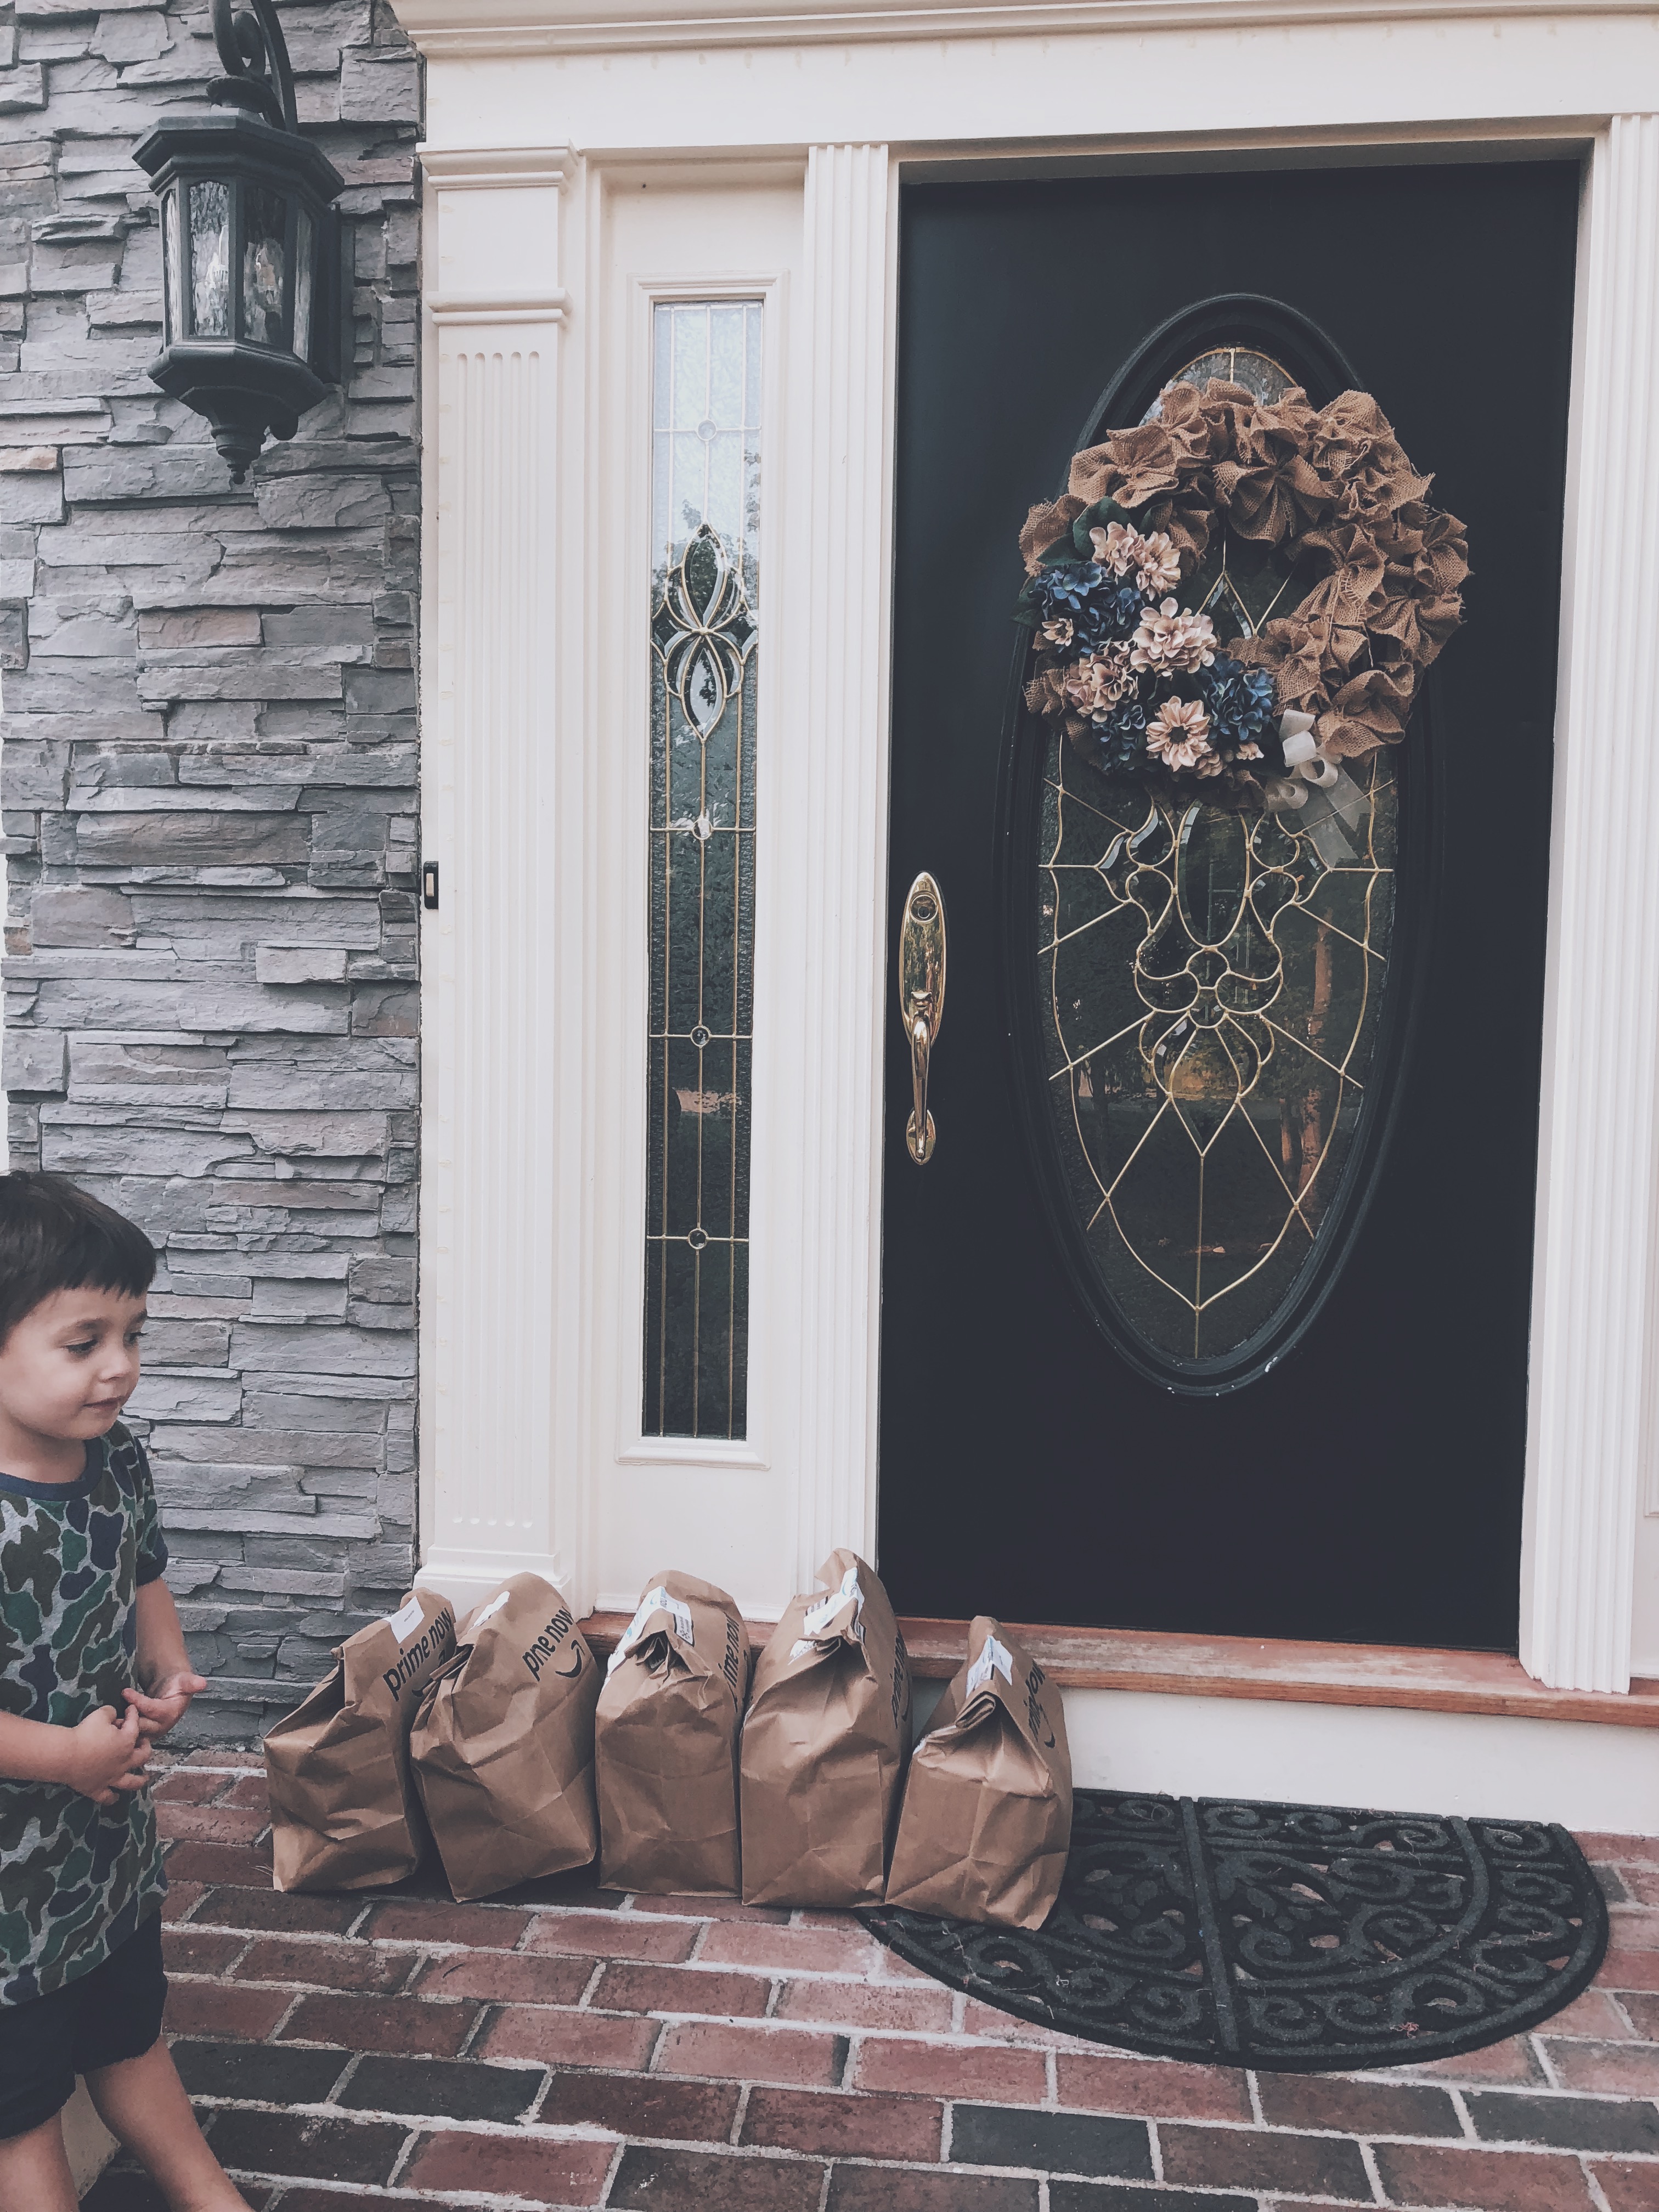
Hey lady, listen, grocery shopping can really take a toll out of our day. Between making our lists, driving, endlessly searching aisles, and having to go back because we forgot that one thing we went there for… you get it. So I was super excited when Amazon and Whole Foods introduced Prime Now aka Whole Foods Delivery Aka Amazon Fresh. Basically, they’re delivering groceries. This isn’t a new concept, many other stores have done this for the small cost of… just kidding most of them add up to ridiculously expensive. Amazon, however, is doing it for FREE. You heard me, free, if you’re an Amazon Prime member that is. So my brain was swirling, how easy would it be to shop for the groceries online? How well would it go? Would it be expensive? It was Whole Foods after all, but they promised to lower their prices. A lot of you were curious too, so I played the guinea pig and gave it a try for you. Guess what? I did not expect what I found, at all.
Here’s How It Works
You can order your groceries and personal items two ways, on the computer or through their new app Prime Now. To my surprise, their app was ridiculously easy to use and navigate. They also make suggestions for items such as milk and bread that you may forget. Thank goodness because I literally almost forgot the milk. Compared to other services, this app was a dream come true. Literally, I sat in the salon chair for my semi-annual hair appointment while I browsed their site for banana chips. I’ve tried so many other online grocery shopping apps and sites that were way too complicated and overwhelming. Overall, the Prime Now was a very neat and easy app to navigate. I’m already impressed.
Is It Really Free?
If you opt for their two-hour delivery window, your delivery is free. However, I am a professional procrastinator and couldn’t wait so I paid an additional $4.99 for the one-hour delivery. Not bad. The app also calculated a $10 tip into my bill, which is to be expected when paying for a service.
Substitutions
One thing you should know if you order groceries is that they almost always make substitutions. For instance, if you order cherry fruit snacks but they are sold out, they may choose another flavor in the same brand, etc.
In this case, the herb roasted potatoes I ordered were substituted with rosemary roasted potatoes. I couldn’t taste a difference.
Bonus, they notified me through the entire process with updates by text. Every substitution was sent to my phone with a link to review the changes. If you don’t like the substitution, deny it with the click of a button. Do note, if you do not accept or deny the changes,
Wait, You Can Talk To Them?
Here is where I am way too excited about Prime Now. My daughter invited another guest for dinner and I hadn’t ordered enough ground beef. There is an option to message your grocery assistant right through the app! I sent a quick message asking to double the amount of ground beef, and received a quaint response within minutes, “Sure thing!” You won’t find that communication field with other services, it was life-saving, or at least dinner saving.
How Was Delivery?
By this point, my friends, I am smiling ear to ear. I can’t describe how much I love this service. When they are finished with your shopping you receive a notification that they are on the way to deliver. You also have a map showing where they are. Instead of waiting at home for the two hours, you can gauge when you’ll need to be home.
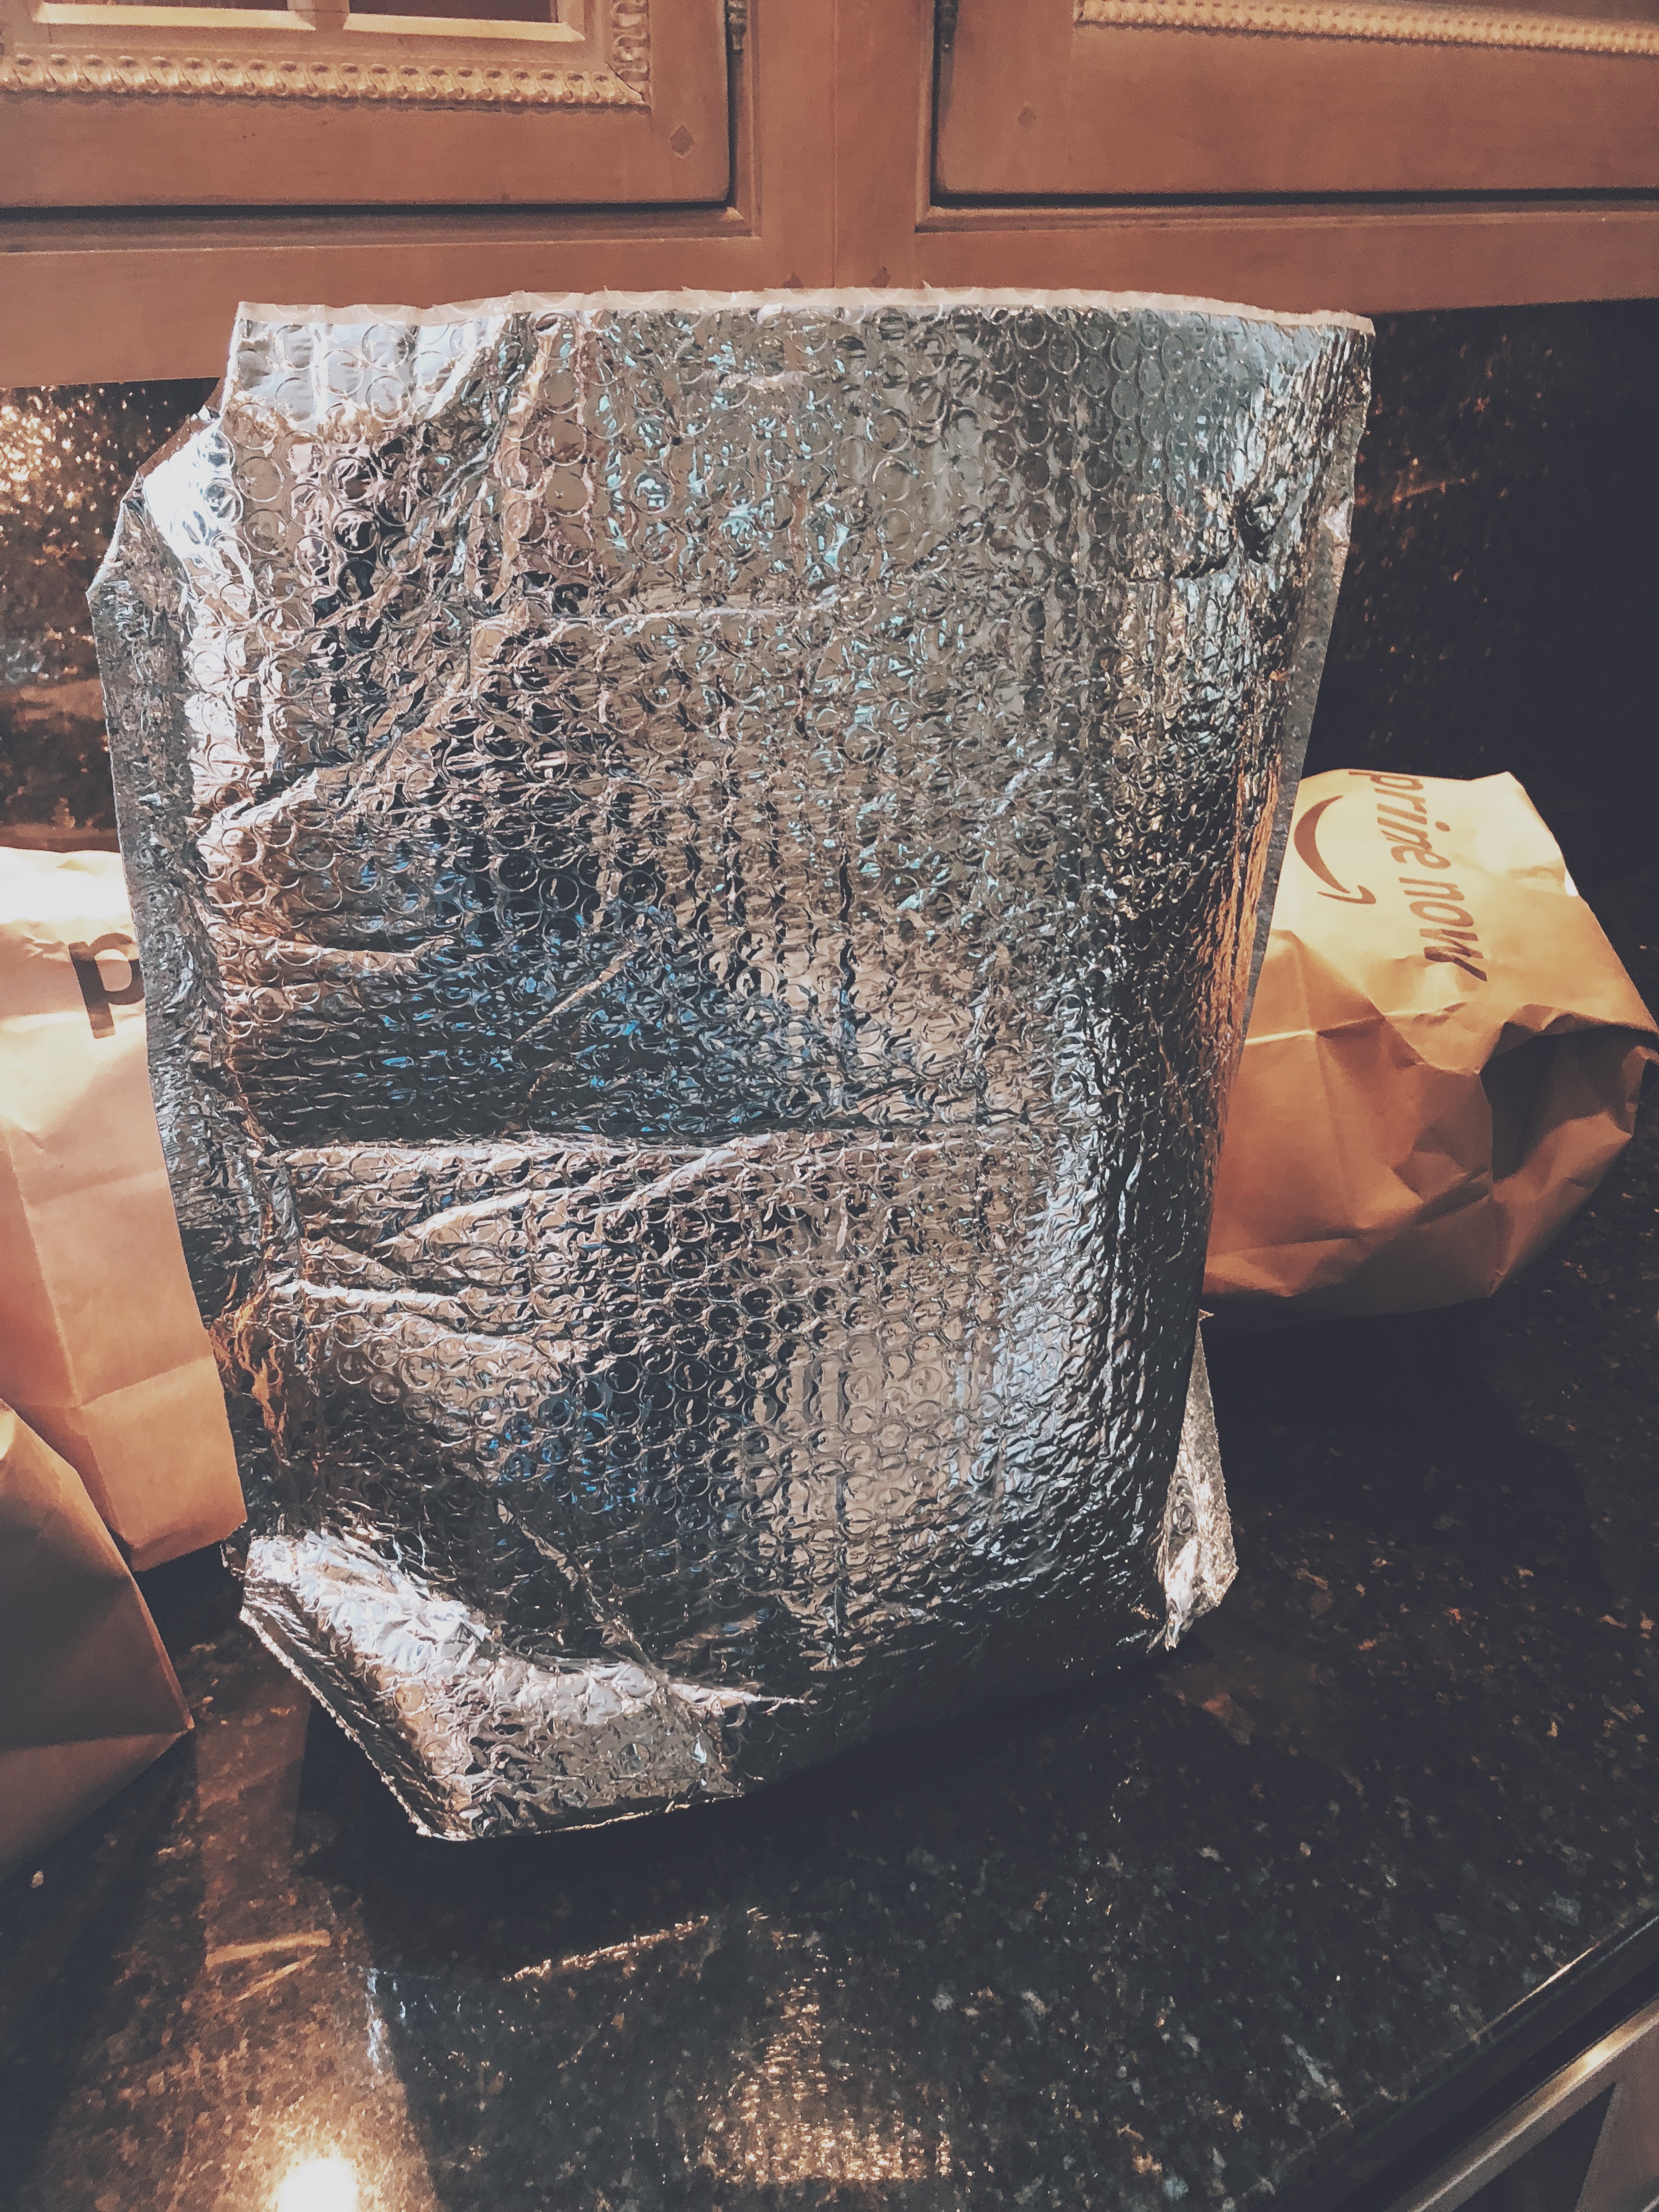
Packaging
The Whole Foods bags were lined up nicely on my doorstep, and the ones containing refrigeration items were marked on the top of the bag. I grabbed those first and touted them to the kitchen. My toddler carried the rest to the pantry, he puts away the dry goods so he can find the fruit snacks.
Inside the bags for refrigeration was another insulated bag to keep items cool. However, unlike meal delivery services like Home Chef, they do not contain ice packs. Be sure to schedule delivery for when you are home. Especially because they drop and fly.
Drop & Dash
No need to change out of your lazy clothes or pajamas either. The delivery driver simply dropped the groceries at my door and went on his way. Nothing to sign, no awkward interactions with strangers.
The one downside, they don’t ring the bell when the food arrives, or send a text alert. My groceries could have sat for hours if I wasn’t keeping an eye out for them. Hopefully, this is improved on in the future, but I have heard the same from others as well. Be sure to check the app or your doorstep for the food.
Tipping
Do note, they are not allowed to accept cash tips, probably to assure their safety. My order automatically added a 10% tip to the bill, that you can change in the app.
Cost & Quality
I’ll be the first to tell you, Whole Foods isn’t as expensive anymore. I would even say that they are quite affordable now! It is honestly so reassuring to know that I am able to feed the kids and my husband healthier food and snacks and not break the bank doing so.
All of the products and items were delivered perfectly. One onion had a little bit that needed cut off, but not enough to bother me.
I received 23 items, nothing missing, for $106.37 including tax, tip, and the $4.99 fee for the one-hour delivery.
Overall
I’m gonna preach about Amazon Fresh Whole Foods Delivery like I’m their missionary because it’s that good.
I love being able to order prepared foods for dinners, a bonus time saver.
I don’t have to lug all of the kids to the store, search the aisles for ingredients I need, or yell at the kids to stop twirling near the glass.
The app was so simple to use, free delivery is a huge perk, and the items I received were spot on.
Great prices Whole Foods I am impressed and happier that better ingredients are made so convenient and available to more families.
Be sure to check the app so you don’t miss the groceries on your doorstep. Nice that we don’t need to open the door for a stranger, or tip them in cash, safer for everyone all around.
So, what are you waiting for chica, go and download the Prime Now app & save yourself some time. Then, I want you to let me know how it goes, comment below, or message me directly on Instagram, Facebook, or here on my website. See that contact button up top ^. Let me know what you would like to see on the blog, or simply introduce yourself.
That’s enough for today, I’m off to order more groceries for next week!
Hey Lady, I want to have a real honest chat with you. Let’s talk about loving ourselves, feeling confident and beautiful in our own skin, and how to do it. Before we talk about anything beauty related, we have to go over this.
When I created this blog, I had this in the root of my heart. I wanted to talk from an honest perspective and to teach women (that’s you!) to truly love themselves. As a makeup artist, and someone who has struggled with self love in the past, I learned that many of us women are too hard on ourselves. It can be really difficult to just love the bodies we are in! To put on that swimsuit, to look in the mirror, to feel our very best. I am here, with you, telling you that you can love yourself just the way you are! You are perfect! You deserve to feel beautiful!
I Bet You Didn’t Even Know
I’d bet you didn’t know how damaging it can be to be so hard on ourselves. Whether you treck to the mirror and look at yourself negatively, whether you say you don’t like the way those jeans fit, or what you feel you need to change.
It’s self-bullying! I want you to picture a child you love, whether it be your son or daughter, a niece or nephew, saying the things you say to yourself. You would immediately halt what you’re doing, get down to their eye level, and preach preach preach for them to love and embrace themselves! So why are we so mean to ourselves?
Why You Didn’t Notice
With any bad habit, it begins small. Maybe with aging, or our bodies changing, we start to criticizes ourselves and the way we look. Little by little, we criticize ourselves more, and it becomes easier to do. Then, we’re literally unhappy, our moods revolve around sometime so simple as how that waistband feels, and we don’t realize how often we are legit mean to our own self.
Give Yourself Permission
I want you to give yourself permission to feel beautiful, to feel perfect, to live life and stop dwelling on the negatives. Keep that in your mind, and stop yourself the next time you’re literally bullying yourself in your mind.
How To Feel Beautiful
This is how I went from hating my body, being downright miserable and insecure, to loving all of my “flaws”.
Go right now, and start every morning, right to the mirror. Pick three things that you love about yourself and say them out loud. When I began, I could barely muster that I liked my back. My back! That may sound worse than how you talk to yourself now, it may not, but wherever you are on your self love journey, start now.
By starting the day with positive intent, we can break those horrible self-bullying habits and I promise you, you begin to love yourself. You’ll begin to feel comfortable with your traits and body that make you so beautifully you.
Next week, choose new things you love. You could add more, but you cannot stop. Remember to give yourself permission to feel beautiful. Remember that there is no perfect, perfect is you. Remeber, keep at it, find three things you love about you every single day.
Share With Your Friends
Whether you share this article with a best friend or family member, send them the video, post to social, make it your intent to share self love! Show your friends how to practice it, sometimes the best way we learn is through teaching. Have your friend join you in practicing positivity with you.
Then, the next time a friend voices frustration with her appearance, don’t just tell her she looks fabulous; stop her in her tracks and tell her that she deserves to feel beautiful and how to practice the three things. Confidence comes from within, external flattery only goes so far. Show her how you beat the horrible cycle of bullying yourself in the mirror and make a difference in her life too.
Take Away
So you’ve probably recognized some of these self-bullying habits while reading or watching, something you’re realizing is worse than you thought. Give yourself that permission, tell yourself you are allowed to love yourself. Pick those three things to love in the mirror and keep practicing. Let yourself feel beautiful today, and share it with your friends. Don’t give up, and if you need someone to talk to or cheer you on, I’m here for you! Message me directly, send an email, find me on social. We have a wonderful group on Facebook, CBC Ladies Talk, where talk about life, what matters to us and support each other. As women, we are stronger together. Join the group and have a tribe of women to support you.
You’ve got this Miss, you are perfect, keep loving on yourself & you’ll get there,