Quick & Easy DIY Plus Quilt & Burp Cloths + Free Patterns

Quick & Easy DIY Plus Quilt & Burp Cloths + Free Patterns

Quick & Easy DIY Plus Quilt & Burp Cloths + Free Patterns

– – – Scroll To View Gallery – – –

How could I possibly introduce my favorite sewing project that I have ever completed? Perhaps, the best baby gift that will ever be given? That will do.

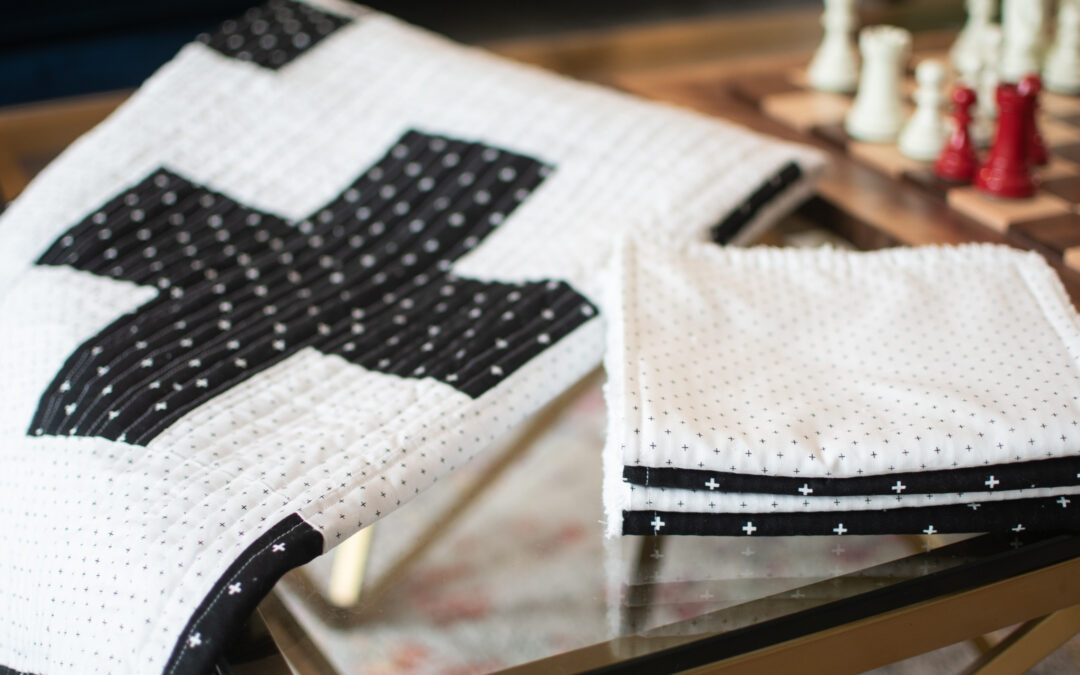
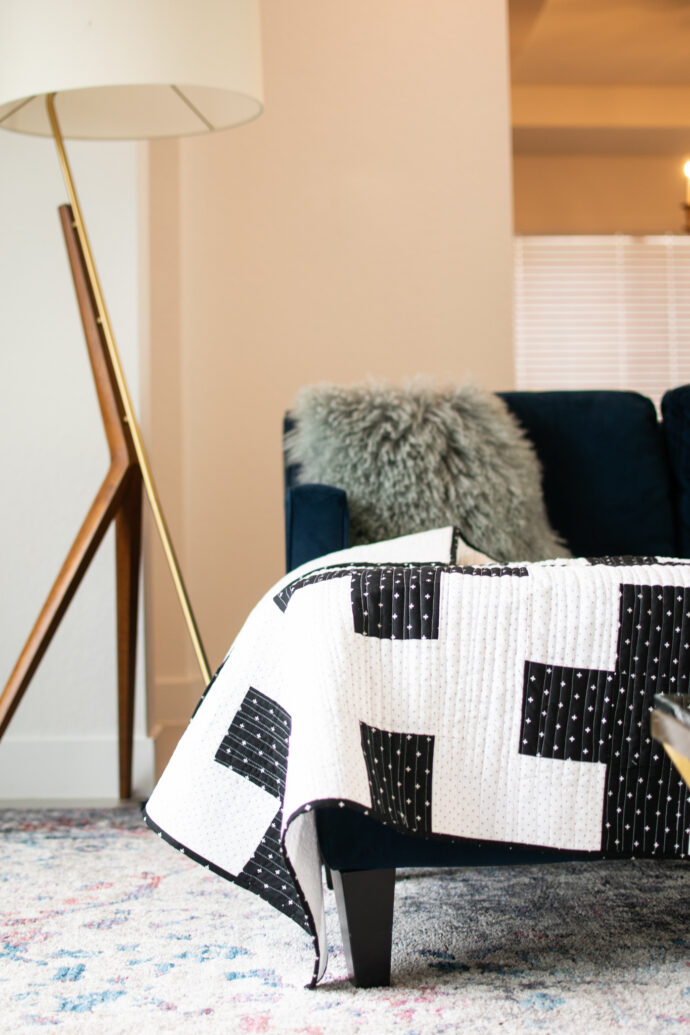
I’ve made these for a friend of the family who just had their first baby! This last weekend I flew through this project; a gorgeous plus patterned quilt and matching burp cloths backed with oh-so-soft cotton chenille. I loved this project so much that I had to share it. This gift is so easy to make and sure to impress whoever cozies up to them.

easy plus quilt pattern

Project Details

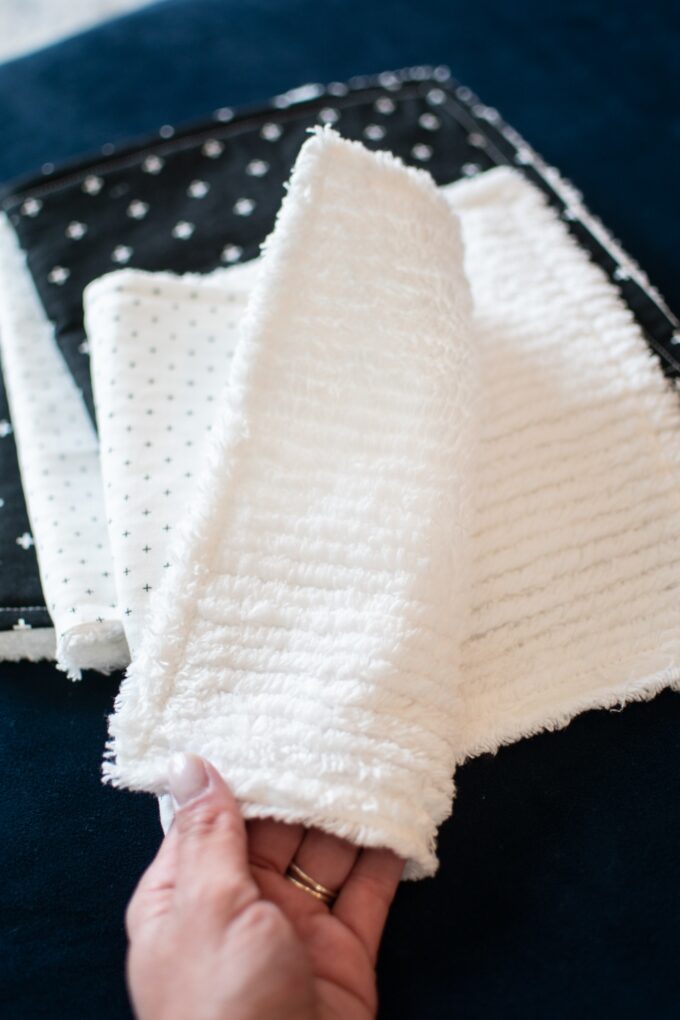
Burp Cloths – Finished cloths measure 8 x 15 inches each. Recommended for beginner to advanced sewing. Easily completed in just one day. You will need 1/2 yard of quilting cotton for the backing, and 1/2 yard of Cotton Chenille for the absorbent side. 

Plus Quilt – Baby sized quilt measures 40.5 x 49.5 inches. Beginner friendly pattern listed at the end of this post. 

easy beginner diy burp cloths baby gift cotton chenille

Selecting The Perfect Fabrics

Let’s talk selecting fabrics. Often for baby quilts, we think characters or pastels, right? Not when I make them! After putting hours of love into a project I want to make sure that it will grow with the baby and never get tucked away into a nursery (or God forbid forgotten in the closet). This couple just welcomed their first child, and for my memories that meant lots of hours on the living room sofa with everything scattered about. I wanted to picture these pieces as a welcome addition to their décor that would never appear as clutter. This is where the neutral colors came into play with a sleek print that suits well enough to be an accessory. This gift is just as much, if not more, for the mother. Try to think of fabrics that will bring her joy in her everyday life as she spends time with her little one. 

All of these fabrics were picked up in one trip to my local Hobby lobby, with cottons costing $6.99 a yard and the cotton chenille more costly at $12.99 a yard. BE SURE TO WASH & DRY THE COTTON CHENILLE FIRST. The amount of fluff that will come from this single cycle is enough to cover a small lamb. Wash it alone on cool and tumble dry on a medium setting before sewing. You may find a cheaper cotton chenille on amazon, I do NOT recommend it as the quality is similar to that of a rough rug, not soft at all.

Burp Cloth Instructions

These burp cloths are a breeze to whip together, you’ll want to make them for everyone! Below is the free printable PDF pattern. Instructions are also included. Be sure to tag me on Instagram or Facebook with your finished ones! To assemble the cloth, simply cut one piece of quilting cotton and one from the chenille cotton using the pattern below. Sew wrong sides together with seam allowance 1/4 inch leaving about two inches open at the top as indicated in the pattern. Turn right sides out, press, and topstitch opening closed. Easy!

FREE BURP CLOTH PATTERN

Printable PDF Burp Cloth Pattern

plus quilt diy and burp cloth pattern

Plus Quilt

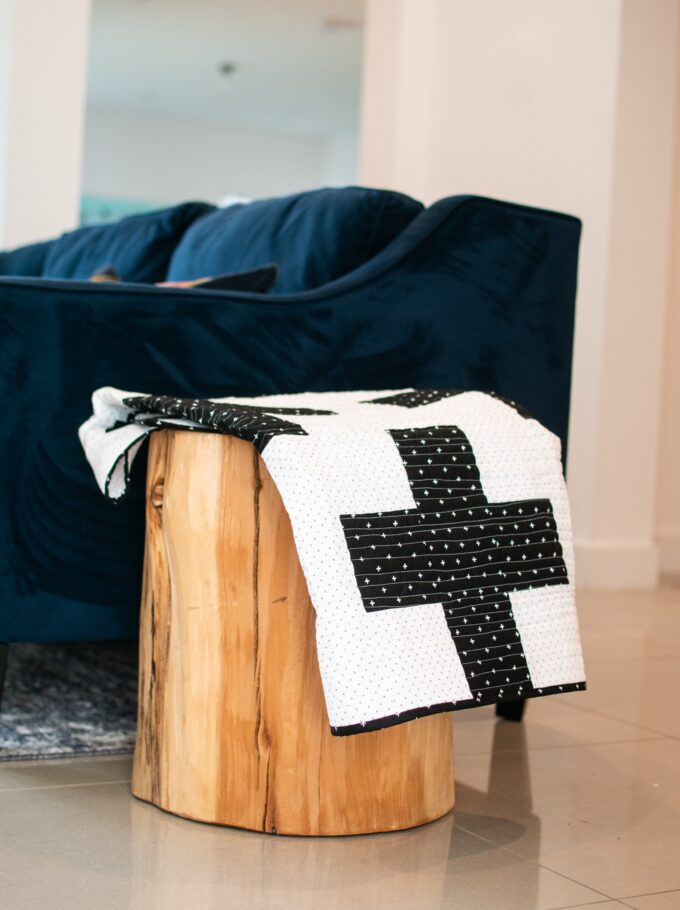
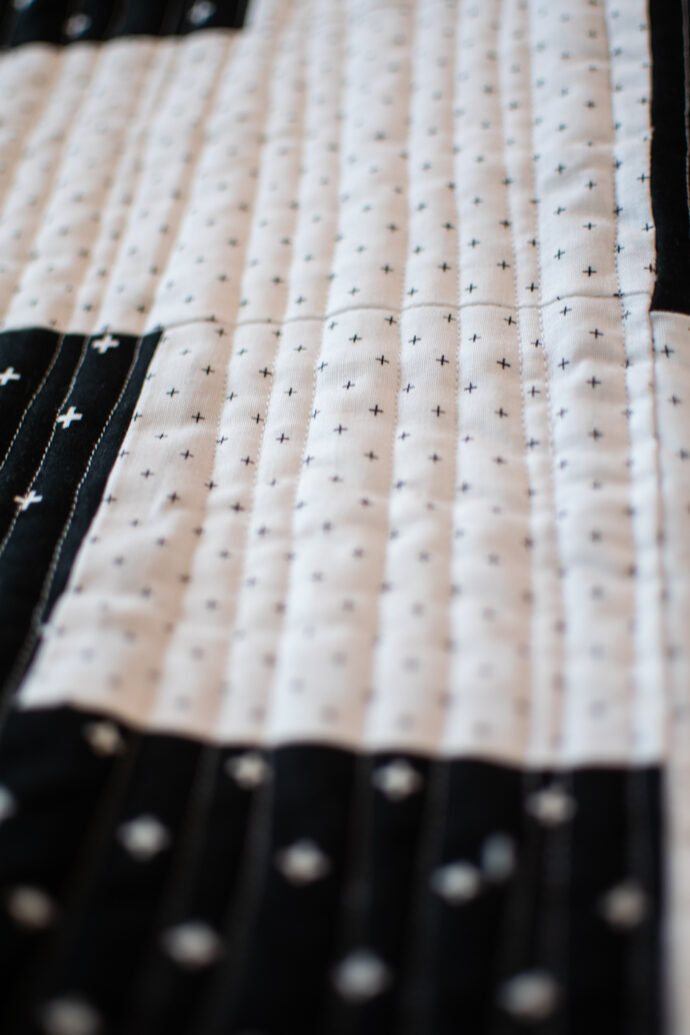
The plus quilt is now my absolute favorite quilt pattern that I have ever sewn! The assembly was so quick, fun, and the end result is beautiful! In any color, you can truly change the feel with a quick switch of fabrics. I will be making more! For the finished quilting I chose to use wavy lines in varying widths. I feel this gave this project a more youthful feel to keep this modern piece in tone for the baby. Also, it helps to hide any imperfect corners that don’t line up, it happens. 


The Pattern Is Made By The Amazing Coral & CO

easy baby gift plus quilt and matching burp cloth

Final Thoughts

This quilt would be great in any color and soon I will be trying it with an antiqued looking fabric. I can’t wait to see the whole mood change with different colors and more. Be sure to Follow me on Instagram & Facebook to stay updated on future products, and now, patterns! I am happy to announce that I will be expanding the blog to more DIY patterns just for you. New to sewing? No problem they will all be beginner friendly. See you soon!


Xo -Chelsey

8 Creative Tips for Easy Amazing Halloween Tablescape

8 Creative Tips for Easy Amazing Halloween Tablescape

8 Creative Tips for Easy Amazing Halloween Tablescape

I absolutely ADORE all things Fall & Halloween. It’s spooky, cozy, fun, and a little bit magical! Given the world now, and that we just moved to Florida! (More on that to come) We no longer have the backdrop of New England Fall to set the seasonal tone this year. That is why I put together the most magical Halloween tablescape to truly set the tone and transform the house. Plus, these were all affordable, quick, and easy. Enough said right? Onto the tips!

magical floating hats decocrated halloween tablescape easy decor

1. Floating Witch Hats

These spooky floating witch hats are quick and easy! Simply sew the top of the hat to a clear string or fishing line and pin it to the ceiling using thumbtacks. You can purchase a pack of ten Witch Hats on Amazon for $12.99 HERE . I used a clear sewing thread that you can purchase HERE.

magical floating hats decocrated halloween tablescape easy decor

2. Go Classic With A Twist

Skulls and skeletal pieces have always been a Halloween staple, but now it’s time to add a modern spin! Think of using gold skulls, or even velvet covered ones to brighten up your Halloween table. You can purchase this same gold skull HERE for under $15. This beautiful black candleabra is part of the Fall Decocrated 2020 box. HERE

magical floating hats decocrated halloween tablescape easy decor

3. Use Black Cheesecloth For Easy Cleanup Webs

You can get really creative indoors with black cheesecloth in place of messy spider webs. Use them to cover light fixtures, span walls or windows, even across a table as a cloth or runner. Do be careful around light fixtures, never leave them unattended because of fire risks and do not place them directly on light bulbs or over an open flame. Safety first! I purchased a two pack of black cloths HERE for $5.

magical floating hats decocrated halloween tablescape easy decor

4. Hang Seasonal Art

Temporary seasonal wall art is the perfect way to round out the decor in any space. This fall sign is available in the Fall 2020 Decocrated box, if you miss it you may find it available in the future in their members only shop! Skip the nails and use 3M Command strips for easy clean up. Decocrated is the easiest way to refresh your decor through the seasons, this wall art is part of the Fall box HERE .

magical floating hats decocrated halloween tablescape easy decor

5. Faux Florals For Warmth

Though I always prefer fresh flowers, these picks from Hobby Lobby certainly add that perfect fall touch to any Halloween table. Select burnt oranges and dewy yellows for the perfect touch. I also LOVE adding in stems of faux wheat. They last longer, keep their color best too. Pro Tip- these floral stems are on sale every other week at Hobby Lobby so check their sale calendar before you go.

magical floating hats decocrated halloween tablescape easy decor

6. Get Batty – Don’t Skip The Walls

Accent any wall or mantle with these adorable flying vinyl bats! Simply use small stickers to attach the assorted bats to make them appear as they are flying across your spooky space! The perfect touch to any Halloween decor, inside or out (under cover from harsh conditions of course). You can get your own pack of 48 bats HERE for under $7.

magical floating hats decocrated halloween tablescape easy decor

7. Tableware For The Wow Factor

Linens and flatware are the most affordable way to upgrade any tablescape or space. Updating your napkins alone can change the entire mood of a dinner party or decor. These black napkins are available for $11 HERE and the gold flatware/silverware is a great find at Walmart for just $25 HERE  This beautiful candelabra is a part of the Decocrated Fall 2020 box HERE.

halloween tablescape top tips decocrated

8. Create Height- Not Just In The Center

Utilize pieces like floral arrangements, tall vases, candles and more to add height to your tabletop. While the center is the go to for taller arrangements, don’t overlook the edge areas. You can even add multiple tall arrangements down the center of a table, well rounded decor has a variety of groupings and height. My favorite piece here is the vase full of pumpkins, found for under two dollars each at Hobby Lobby. If you use real pumpkins, you can also top the vase with live florals and fill it with water for a dazzling piece.

Most importantly, have fun! Try new things, move stuff around. Go around your house and “shop” the pieces you already have. You never know when you’ll fall back in love or reinvent pieces you already have. 

Need an update or refresher in your home? My favorite easy and affordable way to do just that is with my Decocrated subscription box! You’ll be able to update so many spaces on a budget, plus fill your home with quality pieces for each season and all year long! Checkout DECOCRATED HERE and for $30 off for the year use code CHELSEY30. For $10 off just your first box you can also use code CHELSEY10. Take a sneak peek at all the pieces I used this season from their newest Fall box!

magical floating hats decocrated halloween tablescape easy decor
12 Tips For Stunning Tablescapes

12 Tips For Stunning Tablescapes

12 Must Know Tips For Stunning Tablescapes

Tables are the heart of our homes, where we gather for meals, dine with our family and friends, and are the true anchor of any festive day. With these simple easy-to-follow tips your tablescape will be an effortless success throughout all the seasons and many days to come. Plus, learn these affordable tips to wow your guests, on a family friendly budget, too!

This post is sponsored by my dear friends at Decocrated- My favorite home decor subscription box that send beautiful pieces right to your front door every single season. Many of their pieces are in each of the photos! Head to Decocrated.com and use code CHELSEY10 to get $10 off your first purchase.

1. Always Use Fresh Greenery

Adding fresh greens to your napkins, bowls, baskets and more bring life to your table. Our favorites are Eucalyptus, or even Baby’s Breath! You don’t have to spend a ton to elevate your table like expensive bouquets, we find some of the best greenery in the filler section of grocery florals. Check out Whole Foods for $5 bunches to fill your spread. 

2. Don’t Skip The Sweets

Whether you’re serving up a hot pie, a beautiful cake, or even just some apples in a basket, NEVER skip the sweets. Get creative with candy dishes and more, but something inviting makes every table complete. It’s will draw everyone in to make the most of the moments we spend together, and really set the mood! – A sweet one that is. 

3. Add Height For Interest

When your table feels bare, or missing that special element, check to make sure you have elements with height! Stack trays and more for a layered look, rich in depth! Get creative with your pieces, what can you stack and combine?

PRO TIP: Avoid blocking conversations by moving your centerpiece to the corner of the table and let it flow outward from there. Grab this tray in the 2019 Decocrated Winter Box.

4. Use Artwork

Artwork like signage elevates your tablescapes. Pull pieces from around the home like this one above, or find perfect pieces from thrift stores and more! In a pinch? Frame some 5×7 prints that match the color scheme for your table to add an elegant touch. 

5. Invest In Staples

Invest in staples that will stand the test of time, and seamlessly transition you through seasons. We recommend using neutrals that work well with any color scheme. Think napkins, runners, plates, chargers, and trays like this one from the Decocrated 2019 Winter Box. You can rearrange them effortlessly and no one will be the wiser! Don’t believe us? Scroll back up and see for yourself!

6. Make It Easy Grab

Be the best hostess by leaving must haves within arms reach. Straws, cups, napkins and more. You’ll save yourself a ton of time while hosting, plus it really pulls the table together. Don’t forget, set the table with ready-grab snacks too! This will really set the table as your anchor to draw everyone together and keep conversation flowing. 

7. Always Incorporate Linens

Never skimp on the linens, be it table runners, napkins, or even a pillow! Take a peek in the corner at the pillow from the Decocrated box (always a great source for quality fabric items that warm up every space). The rule should follow you throughout your entire home, you can never have too many cozy items, but don’t forget the tables! Use these to make your dining room especially inviting.

8. Ribbons & Ties Go Far

Use inexpensive ribbons and strings to pull together a wow-worthy table for any holiday or season. This is our favorite for Christmas and Thanksgiving. Incorporate the whole look by using the same textile throughout the table. Don’t only wrap your napkins, wrap faux presents like above, tie bread baskets and more with the same strings! For $2.99 and under, you have the perfect accessory. 

9. Set Your Table & Keep It Set

Keep your table set, even days you’re not having guests! Keeping silverware and plates ready to go not only sets the mood, extends your decor, but also makes the home feel elevated and upscale. Yes, regardless of your home size or value, keeping your tablescape will bring out the fancy for everyone! Have fun with simple napkin folds to take you through the season, just wash up and place back that night (or tomorrow morning if the kids keep you busy because they’re going wild and don’t want to sleep.) 

PRO TIP: If you have little ones, remember, involving them in cleaning and setting the table is fun! Don’t worry about it getting messed up, have fun teaching them how to learn wonderful things like where spoons or forks go, how to fold for their fine motor skills. Make it a fun family routine. 

10. Repurpose Misc. Items

Dig into your china cabinet for this one! Repurpose old items like antique baby cups, teacups and more for a unique look. Random keepsakes give your settings more life, and are great conversation pieces. Use them for garnishing stations, to hold seasonal items like cinnamon sticks, and more!

11. Layer Up In Details

Add layers to your tablescape for a dramatic look. Use multiple napkins to give your plates an elegant touch. Use multiple garlands down the table to give depth and interest, a string of lights warms up any setting. Layer sizes of decor, with larger, medium and smaller pieces. Don’t forget the finishing little (and affordable) details for each season like candy canes strewn across the runner. 

PRO TIP: Start with larger items, then add your garland, and finish by filling in spaces with your smaller pieces up front. Check around the table to be sure everything can be seen to know if your placement is just right. 

12. Use A Cohesive Color Scheme

Pick a color scheme and stick with it, this is the easiest way to guide your tables. Don’t forget to check the hues from those colors or greenery too! This is a perfect example of sticking to cool colored greenery and blues to keep a merry flow. Use at least three colors and make sure it ties in with the theme you’re going for. 

These beautiful trees are available in the Winter Decocrated Box 

Easy Rules To Follow- How To Decorate Shelves and Built Ins

Easy Rules To Follow- How To Decorate Shelves and Built Ins

How To Decorate Built In Bookshelves

The other day I walked into our Den, a gorgeous room with beams running across the ceiling, full of light and adorned with windows that remind me of a seaside home. Want to guess what we use it for? A kids room, and for the Christmas tree once a year. Since moving in two years ago, we have been designing rooms one at a time but completely neglected the Den. On either side of these large curved windows are two built in bookshelves. It really is our in-home library for storage purposes. However, I couldn’t believe that it hadn’t donned on me to do anything with these beautiful book shelves! So, in comes Decocrated.

Decocrated is an amazing home decor subscription box that send seasonal boxes of curated one of a kind seasonal decor. The pieces are hand crafted and help keep my home beautiful throughout the year. Meaning- I have lots of pieces to play around with! Let’s get to it. ((Use code CHELSEY10 for $10 off your first box.))


The Before


Obviously this little shelf had loads of potential. I have this habit of constantly moving things around until I find the perfect look I love, so the final style will probably change through the year. That’s because it sometimes takes me a moment to find the perfect balance between design and function. Plus, I tend to get new pieces all the time and really just love to play around with decor.  


1-2-3   1-2-3   

If you look at any styled area, I will repeat this until it is engraved into your brain, style is complimented by odd numbers. Ish. That means that you can group items in threes, fives, etc, for a cohesive design. That also means grouping of like-type pieces look best in threes.  This rule is flexible because like the pumpkin sitting on top of the books above, the books are grouped in three, but additional items can be placed in because the shelves are also separated into threes. 


Contrasting Pieces 

When you see beautifully designed shelves you might think, how did they know all these pieces go together? Or, I would have never thought to place those together. However, there are actually rules that can help you do just the same! The first rule, add contrast! I personally love to introduce black into my decor because it gives a space depth, and helps me mix together both antiques with modern pieces. You may choose to add a bright and vibrant color instead, but never discount a good dose of black, because it truly is timeless. 


Function Is Key


 The common mistake I see with spaces and decor is neglecting to use a space for function. It can be pretty AND be a highly functioning space as well. The last thing you want to do is create a ton of spaces that are unusable in your home. Think about the adjoining spaces, can you make it a designated usable space? Given that the nearby windows are low to the ground, I turned the space into a reading nook full of pillows to create that cozy vibe. These pillows are actually from the Decocrated Summer & Fall boxes.

You can also add baskets to your shelving to hide items we don’t want on display, but that you need for everyday use, like keys, remotes, baby toys etc. 


Diagonal Patterns


Signage This is another trick I use to make sure my shelving is organized and pleasing to the eye, and it has to do with how we look at areas. You want the eye to dance across the area, without seeing obvious patterns. Look at the greenery in this space for example, it moves from the top right, to the center middle, and down to the right again at the bottom. The black pieces flow from the top left diagonally to the bottom right.

How many patterns can you find in this built in? Use this trick with common elements such as woods, papers, metallic pieces and greenery to ensure the design flows just right.


When In Doubt  

If you ever find yourself stuck, do yourself a favor and pull all of your pieces off the shelf, or even out of a room before beginning. This is one of my biggest tips because it is important because we get caught up on what is already there. Instead, take pieces out, maybe you only need half of the items you have. You can always find new homes around the house for decor you no longer need, or maybe you find that you just need a little more! Focus on adding pieces one at a time and I guarantee you will have a better time with the design altogether. Still stuck? Send me an email and our team is happy to help you get your space to one you’ll love. Email me personally at Chelsey@themamaguide.com or find us on Instagram @TheMamaGuideOfficial .

Easy Summer Gift Basket- Lemon Theme

Easy Summer Gift Basket- Lemon Theme

Easy Summer Gift Basket – Lemon Theme

Someone is going to have to stop me this summer because I am in full-fledged lemon obsession. Absolute lemon addiction over here, not even ashamed! Lemon dresses, sewing lemon skirts for my kids, and now.

Lemon gift baskets. Woop!

This summer they are so on trend, along with flamingos, but that’s another post you can check out HERE. But this post is all about putting together the most perfect gift basket, that really says thank you. There are a few different elements I have in any basket that I’ll be sharing down below, keys to follow, and how to make your very own like this one. First, let’s dive into what I used.


What’s Inside

For this basket, I gathered everything in one Target swoop. I’ll link the items below, but the links may expire as the items no longer become available. You can easily swap out the items for similar ones or another theme and I’ll teach you how to balance your own basket too. Here’s what went inside this one. 

Lemon Room Spray by Magnolia Home

Lemon Sprig ( artificial lemons and leafs)

Wooden Serving Board         

Magnolia Home Wire Basket

Bag of Lemons

Tea Towel

Citrus Candle

Powell Mahoney Lemon Sour Drink Mix

Paper Cups & Plates ( from the bargain spot in Target )

What’s Inside A Cohesive Gift Basket?

If you’ve followed along before, you know I’m all about themes! They make it easy to tie everything together for a cohesive look, for anything really. This basket is obvi a lemon theme, but colors are important too. Think about these three aspects for theme creation. 

Colors

Odd numbers are always the rule, you should opt for 3, or even five colors to create a balance that is pleasing to the eye.  This basket was easy, lemons are yellow and green. But what about the third color? There is a secret trick to cohesive design, it doesn’t always have to be a color. I opted for “neutrals” for the third element of color, and that means a mixture of textures. So we have yellow, green, and neutrals. 

Mix Elements & Textures

Another secret to a smooth design, for anything, is to have a good mixture of textures. Don’t try to be too matchy-matchy. Think metals, woods, papers, linens, organic elements and greenery, plus glass! So long as your colors are complimentary, a limited amount of color pops with the remaining colors as a neutral, you can mix textures to your heart’s desire. Think about the types of textural elements as well, this is a very old-school medicine cabinet style texture mix. We have the old dark glass for the room spray, vintage-like tea towel in blacks and whites, a black wired basket, it’s all in a theme of style as well. If that starts to feel overwhelming to you, just step back and ask yourself if any of the textures together look out of place. That’s why themes are so helpful, they give you a starting idea to flow with without question. 

Selecting Perfect Items

You’ll hear the word theme out of my mouth a thousand times, it’s because that’s the easy sauce that makes things mindless. When selecting your items, think about the usefulness and what purpose they will serve. Make sure the items you put in the basket can actually be used- not just pretty things that will sit in a closet.

Find a basket that can be used for multiple purposes, I loved this one from Magnolia Homes because you can display it on a counter, use it for a picnic, or for the obvious- storage purposes like in the laundry or powder room. It’s pretty. If you choose a colored basket, think about the recipient’s home decor style and where it could go. When in doubt, stick with something classic and let the items inside shine. 

You can make baking baskets with spatulas , napkins, and matching cupcake liners. You could do a market fresh basket with tea towels, lots of fresh veggies from the farmers market and specialty olive oils. Even a wine inspired basket with a cool bottle opener, your favorite red, and grilling seasonings to pair. When in doubt, just focus on how you imagine the basket being used. 


Final Touches & Final Thoughts

Everything needs those final touches, the little details make everything shine. Like sprinkles on a cake! Or a sprig of lemon and leaves for this basket. You can add a lot of little and inexpensive details to wrap up a piece. This basket was pretty large, so I filled the bottom with lemons, instead of tissue paper or such. Balance out the height of items on top with artificial or fresh greenery, see the lemon sprig on one side to balance the wooden plate? All about that balance. 

Head over to your local Hobby Lobby for some details to fill your basket if you can’t find one at Target, like I did. 

Remember: Every other week at Hobby Lobby is 50% off all faux florals. Pick the right week!

Remember, don’t be shy! If you have any questions or want help on your project, feel free to message me! Hit that contact field up top, or message me on IG

Happy Summer!

Xo, Chelsey


How to Throw an Amazing Yet Easy Party – Free E-Book

How to Throw an Amazing Yet Easy Party – Free E-Book

How to Throw an Amazing Yet Easy Party – Free E-Book

What’s in a Good Party?

We throw parties to mark a momentous occasion, or for someone special to us; but really good parties mainly have the guest in mind. In days when we are all too busy, when we truly slow down and come together, our parties are our thank you to those we love. Throw a party from that perspective, you’re guests (and you!) will walk away with a memory of an experience, not just a gathering. Here are three things to keep in mind when throwing an amazing party your guests will leave raving about, plus the full 20 page E-Book outlining all my party secrets below!

Decorate For Experience

Before you look up and around for areas to decorate, make a plan with experience in mind. Where will beverages and food be served? What tables will be the focal point? What will guests see when they enter your home or party location? Focus on those areas to make decor go further. My tip, utilize inexpensive balloons, candy, and streamers in modern ways to make your decor dollars stretch. 

Themes Are Everything

Pick a theme, but do it right. Your theme should set the tone for your decor, your invites, the food you serve and more. The difference between a chotchky themed party and a beautifully designed one, is to keep imagery or characters at a minimum. Add variety to your color scheme, keeping true to your main idea. How do we do that? Instead of everything being red and white striped in the circus party we threw, I added pops of color in subtle ways. Look at how the confetti subtly introduces new colors, stands, or food. See how the candy colors compliment the predominant red and white stripes, yet add to the theme? If you’re throwing a character or print theme, what NOT TO DO, is have every item with that one character or print. For instance, if you’re doing a purple unicorn theme, add two more complimentary colors to your napkins, cupcake frosting, maybe the balloons or streamers! Have at least three colors introduced, three is more pleasing to the eye. Also, think of elements that add to the experience of the theme. I had tickets everywhere, to really make the party carnival/circus like.

Basically, pick a focus of your theme, and add complimentary colors and patterns to add depth and avoid a dull repetitive decor theme.  

Fun For Kids & Adults

When your guests arrive, get something into their hands! Drink- check. Food- check. Favors? Yes- check! A great party is when the adults and the kids can both have fun! The biggest challenge is allowing parents to relax when we’re all chasing our littles around. Give favor boxes to younger guests when they enter the door. It helps to keep them busy while Mom & Dad unwind, grab a beverage, and say hello to everyone. Especially for shy kiddos, they’ll have something in their hands to focus on instead of being overwhelmed by a big crowd of strangers.

Bonus: Have kid safe areas where the little ones can wander and collect more goodies for their boxes, just in sight of where parents can relax. 


Self Serving Yet Cute!


One of the BIGGEST LESSONS I learned for throwing a flawlessly easy party, was to not over-host! What does that mean? It means having a ton of guests and running around like a chicken with your head cut off. Ha! 


If I could go back in time, I would teach myself this little secret.


  Create multiple self-serve stations at your party, Ms. Chelsey! But they have to be inviting- instead of ‘buffet boring- like this host is lazy’ like. 


How do we do that? Make these stations cute, and part of the experience! Add little details that will wow your guest and make the experience more fun! How cute is this popcorn station? 

Separate your stations so that guests don’t overcrowd an area, and make them easy to grab! For this party I had a two snack stations, a juice/soda/water spot, an adult beverage dispenser inside the kitchen (away from little kids’ reach) and the main meal was served in another area.

Make each area special, with decor, or options to customize their needs. For drinks, add colorful straws, beverage napkins, and garnishing options. Little slice of lemon and a sprig of mint, yes please! 

Every Detail Counts

Little details make a big punch! You don’t have to spend hundreds to customize elements of your party. My favorite custom go-to for every party are custom candy bars and water bottles. Even my invites are custom designed to match the party. It’s easier and less expensive than you would think! To find out how to customize your party for that extra WoW factor, download the Complete Party Guide!

The 2019 Party Guide- Complete Edition

A lot goes into planning a party, but to make it easy I broke down all of the details, into an easy to navigate Party Guide- 2019 Edition. 

The 20 page guide has everything from 

A full schedule breakdown for when to start planning, how to schedule your planning and more. 

Want more insights for how to theme your party, and ideas on how to incorporate your theme? Check out ten party theme ideas with inspiration for how to craft your own theme! 

Where do you grab your decor, for less? All my decor secrets are inside!

Learn where to go to customize and create your very own invites, water bottles, and even candy bar party favors. 

Download the 2019 Complete Party Guide E-Book

The Complete Party Guide E-Book is usually regularly listed for $14.95, grab the whole 20 page edition for free for a limited time. 

Download your E-Book free for a limited time, and let me know what type of party you plan to throw? No idea? I have included three pages full of theme ideas, plus a full menu design to inspire you for your food choices and more! Make sure to tag me when you throw your parties to be featured on the blog and on Instagram or Facebook! Can’t wait to celebrate with you! 

Happy Party Throwing,

Xo, 


Chelsey <3